Tutorial - Autodesk Forma / ACC
Level: Intermediate
Time: 30 min
Prerequisites:
- You have a VIKTOR account and completed the installation process. No account? Get one here
- You have access to an Autodesk Construction Cloud project with a Revit model.
- Your VIKTOR environment has an Autodesk Platform Services OAuth 2.0 integration available.
- The AEC Data Model is active in your ACC account for the prompts that query model data.
Introduction
Welcome to this tutorial on how to create VIKTOR apps that work with Revit models stored in Autodesk Forma and Autodesk Construction Cloud (ACC).
If you work with BIM models, you may need more than a model viewer. You may also want to calculate quantities, compare groups of elements, highlight categories, or check whether model properties meet your project rules. So in this tutorial, we will use four prompts to explore these workflows with the VIKTOR App Builder.
Each prompt is a starting point for a different ACC workflow:
- Visualize a Revit model in the Autodesk Viewer.
- Generate a quantity takeoff from a Revit structural model.
- Highlight Revit categories with custom colors.
- Validate Revit pipe properties.
1. Set up the integration
Before testing the prompts, configure an Autodesk Platform Services (APS) OAuth 2.0 integration in VIKTOR and connect the same APS application to your ACC account as a custom integration.
Follow these sections to complete the setup:
- Create the APS OAuth 2.0 integration.
- Connect the APS application to ACC.
- Review the ACC requirements and available APIs.
- Activate the AEC Data Model before using the quantity takeoff or property validation prompts.
Before submitting a prompt, replace [YOUR-APS-INTEGRATION-NAME-HERE] with the exact name of the APS OAuth 2.0 integration available in your VIKTOR environment.
2. Understand the key concepts
Although you can get quite far in VIKTOR with simple prompts, it helps to understand the main concepts behind these workflows:
- APS integration: Autodesk Platform Services (APS) is the connection between VIKTOR and Autodesk. The OAuth 2.0 integration lets you sign in securely and gives the app permission to access the ACC projects and models available to you.
- AEC Data Model API: This API lets the app read Revit element data from ACC without opening Revit. It can return names, properties, quantities, and relationships between model elements.
- APS Viewer: This is the interactive 3D viewer shown inside the VIKTOR app. You can use it to explore the model and highlight elements, while the AEC Data Model API provides the data behind those elements.
- Category, family, type, and instance: These describe where an element belongs in Revit. A category is a broad group such as Doors. A family is a reusable design such as a single door. A type is one configured version, such as a 900 × 2100 mm door. An instance is one actual door placed in the model.
- GraphQL: GraphQL is the query language used by the AEC Data Model API. The app asks only for the model data it needs, such as all pipe instances and their diameters, and the API returns that data in a structured response.
In simple terms, the app uses the APS integration to access the selected model, sends a GraphQL query to retrieve its data, and then shows the result in a viewer, table, or chart.
3. Explore ACC workflows with prompts
Click the arrow on a prompt to open it in the VIKTOR App Builder. After the app is generated, connect the APS integration, select a Revit model from ACC, and review the preview.
Prompt 1: Visualize a Revit model in the Autodesk Viewer
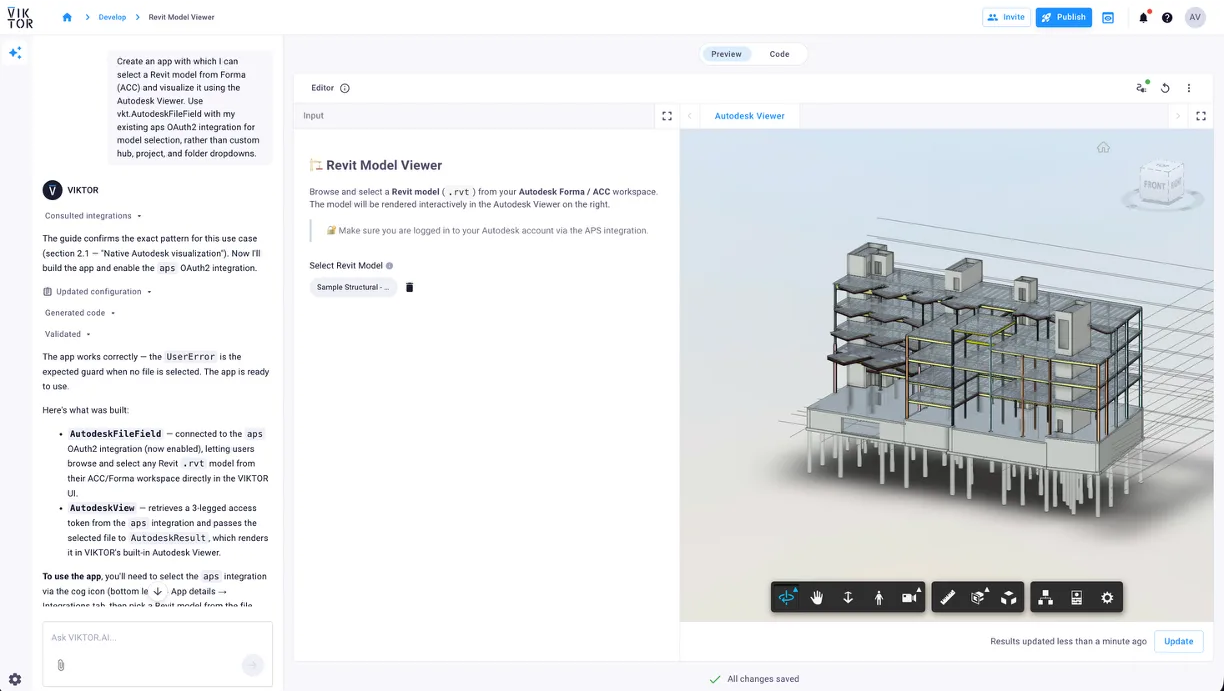
Let's start with the simplest workflow. This is useful when you want to review or share an ACC model without downloading the file or opening Revit. The app uses vkt.AutodeskFileField to browse the ACC projects available to the signed-in user. After you select a Revit model, it opens in the Autodesk Viewer inside VIKTOR.



Revit model viewer
Once the App Builder finishes creating the app, connect the APS integration and select a Revit model. Use the viewer controls to orbit, pan, zoom, isolate elements, and inspect the model.
If you want to visualize another Revit view, including a 2D view, add this instruction to the prompt:
Use the APS Viewer SDK to visualize the model and let me select any available Revit view, including 2D views.
Prompt 2: Generate a quantity takeoff from a Revit structural model
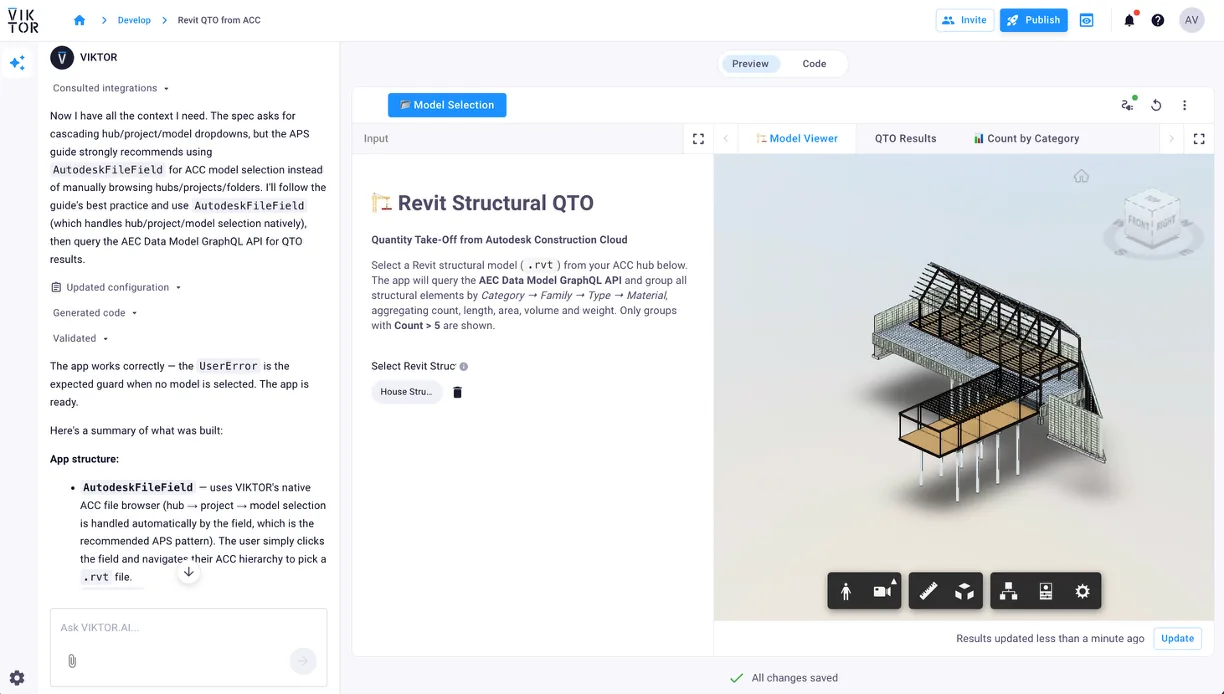
The second workflow combines the Autodesk Viewer with the AEC Data Model API. This is useful for early estimates, model checks, and understanding which elements make up a structural model. The generated app groups model elements and calculates the quantities available for each group, so you can explore the results without exporting the Revit data first.
Revit structural quantity takeoff
Select a Revit structural model in the generated app. The model tab lets you inspect the geometry while the QTO table shows the grouped element data and available quantities.
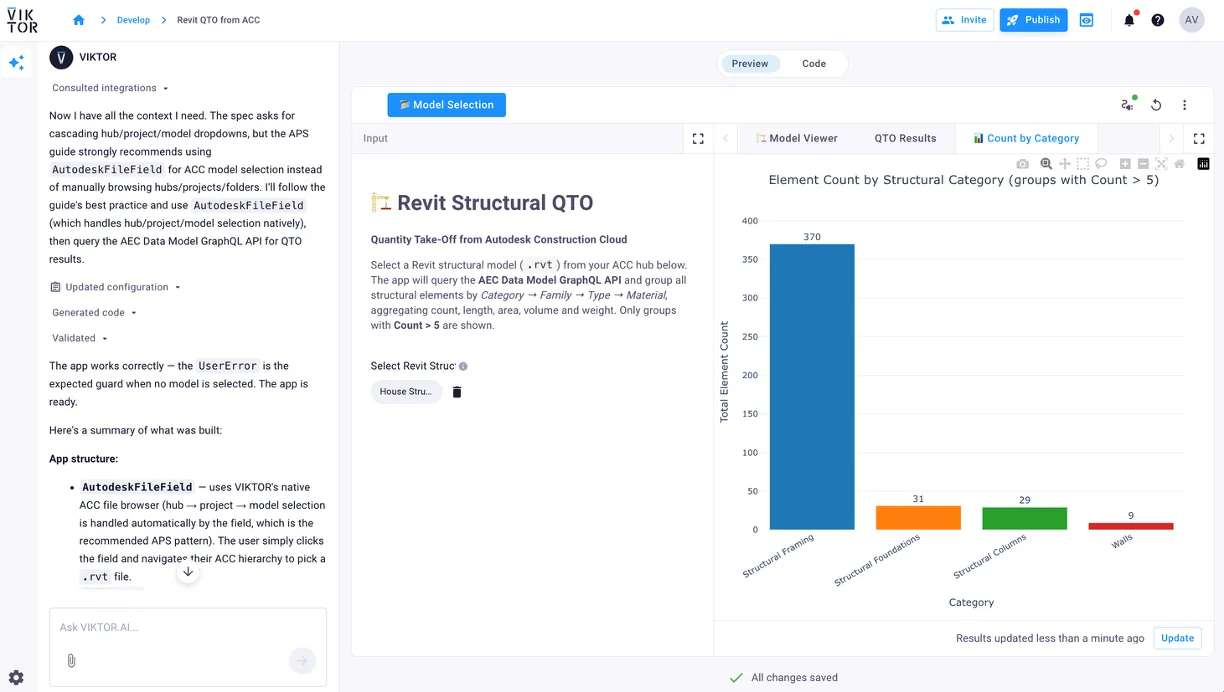
Open the category chart to compare the number of elements in each structural category. Only groups with more than five elements are included in the results.
You can extend this app to analyze the families, types, or individual instances within a selected category. You can also export the results to Excel or PDF, compare model versions, or add other charts such as pie charts.
Prompt 3: Highlight Revit categories with custom colors
The third workflow helps you understand a model faster by giving related categories their own colors. This is useful for design reviews and coordination because you can separate structural, architectural, and building-services elements visually. Add one or more highlighting rules, select the categories for each rule, and choose the color that should be applied in the viewer.
Revit category highlighter
Select a model, add the rules you need, and assign a color to each group of categories. The Autodesk Viewer updates the model so you can identify the selected categories visually.
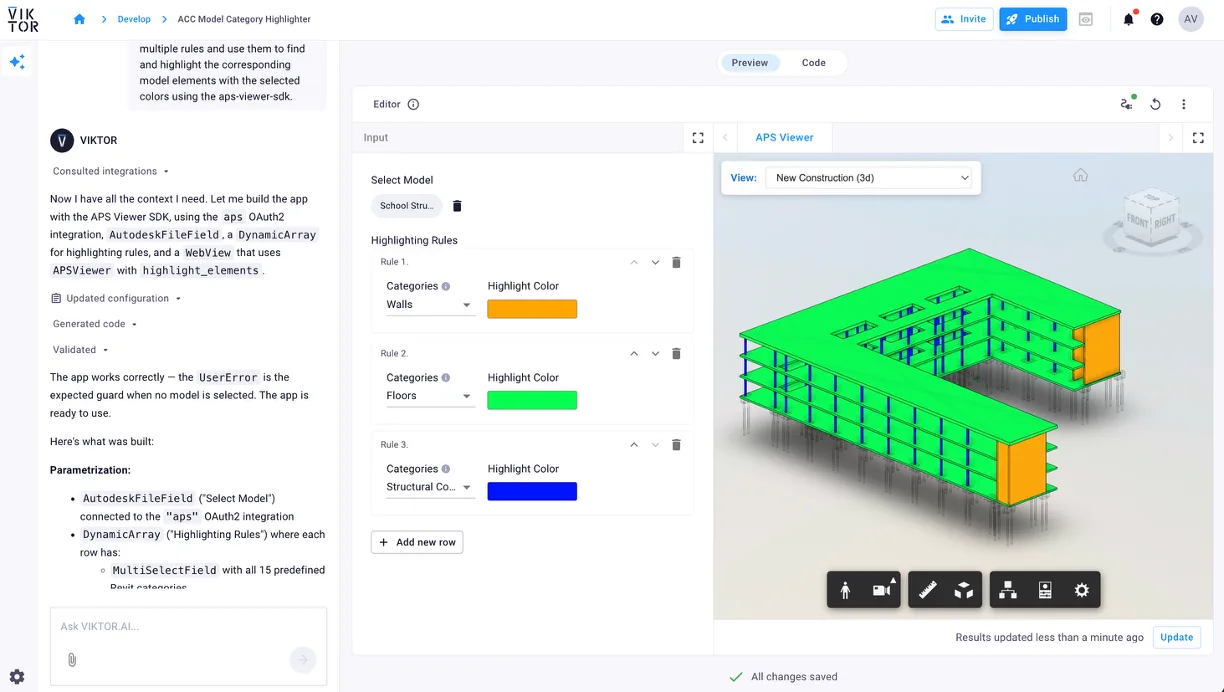
Use the View dropdown in the upper-left corner of the viewer to move between the Revit views available in the model. The selected colors remain visible when you change views, including in supported 2D views.
Prompt 4: Validate Revit pipe properties
The final workflow turns model data into a repeatable quality check. This is useful when an engineer needs to find elements that do not follow a project requirement without checking every pipe manually. Each rule targets a pipe type, property, operator, and comparison value. Elements that do not satisfy the rule are highlighted in red.
Revit pipe validation
Select a Revit model and add one or more pipe validation rules. The app evaluates the matching elements and highlights every failed check in red, making it easier to find values that need attention.
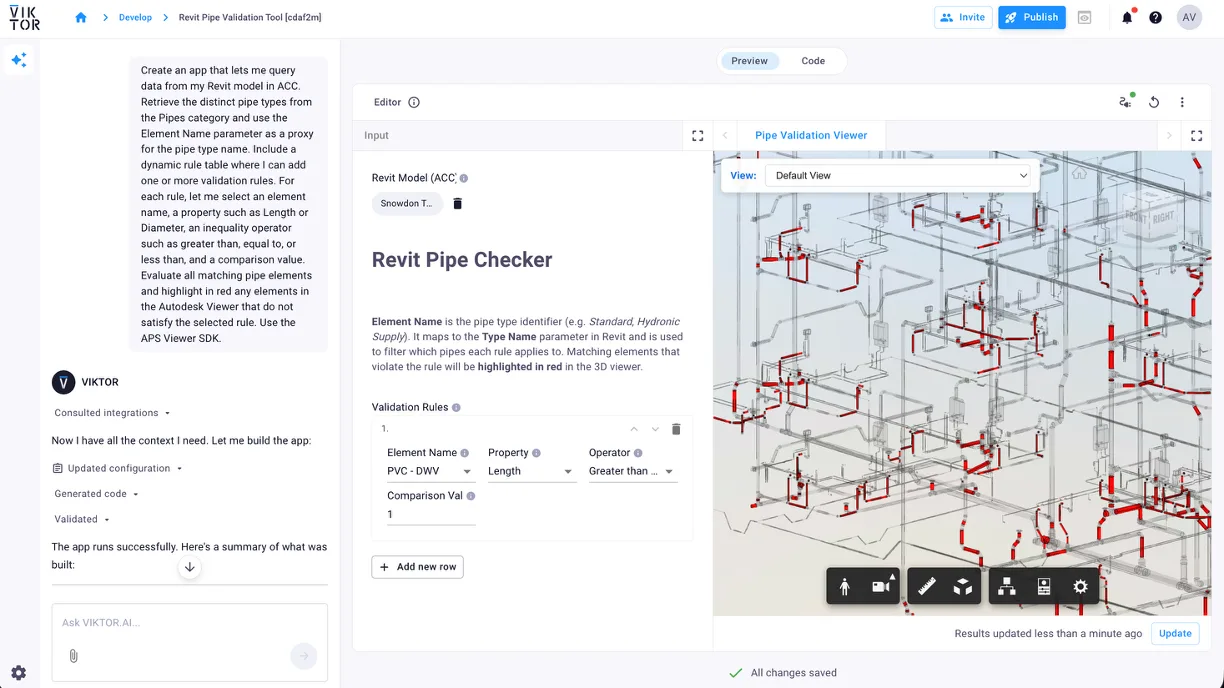
You can replace these example rules with custom engineering logic that matches your project standards. Keep in mind that the AEC Data Model API does not expose every Revit property or relationship. Connectivity and some mechanical-system properties may not be available, so check which properties the model returns before defining a rule.
4. Limitations
The quantity takeoff and pipe validation prompts use the AEC Data Model API. Before building a production workflow, review the AEC Data Model limitations.
Keep these points in mind:
- The AEC Data Model supports the US, EMEA, and AUS regions.
- Linked Revit models are not supported.
- Full geometry queries are not available through the AEC Data Model API. The apps use the Autodesk Viewer to display model geometry.
- The AEC Data Model works with Revit 2024 and later.
To infinity and beyond!
Well done! You now have four starting points for creating VIKTOR apps that work with Revit models in ACC. You have explored model visualization, quantity takeoffs, category highlighting, and property validation.
Finally, the journey doesn't end here. Continue with the Autodesk Forma Site Design tutorial or check out some of our other tutorials.