Tutorial - Autodesk Forma Site Design
Level: Intermediate
Time: 30 min
Prerequisites:
- You have a VIKTOR account and completed the installation process. No account? Get one here
- You have access to an Autodesk Forma Site Design project.
- Your VIKTOR environment has an OAuth 2.0 integration available for Autodesk Forma Site Design.
Introduction
Welcome to this tutorial on how to create VIKTOR apps that connect to Autodesk Forma Site Design through Autodesk Platform Services (APS), VIKTOR, and Python.
As an engineer or architect, you may work with changing requirements throughout a project. In this tutorial, we use three example workflows to explore how VIKTOR can help you read Forma data, generate geometry, visualize results, and publish new design outcomes without changing the app's source code for every variation.
Instead of starting with a single finished application, we will use prompts as the starting point for each workflow. Each prompt describes a different way to combine VIKTOR with Forma Site Design:
- Create a parametric tower and publish it to the Forma Library.
- Analyze terrain for drainage and ponding risks.
- Place a building on terrain and publish it to a derived proposal.
1. Set up the integration
Before testing the prompts, configure the APS application, VIKTOR OAuth 2.0 integration, ACC custom integration, and Forma extension service account. The same APS client ID must be connected across these services, and the Forma extension must be installed in every project the app needs to access.
For the complete setup procedure, including the required permissions, regions, project access, and OAuth 2.0 integration configuration, follow the Autodesk Forma Site Design integration guide. In particular, review these sections:
- Before you begin: confirm the required VIKTOR, APS, ACC, and Forma access.
- Create the APS application and VIKTOR integration.
- Add the APS client ID to the ACC account.
- Create and install the Forma extension.
2. Understand the key concepts
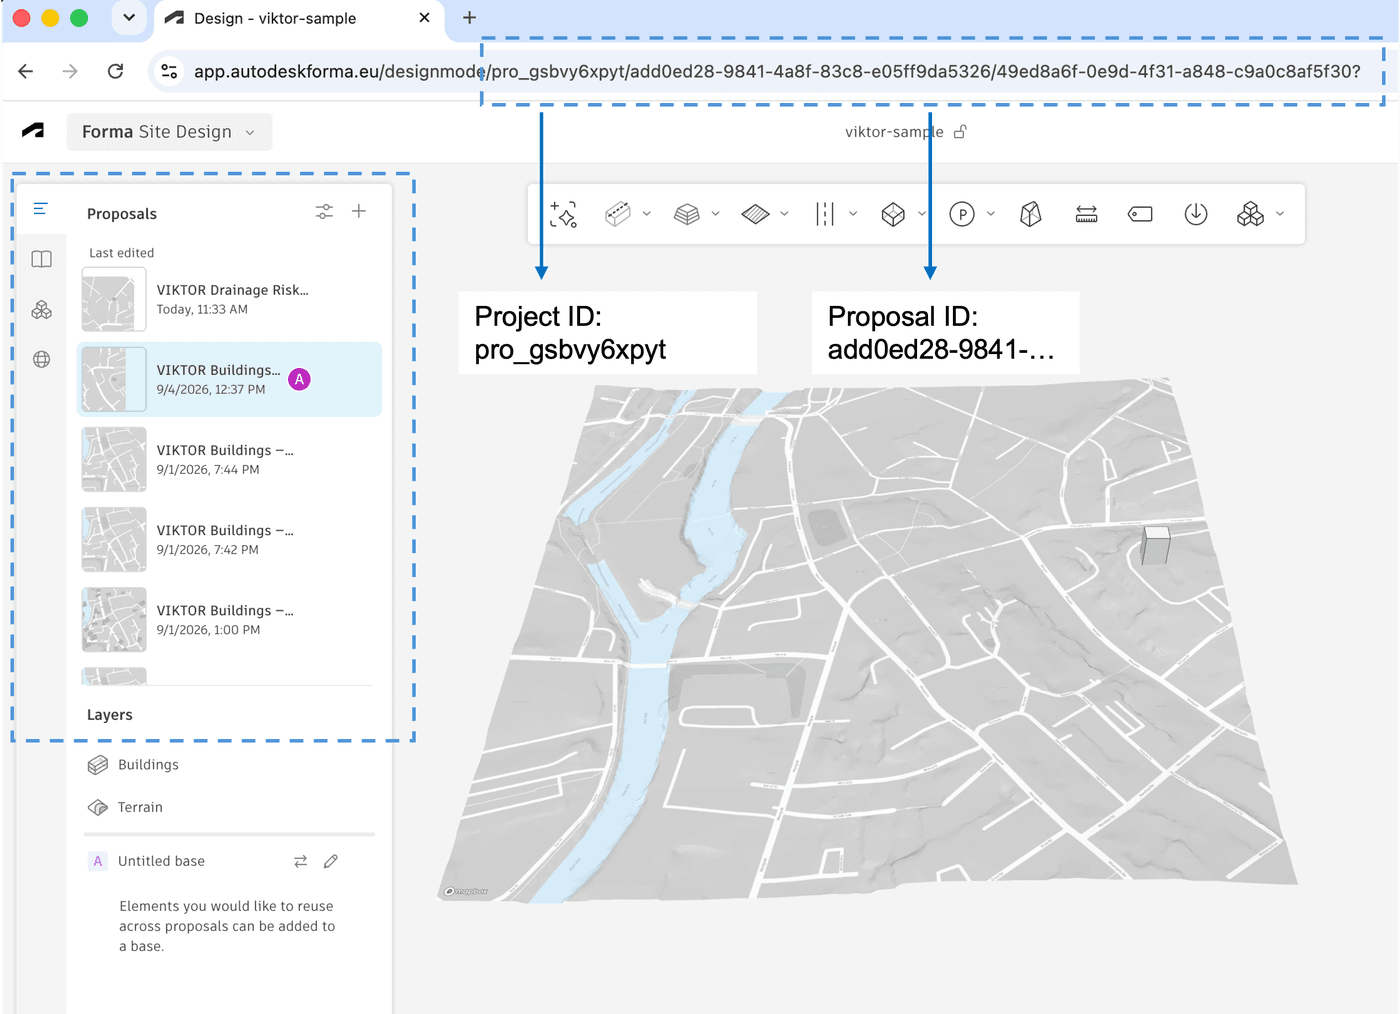
Most Forma workflows created with the VIKTOR App Builder start with the same project context: a Forma project ID and a selected proposal or project revision. You can find these values in the URL of the open Forma Site Design project:
- Project ID: the value after
/designmodel/, such aspro_gsbvy6xpytin the example below. - Proposal or revision ID: the identifier that follows the project ID. The exact field label depends on the generated app. When the app asks you to select a revision, choose the proposal or revision you want it to read or extend.
Copy the relevant values into the generated app when prompted. The examples below may ask for the project ID and region first, then load the available proposals dynamically so you can select the right proposal or revision.
3. Explore Forma Site Design workflows with prompts
The following prompts are starting points for three different Forma workflows. Click the arrow to open a prompt in the VIKTOR App Builder. Review the generated app and test its preview before using an action that writes to Forma.
Prompt 1: Create a parametric tower and publish it to the Forma Library
Let's start by creating a parametric tower. This is useful in the early stages of a project, when you want to explore different building options without rebuilding the model by hand. Before you submit the prompt, replace [YOUR-FORMA-SITE-INTEGRATION-NAME-HERE] with the name of the OAuth 2.0 integration configured in your VIKTOR environment. Then open the prompt in the App Builder, review the generated app, and test the preview before publishing the GLB to your Forma Library.



Parametric twisting tower
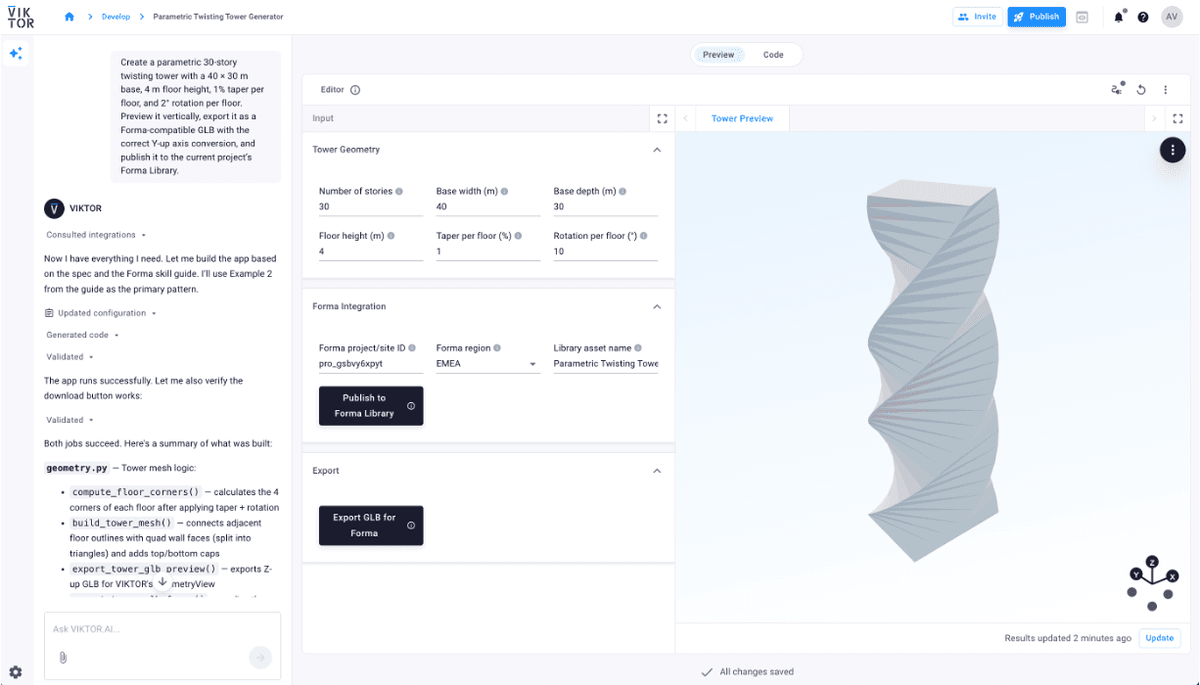
Once the App Builder finishes creating the app, open the preview and enter the Forma project ID. You can then change the tower parameters, such as the number of stories, base dimensions, floor height, taper, and rotation. When the model looks right, publish it to the Forma Library.
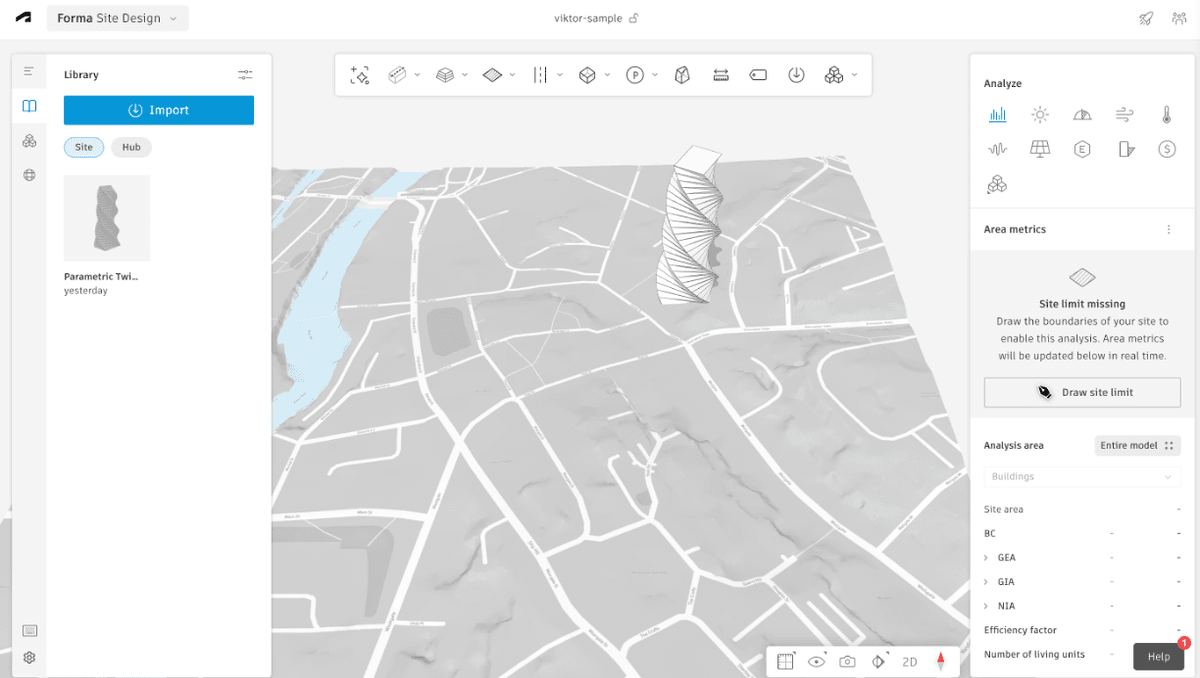
Next, open the Forma Site Design project and go to the Library. Select the parametric twisting tower and place it into the proposal you want to update. This lets you reuse the generated model in Forma after testing different parameters in the VIKTOR app.
Prompt 2: Analyze terrain for drainage and ponding risks
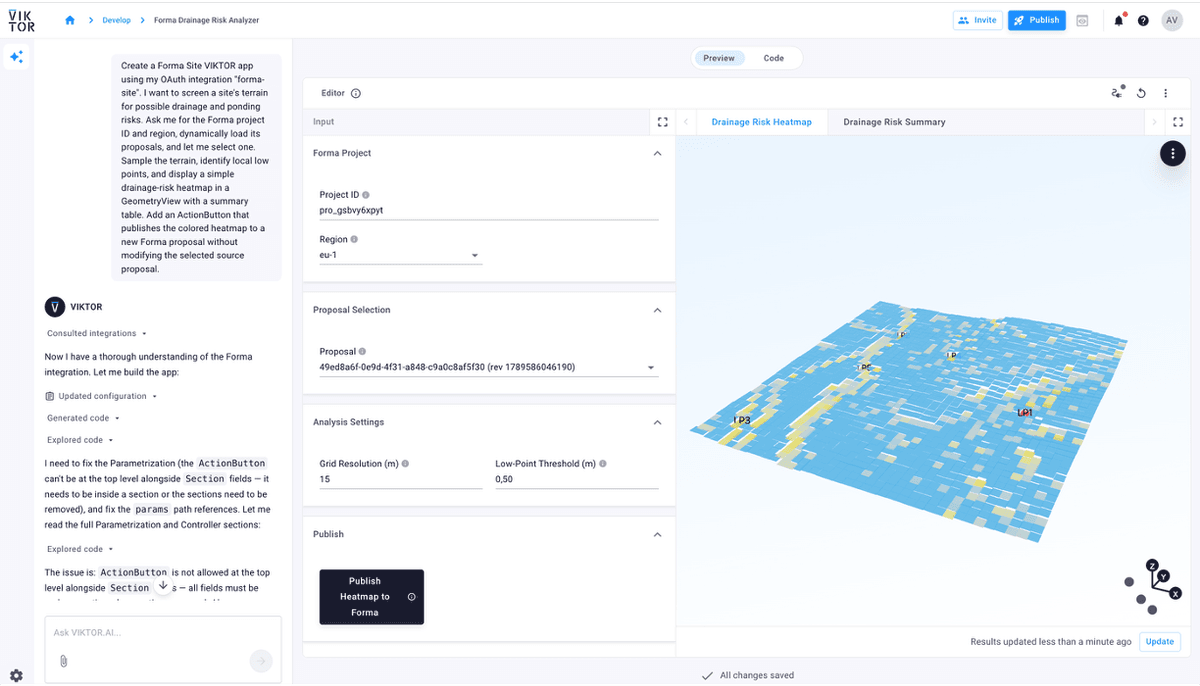
The second workflow looks at the terrain before you make a design decision. It is useful when you want to find possible low points and drainage risks during early site planning. Enter the Forma project ID and region, select a proposal from the proposals loaded by the app, and review the heatmap and summary table before publishing a new proposal.
Drainage and ponding risk analysis
Once the App Builder finishes creating the app, enter the Forma project ID and select a proposal in the Proposal Selection field. Review the drainage-risk heatmap and summary table, then use the publish action when the result looks right.
After the heatmap is published, return to the Forma Site Design project and refresh the page. The new proposal should appear in the proposals list with the colored heatmap ready for review.
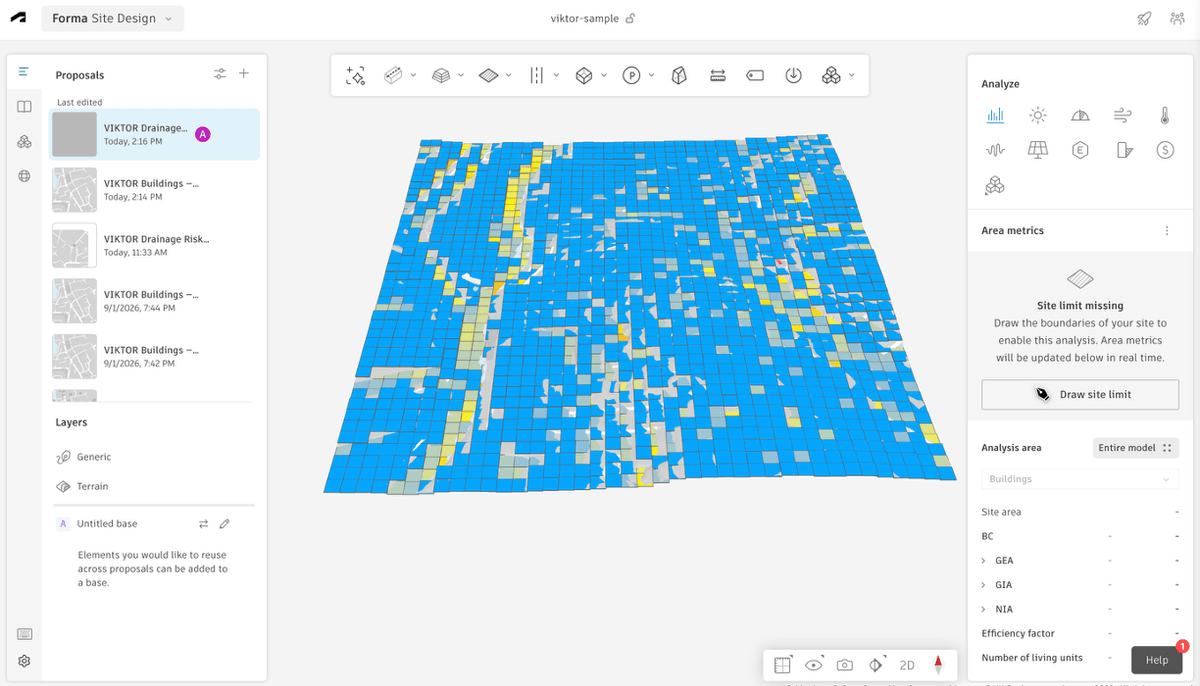
This prompt asks the generated app to create a new proposal so the selected source proposal stays unchanged. You can also update the prompt to modify an existing proposal instead, but do that only when you intend to change that proposal.
Prompt 3: Place a building on terrain and publish it to a derived proposal
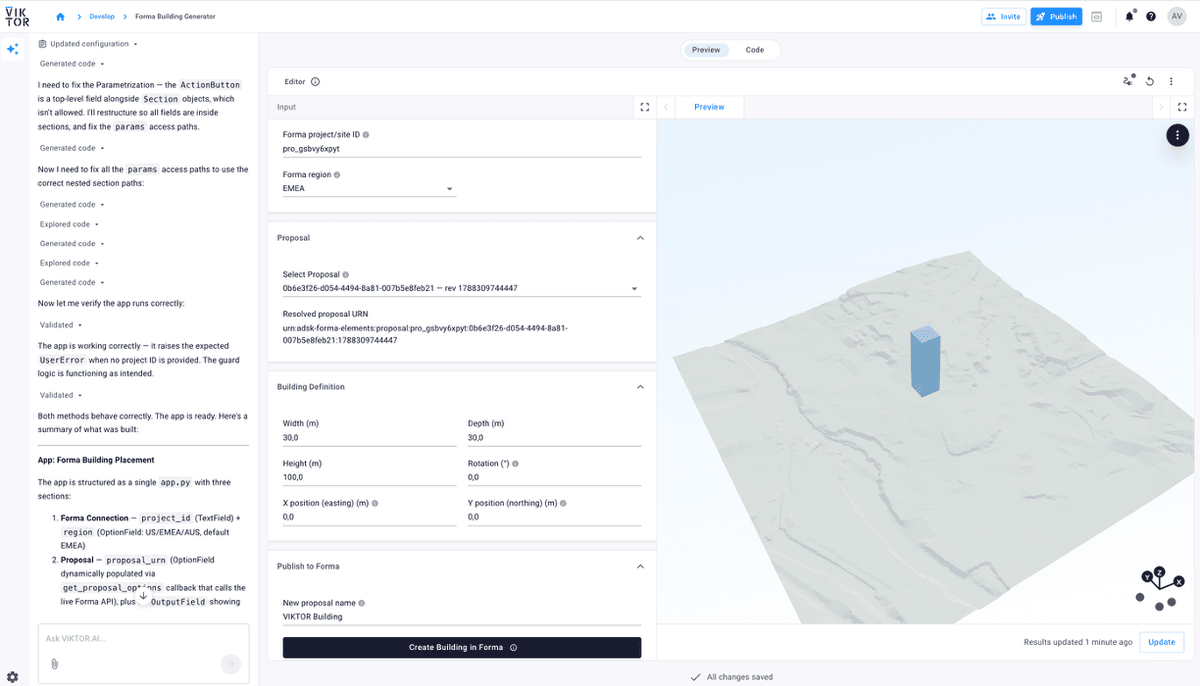
The third workflow helps you test a simple building on real Forma terrain. Change the building dimensions, rotation, and position in the generated app, then use the GeometryView to check the result. When the placement looks right, publish it to a new derived proposal so the selected source proposal stays unchanged.
Terrain-aware building placement
Once the App Builder finishes creating the app, enter the Forma project ID and region, then select the proposal you want to use. Change the building dimensions, height, rotation, and X/Y position to test different site options. Add a name for the new proposal, review the GeometryView, and create the building in Forma when the result looks right.
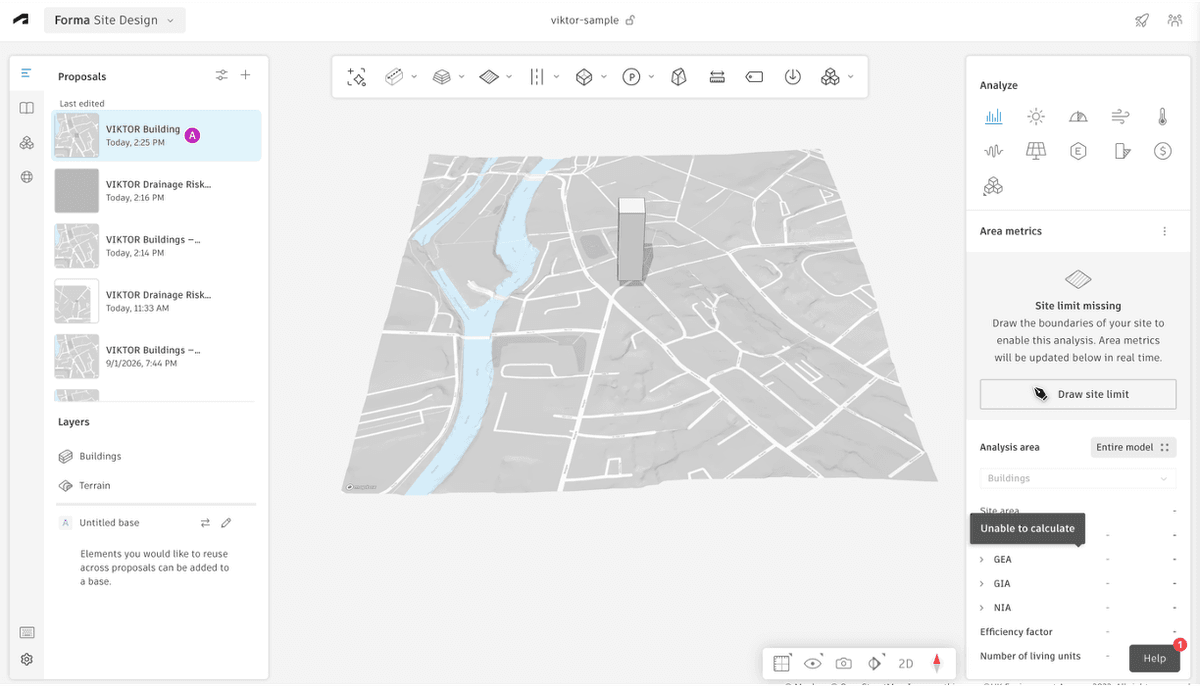
After the action finishes, return to Forma Site Design and refresh the project. Open the new proposal and check that the building was added to the selected terrain without changing the source proposal.
4. Limitations of the VIKTOR Forma Site Design integration
In this tutorial, VIKTOR communicates with Forma through its HTTP APIs, also commonly called REST APIs. You can think of these APIs as a background connection: the VIKTOR app can ask Forma to read or save supported project, proposal, terrain, geometry, and Library data. The VIKTOR integration does not control the live Forma workspace. For an overview, see Forma's HTTP API extension type.
Here are some limitations of the integration:
- The VIKTOR integration does not control the live canvas. It cannot see what the user has selected, move the camera, or read the current scene state.
- The VIKTOR integration does not start Forma's drawing tools. It cannot ask the user to draw a point, line, polygon, or extrusion directly in the Forma scene.
- The VIKTOR integration cannot always download the full geometry of existing elements. If the workflow needs geometry from the model currently loaded in Forma, the server-side integration may not provide it. Persistent changes still require supported API operations and the appropriate edit permissions.
To infinity and beyond!
Well done! You now have three starting points for creating VIKTOR apps that connect to Autodesk Forma Site Design. You have explored how to generate parametric geometry, analyze terrain, preview results in VIKTOR, and publish new outcomes to Forma.
Finally, the journey doesn't end here. Check out some of our other tutorials or explore the VIKTOR documentation to learn more about building apps with VIKTOR.