Tutorial - Automatic reporting
Estimated time: 30 minutes
Difficulty level: Beginner
Introduction
Welcome to this tutorial on automatic reporting in VIKTOR with Python! As an engineer or data scientist, generating reports is an essential part of your work. Reporting not only helps you understand the insights from your data but also helps you communicate your findings/results to stakeholders. In this tutorial, we will explore how to automate the process of generating reports in VIKTOR with python. We will cover:
- Creating a basic report
- Adding a table with dynamic rows to the report
- Adding a table with dynamic columns to the report
- Including a figure in the report
- Downloading the report
By the end of this tutorial, you will have created a simple VIKTOR application that makes an invoice. See gif below:
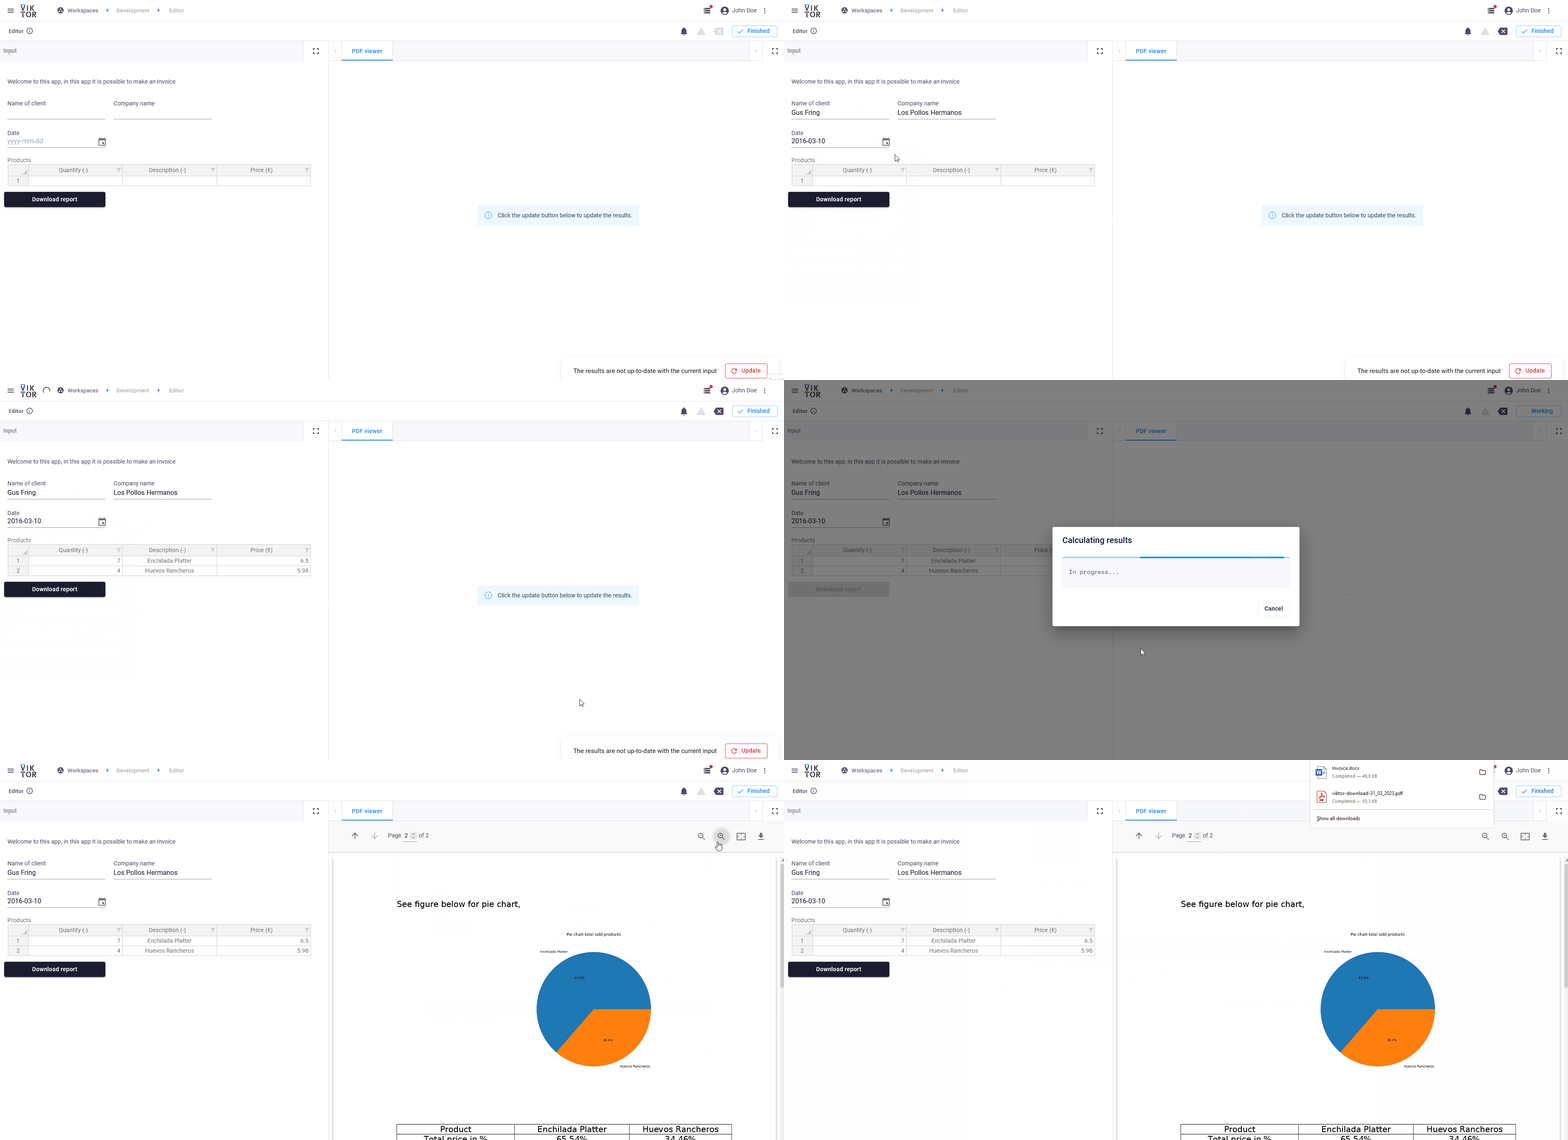 What the app looks like once you've completed this tutorial
You can find the complete code below.
Pre-requisites
- You have some experience with reading Python code
During the tutorial, we added some links to additional information; but don't let them distract you too much. Stay focused on completing the tutorial. After this, you will know everything you need to create an app which includes automatic reporting functionalities.
1. Basic setup
In this chapter, we will go through the process of generating a report automatically as fast as possible. In the following chapters, we will add more elements to the report. First, we will create a Word template and then fill this template with data from our app.
At the beginning, you may feel that you are not making a lot of progress because we have to set the basis first, but we promise that we will end up adding stuff to your app and report at lighting speed ⚡
Let’s get started!
Create an empty app
Let's create, install and start an empty app. This will be the starting point for the rest of the tutorial.
But before we start, make sure to shut down any app that is running (like the demo app) by closing the command-line shell
(for example Powershell) or end the process using Ctrl + C.
Follow these steps to create, install and start an empty app:
-
Open a terminal and run the following command to create the app on the VIKTOR platform and generate the initial code locally:
viktor-cli create-app "Reporting tutorial" --init --app-type editor -
Open the newly created folder in your code editor and run
viktor-cli clean-startin the terminal to install dependencies and connect the app to the platform.
If all went well, your empty app is installed and connected to your development workspace. Do not close the terminal as this will break the connection with your app. The terminal in your code editor should show something like this:
INFO    : Connecting to cloud.viktor.ai...
INFO    : Connection is established (use Ctrl+C to close)
INFO    :
INFO    : Navigate to the link below to see your app in the browser
INFO    :     https://cloud.viktor.ai/workspaces/XXX/app
INFO    :
INFO    : App code loaded, waiting for jobs...
- You only need to create an app template and install it once for each new app you want to make.
- The app will update automatically once you start adding code in
app.py, as long as you don't close the terminal or your code editor. - Did you close your code editor? Use
viktor-cli startto start the app again. No need to install, clear, etc.
Create your Word template
To make a report in this tutorial we will use a hypothetical example, we will create an invoice. Depending on your situation you may choose to format this more in terms of an engineering report or consultancy presentation.
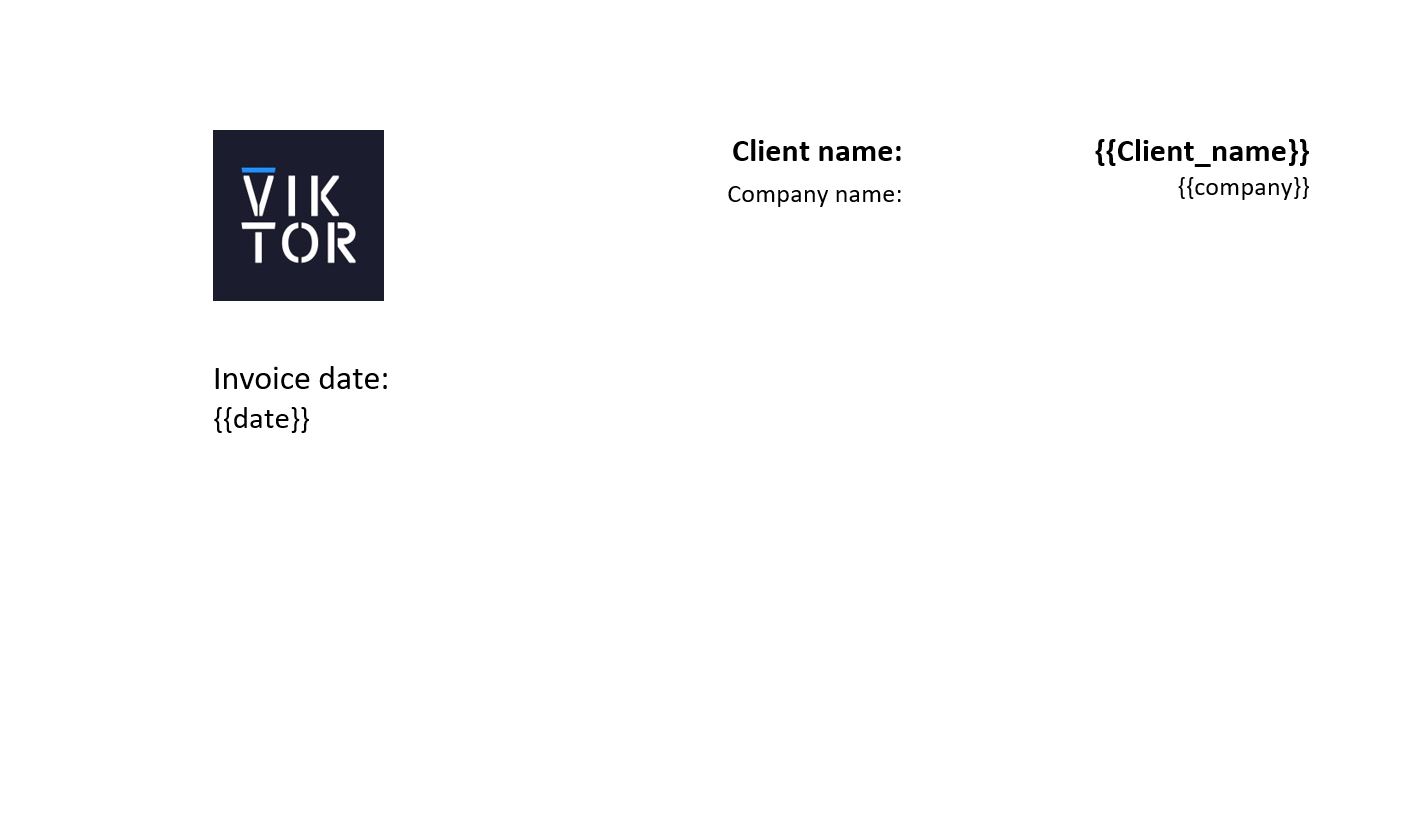
To start, we will have to make a Word template to fill with information later. We will keep it basic for now and only add the client’s name, company, and date.
We will use tags enclosed by double curly braces like this {{company}} to place information in the Word template.
The string inside the double curly braces is known as the identifier, and we use it to place the correct values in the right tags.
- Open an empty Word file and fill it similarly to the example below. Alternatively, you can download the pre-made template
-
Now, save your template in a
filesfolder. Navigate to your app directory (most likely located somewhere similar toC:\Users\<username>\viktor-apps\reporting-tutorial) and create the new folder there. Once you've created the new folder, save the template in it with the filenameTemplate.docx. Your app folder should now look something like this:reporting-tutorial
├── files
│ └── Template.docx
├── tests
├── app.py
├── CHANGELOG.md
├── README.md
├── requirements.txt
└── viktor.config.toml
App input fields
The next step is to have some information to fill the template with. In this case, we will add 3 input fields to our
app: client_name, company, and date. We will use a TextField and
DateField for this.
-
Open
app.py, and add the relevant fields to your parametrization. If you like you could accompany the fields with some instructive text. In the end yourapp.pyfile should look like this:import viktor as vkt
class Parametrization(vkt.Parametrization):
intro = vkt.Text("# Invoice app 💰 \n This app makes an invoice based on your own Word template")
client_name = vkt.TextField("Name of client")
company = vkt.TextField("Company name")
lb1 = vkt.LineBreak() # This is just to separate fields in the parametrization UI
date = vkt.DateField("Date")
class Controller(vkt.Controller):
parametrization = Parametrization -
Refresh your app, and you should see the input fields there.
Filling the template with data
We will now fill the word template from the input fields.
-
First, import
Pathfrompathlibat the beginning of youapp.pyfile:from pathlib import Path -
Now create a method called
generate_word_documentin your controller class. The resulting controller class would look like below:class Controller(vkt.Controller):
parametrization = Parametrization
def generate_word_document(self, params):
# Create emtpy components list to be filled later
components = []
# Fill components list with data
components.append(vkt.word.WordFileTag("Client_name", params.client_name))
components.append(vkt.word.WordFileTag("company", params.company))
components.append(vkt.word.WordFileTag("date", str(params.date))) # Convert date to string format
# Get path to template and render word file
template_path = Path(__file__).parent / "files" / "Template.docx"
with open(template_path, 'rb') as template:
word_file = vkt.word.render_word_file(template, components)
return word_file
How this works
-
List with information: Inside
generate_word_documentwe made a listcomponentswith all the information we want to put in the report. TheWordFileTagfunction has two arguments, the first argument is the identifier. This is used to find the location in the word template. The second argument is the value that needs to be placed at the location of the identifier in the template -
Open and render template: The last part opens the template and uses the function
render_word_fileto insert the information from thecomponentslist into the template. Finally, we need to return the filled template.
Generate a PDF report
Now that we have a filled template invoice, we can work on visualising it. In VIKTOR it is possible to show
a pdf using the PDFView. Follow the next steps:
- Create a
pdf_viewmethod inside the controller class, after thegenerate_word_documentmethod we just created. - Generate the invoice using the
generate_word_documentmethod we built in the previous section. - Convert word to pdf, with the
convert_word_to_pdffunction. - Return a
PDFResult.
See code below for the resulting pdf_view method:
...
class Controller(vkt.Controller):
parametrization = Parametrization
@vkt.PDFView("PDF viewer", duration_guess=5)
def pdf_view(self, params, **kwargs):
word_file = self.generate_word_document(params)
with word_file.open_binary() as f1:
pdf_file = vkt.convert_word_to_pdf(f1)
return vkt.PDFResult(file=pdf_file)
All code so far, just in case.
Just in case something went wrong, here you can find all code together so far:
Complete code
import viktor as vkt
from pathlib import Path
class Parametrization(vkt.Parametrization):
intro = vkt.Text("# Invoice app 💰 \n This app makes an invoice based on your own Word template")
client_name = vkt.TextField("Name of client")
company = vkt.TextField("Company name")
lb1 = vkt.LineBreak() # This is just to separate fields in the parametrization UI
date = vkt.DateField("Date")
class Controller(vkt.Controller):
    parametrization = Parametrization

    def generate_word_document(self, params):
        # Create emtpy components list to be filled later
        components = []

        # Fill components list with data
        components.append(vkt.word.WordFileTag("Client_name", params.client_name))
        components.append(vkt.word.WordFileTag("company", params.company))
        components.append(vkt.word.WordFileTag("date", str(params.date))) # Convert date to string format

        # Get path to template and render word file
        template_path = Path(__file__).parent / "files" / "Template.docx"
        with open(template_path, 'rb') as template:
            word_file = vkt.word.render_word_file(template, components)

        return word_file
@vkt.PDFView("PDF viewer", duration_guess=5)
def pdf_view(self, params, **kwargs):
word_file = generate_word_document(params)
with word_file.open_binary() as f1:
pdf_file = vkt.convert_word_to_pdf(f1)
return vkt.PDFResult(file=pdf_file)
Now that we have a basic functional version of our report, let's add some more complicated elements. In the next sections we are going to add:
- A table, with dynamic rows
- A table with dynamic columns
- A figure we're going to make ourselves
Finally we'll also include functionality to download the report.
2. Table with dynamic rows
The simple steps to adding a table with dynamic rows into our invoice are:
- Update the template
- Add input fields for the table
- Process the user input
- Fill the template with the processed input
Update the template
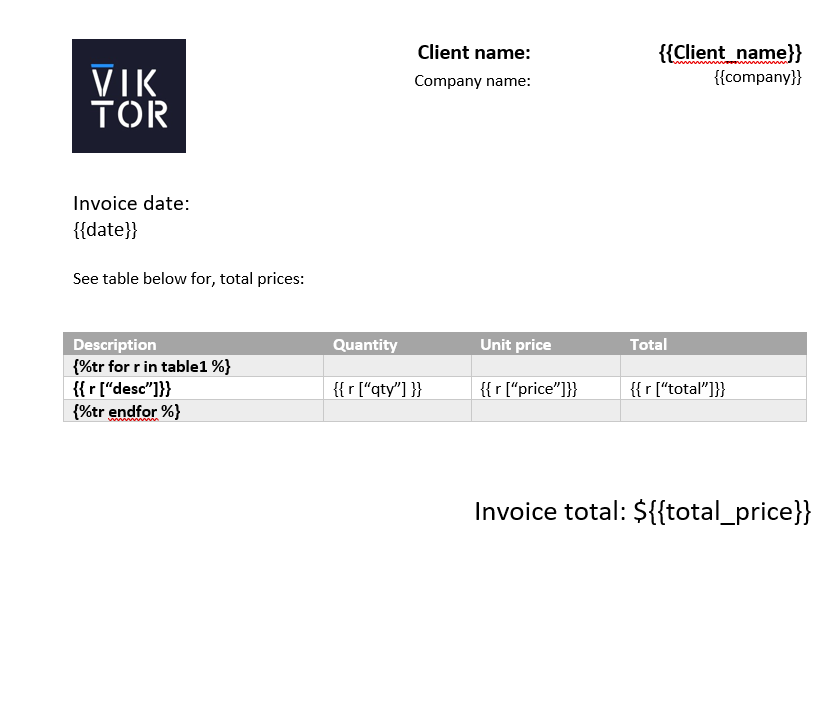
The table has a variable amount of rows (dynamic rows), meaning that the number of rows will vary depending on the input. We will do this by writing a for loop inside our template. Follow the steps or just download the updated template
-
Open your Word template and create a table with the appropriate column headings and layout.
-
Add a row below and paste the following line of code in the first cell to start the for loop:
{% tr for r in table1 %} -
Add another row and, in each column, add the following line of code, where
varis the key name of the value (desc, qty, price, total):{{r[var]}} -
Insert a bottom row and add the following line of code to close the for loop:
{% tr endfor %} -
Under this table, lets add the following line to show the total price:
${{total_price}}
By following the steps, you added the table to the template, which should make it look like this:
Add input fields
For the table, we will add some input fields.
- In your
Parametrizationclass, under the fields we added before, add:
   # Table
   table_price = vkt.Table("Products")
   table_price.qty = vkt.NumberField("Quantity", suffix="-", min=0)
   table_price.desc = vkt.TextField("Description", suffix="-")
   table_price.price = vkt.NumberField("Price", suffix="€", min=0)
- Refresh your app. You should see a nice table!
Process user input
In order to enter the table and the final total amount on the invoice, we will create two methods. One to calculate the total price and another to process the data in the table.
Calculate the total price
Inside your Controller class, under the PDFview we made in last section, create this method:
 @staticmethod
 def calc_total_price(params):
    # Get user entry from params
    product_table = params.table_price

    # Calculate total price from quantities and unit price
    quantities = [row["qty"] for row in product_table]
    prices = [row["price"] for row in product_table]
    total_price = 0
    for qty, price in zip(quantities, prices):
         total_price += qty * price

    return total_price
This method takes the table and for every entered item in the table, it calculates the total price for that specific item and adds it to the overall total. Which is then returned by the method.
Processing the table
The user input currently in the table does not provide all information for the invoice we have set up in the template. For this table we will also require a total cost per product.
Inside your Controller class, under the calc_total_price method we just made, create this method:
 def process_table(self, params):
    product_table = params.table_price
    for row in product_table:
        row["total"] = row["qty"] * row["price"]

    return product_table
Fill template
Remember that we created the method called generate_word_document to add the data to the word template? Well, now we
will modify that method to add the table data.
- Just below the method definition, add these two lines like this:
    def generate_word_document(self, params):  #<--- this is just for your reference

        total_price = self.calc_total_price(params)
        table = self.process_table(params)
- Just a few lines under, in the part where we append the data to the components list, add:
     components.append(vkt.word.WordFileTag("total_price", str(total_price)))  # Convert price float to string
     components.append(vkt.word.WordFileTag("table1", table))
- Update your app, fill in the table and check this amazing table inside your invoice!
If you get stuck, you can always try to have a quick peek at the complete code at the end of this tutorial
3. Table with dynamic columns
In the previous section, we added a table with a fixed column and a variable number of rows. This time we will turn things around and create a table with fixed rows and variable columns because this could apply better to your situation, and we want to show you both options. The steps are the same as before, so let’s jump into it.
Update the template
Open the template and add a second table to it that looks as follows and don't forget to save. Or just use the updated template
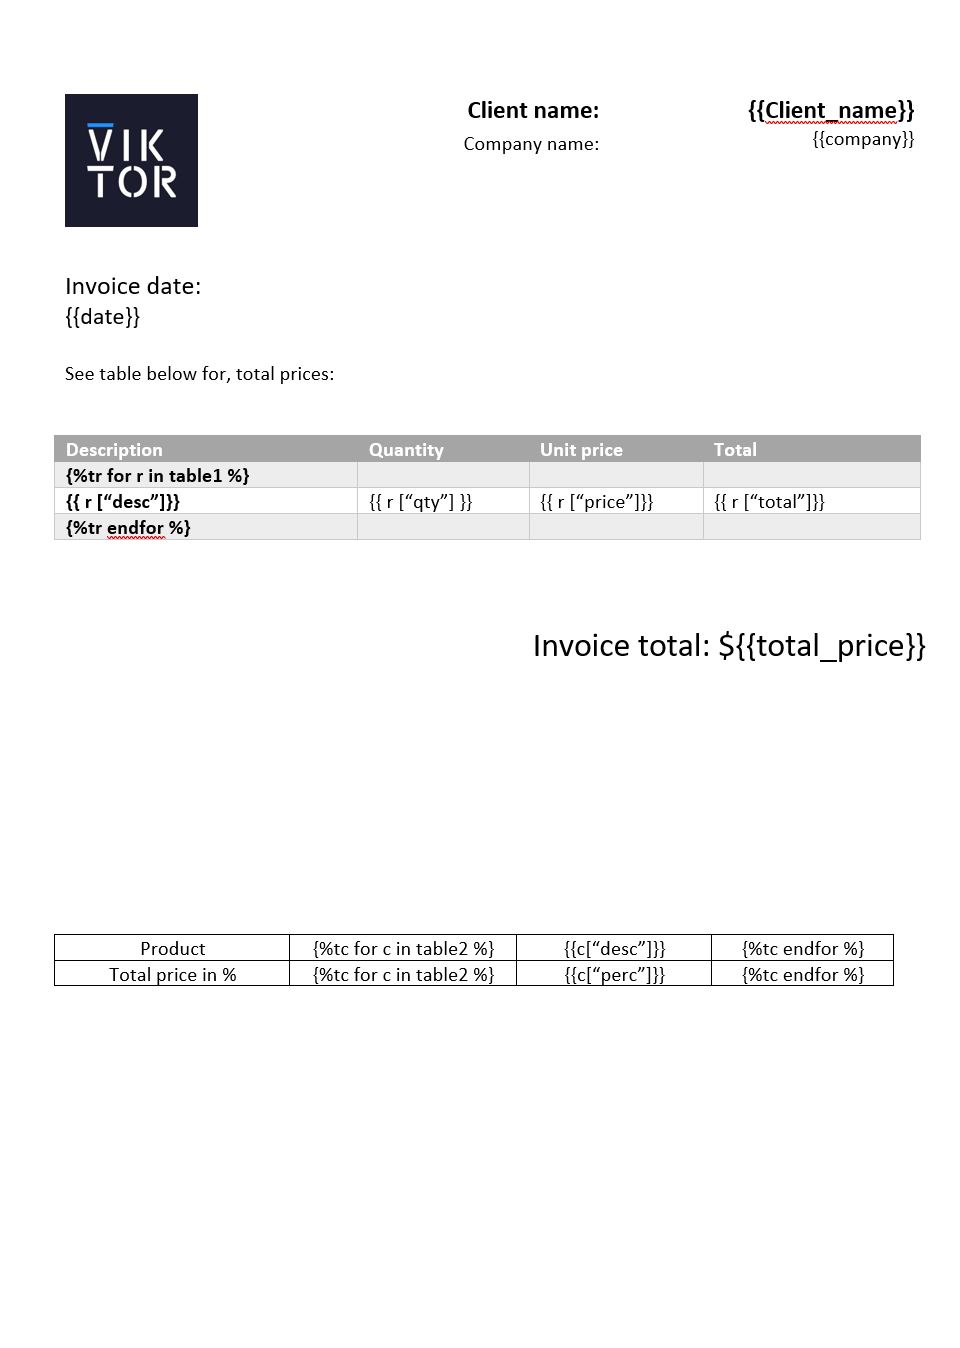
You may notice that, this time, we are creating a for loop in each row that loops through the columns.
Adjust the data processing
For this second table we also have to calculate the percentage of the total costs every product constitutes. Therefore,
we will adjust the process_table method we made earlier. It should now look like the following (notice we are employing
the calc_total_price() method created earlier in the process as well):
 def process_table(self, params):
    total_price = self.calc_total_price(params)
    product_table = params.table_price
    for row in product_table:
        row["total"] = row["qty"] * row["price"]
        row["perc"] = str(round((row["total"] / total_price) * 100, 2)) + "%"

    return product_table
Fill template
For the sake of time, we will use the same input fields and calculation methods we made before.
-
To add the data to the template, go to
generate_word_documentand add:components.append(vkt.word.WordFileTag("table2", table)) -
Update your app and see the new table in the report. Wow, that went lightning fast!
4. Adding a figure
Now we will add a figure, and we will choose a pie chart because we are engineers and we love charts 😉
Generating the figure
To generate the figure you can use multiple different python libraries. In this tutorial we will not go into depth on this subject.
The method below can take in the params as we created them earlier, create a pie-chart of the total division of products
in the customer's order, and save that figure to a data object using the BytesIO package.
-
At the end of you code, inside the
Controllerclass add this code:@staticmethod
def create_figure(params):
product_table = params.table_price
# Create figure
fig, ax = plt.subplots(figsize=(16, 8))
products = [row["desc"] for row in product_table]
qty = [np.round(row["qty"], 2) for row in product_table]
ax.pie(qty, labels=products, autopct="%1.1f%%")
ax.set_title("Pie chart total sold products")
png_data = BytesIO()
fig.savefig(png_data, format='png')
plt.close()
return png_data -
Don't forget the imports
from io import BytesIO
import numpy as np
import matplotlib.pyplot as plt
Update the template
Open your template and place the following tag at the location where you want to see the pie chart. This should complete the template. Again, you can also download the full template here:
{{ figure_sales }}
Insert Image in report
An image can be inserted using the WordFileImage
object which requires a binary file handle. The method create_figure stores a png image in the BytesIO object. This
object can be directly placed in the Word document through the WordFileImage.
-
You can paste the code below in the
generate_word_documentmethod underneath the tables and above the actual rendering of the Word file:# Place image
figure = self.create_figure(params)
word_file_figure = vkt.WordFileImage(figure, "figure_sales", width=500)
components.append(word_file_figure) -
Update your app, and you will see the chart.
5. Download the Word report
The last step is to add a download button, the download enables the user to download a file in any format. In this case we will use it to download the report in Word format, just in case you want to add something manually.
The PDFView used in the previous chapter already allows the user to download the PDF file from the view directly.
The case we're tackling with this download button is the one where the user would require the actual Word format.
Create a download method
The button we will make in the next step requires a file in the form of a DownloadResult,
so first we will make a simple method.
At the end of your Controller class add:
def download_word_file(self, params, **kwargs):
word_file = self.generate_word_document(params)
return vkt.DownloadResult(word_file, "Invoice.docx")
Add a download button.
A DownloadButton is added to the parametrization to allow the user to
download the file with a single click. This button requires a method argument. This method is the method we just
added to the controller class.
Pay attention to the way the method is added to the DownloadButton. This has to be in the format of a string so if the
method (as in the example below)
is called download_word_file then it should be added to the DownloadButton as method="download_word_file"
At the end of your Parametrization class add the button:
# Downloadbutton
download_word_file = vkt.DownloadButton('Download report', method='download_word_file')
6. All code together
Complete code
import viktor as vkt
import matplotlib.pyplot as plt
import numpy as np
from io import BytesIO
from pathlib import Path
class Parametrization(vkt.Parametrization):
intro = vkt.Text("# Invoice app 💰 \n This app makes an invoice based on your own Word template")
client_name = vkt.TextField("Name of client")
company = vkt.TextField("Company name")
lb1 = vkt.LineBreak() # This is just to separate fields in the parametrization UI
date = vkt.DateField("Date")
# Table
table_price = vkt.Table("Products")
table_price.qty = vkt.NumberField("Quantity", suffix="-", min=0)
table_price.desc = vkt.TextField("Description", suffix="-")
table_price.price = vkt.NumberField("Price", suffix="€", min=0)
# Downloadbutton
download_word_file = vkt.DownloadButton('Download report', method='download_word_file')
class Controller(vkt.Controller):
parametrization = Parametrization
def generate_word_document(self, params):
total_price = self.calc_total_price(params)
table = self.process_table(params)
# Create emtpy components list to be filled later
components = []
# Fill components list with data
components.append(vkt.word.WordFileTag("Client_name", params.client_name))
components.append(vkt.word.WordFileTag("company", params.company))
components.append(vkt.word.WordFileTag("date", str(params.date))) # Convert date to string format
components.append(vkt.word.WordFileTag("total_price", str(total_price))) # Convert price float to string
components.append(vkt.word.WordFileTag("table1", table))
components.append(vkt.word.WordFileTag("table2", table))
# Place image
figure = self.create_figure(params)
word_file_figure = vkt.WordFileImage(figure, "figure_sales", width=500)
components.append(word_file_figure)
# Get path to template and render word file
template_path = Path(__file__).parent / "files" / "Template.docx"
with open(template_path, 'rb') as template:
word_file = vkt.word.render_word_file(template, components)
return word_file
@vkt.PDFView("PDF viewer", duration_guess=5)
def pdf_view(self, params, **kwargs):
word_file = self.generate_word_document(params)
with word_file.open_binary() as f1:
pdf_file = vkt.convert_word_to_pdf(f1)
return vkt.PDFResult(file=pdf_file)
@staticmethod
def calc_total_price(params):
# Get user entry from params
product_table = params.table_price
# Calculate total price from quantities and unit price
quantities = [row["qty"] for row in product_table]
prices = [row["price"] for row in product_table]
total_price = 0
for qty, price in zip(quantities, prices):
total_price += qty * price
return total_price
def process_table(self, params):
total_price = self.calc_total_price(params)
product_table = params.table_price
for row in product_table:
row["total"] = row["qty"] * row["price"]
row["perc"] = str(round((row["total"] / total_price) * 100, 2)) + "%"
return product_table
 @staticmethod
 def create_figure(params):
     product_table = params.table_price
     # Create figure
     fig, ax = plt.subplots(figsize=(16, 8))
     products = [row["desc"] for row in product_table]
     qty = [np.round(row["qty"], 2) for row in product_table]
     ax.pie(qty, labels=products, autopct="%1.1f%%")
     ax.set_title("Pie chart total sold products")
     png_data = BytesIO()
     fig.savefig(png_data, format='png')
     plt.close()

     return png_data
def download_word_file(self, params, **kwargs):
    word_file = self.generate_word_document(params)

    return vkt.DownloadResult(word_file, "Invoice.docx")
To infinity and beyond!
Well done! You are now able to create an app that takes in user input and processes this automatically into a report which is
shown as a PDFView and can be downloaded as a Word file!
Of course, the journey doesn't end here. Check out some of our other tutorials or go to the Create apps where you can see the different options you have to create apps.