Word-file templater
This guide is an informative piece to help you if you have questions about the Word-file templating functionality. If you would like a more instructive lesson, take a look at the Reporting tutorial we have available.
Services need to be mocked within the context of (automated) testing.
The following steps are to be performed to implement a Word template. A more elaborate example of the individual components will be shown in the sections below.
- Template a Word (.docx) file using the jinja notation (e.g.
{{ tag }})
The extension of the Word template should be of type .docx (not .doc).
- Create a sequence of
WordFileTagand/orWordFileImageobjects - Execute
render_word_filewith the word template from step 1 and the components from step 2
Example Word template
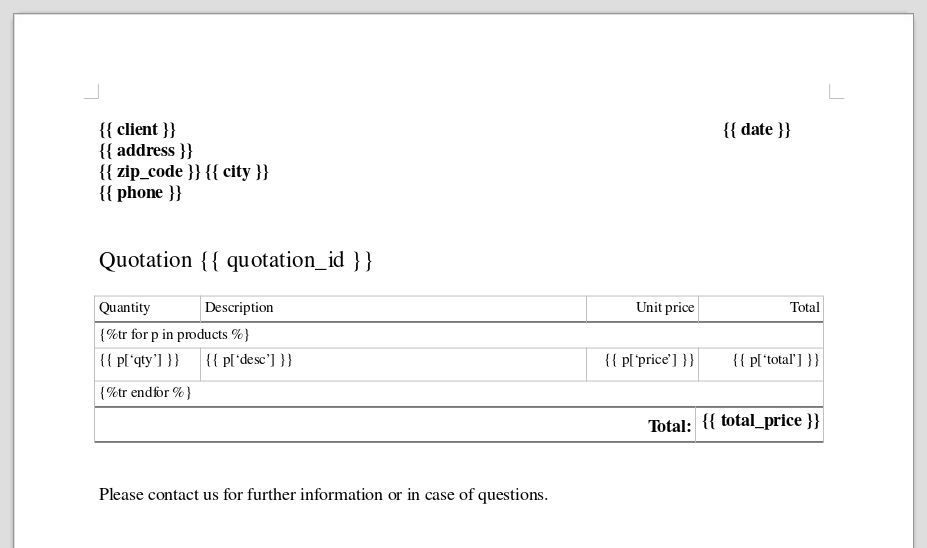
The figure below shows an example of a quotation document, in which the contact details of the customer is filled in as well as listing the components that he or she has selected.
 Word template
Also note that styling as defined in the original .docx file will be inherited by the rendered document. For example, the 'date' tag is bold in the template, which results in a bold rendered date in the resulting file.
WordFileTag
In the application you need to refer to the created tags in the word file components. In case of textual data the
WordFileTag can be used:
components = []

components.append(WordFileTag('client', params.client))
components.append(WordFileTag('date', datetime.datetime.today().strftime('%d-%m-%Y')))
The WordFileTag values can also be of type list or dict, to make it possible to iterate within the template. In
the example template above, the products is a list of dictionaries:
products = [
    {'qty': 1, 'desc': 'Product A', 'price': 100, 'total': 150},
    {'qty': 3, 'desc': 'Product B', 'price': 150, 'total': 450},
    ...
]

components.append(WordFileTag('products', products))
Using the {%tr for p in products %} notation in the template allows for looping through the products, printing each
product on a new line in the defined table. Please consult the jinja
documentation for more detail on jinja templating.
WordFileImage
SVG is not supported as image type.
An image can be inserted using the WordFileImage object, which
requires a binary image file handle. This can either be a static image (path), an uploaded image (file entity), or a
dynamically created image of, for example, a result plot.
from pathlib import Path

image_path = Path(__file__).parent / 'my' / 'relative' / 'path' / 'static_image.png'
with open(image_path, 'rb') as image:
    word_file_image = WordFileImage(image, 'img_tag')

components.append(word_file_image)
The static_image.png in this case will be placed on the position of image_tag in the Word template, in its original size. The image can be scaled by defining a width and/or height (pt). When only one is provided, the other is scaled. When both are provided, both are used and the original aspect ratio might be changed.
WordFileImage(img, 'img_tag', width=30)
render_word_file
Now that all the Word file components are defined, the Word file can be rendered using
render_word_file. The template can also be either a static file
(path) or an uploaded file (file entity):
template_path = Path(__file__).parent / 'my' / 'relative' / 'path' / 'template.docx'
with open(template_path, 'rb') as template:
    word_file = render_word_file(template, components)
The document can then be passed to for example a DownloadResult:
return DownloadResult(word_file, f'quotation_{params.quotation_id}.docx')