Tutorial - Integrate STAAD.Pro
Estimated time: 55 minutes
Difficulty level: Intermediate
Introduction
STAAD.Pro is one of the most widely used software tools for structural engineering. It offers a range of features for modeling and design, along with a robust API called OpenSTAAD that enables you to automate a workflow. In this tutorial, you will learn how to create a VIKTOR web app that integrates STAAD.Pro behind the scenes.
Here are the main sections we will cover:
- Build a VIKTOR app.
- Create a simple parametric model.
- Calculate the member end forces of your model.
- Display the member end forces in your VIKTOR app.
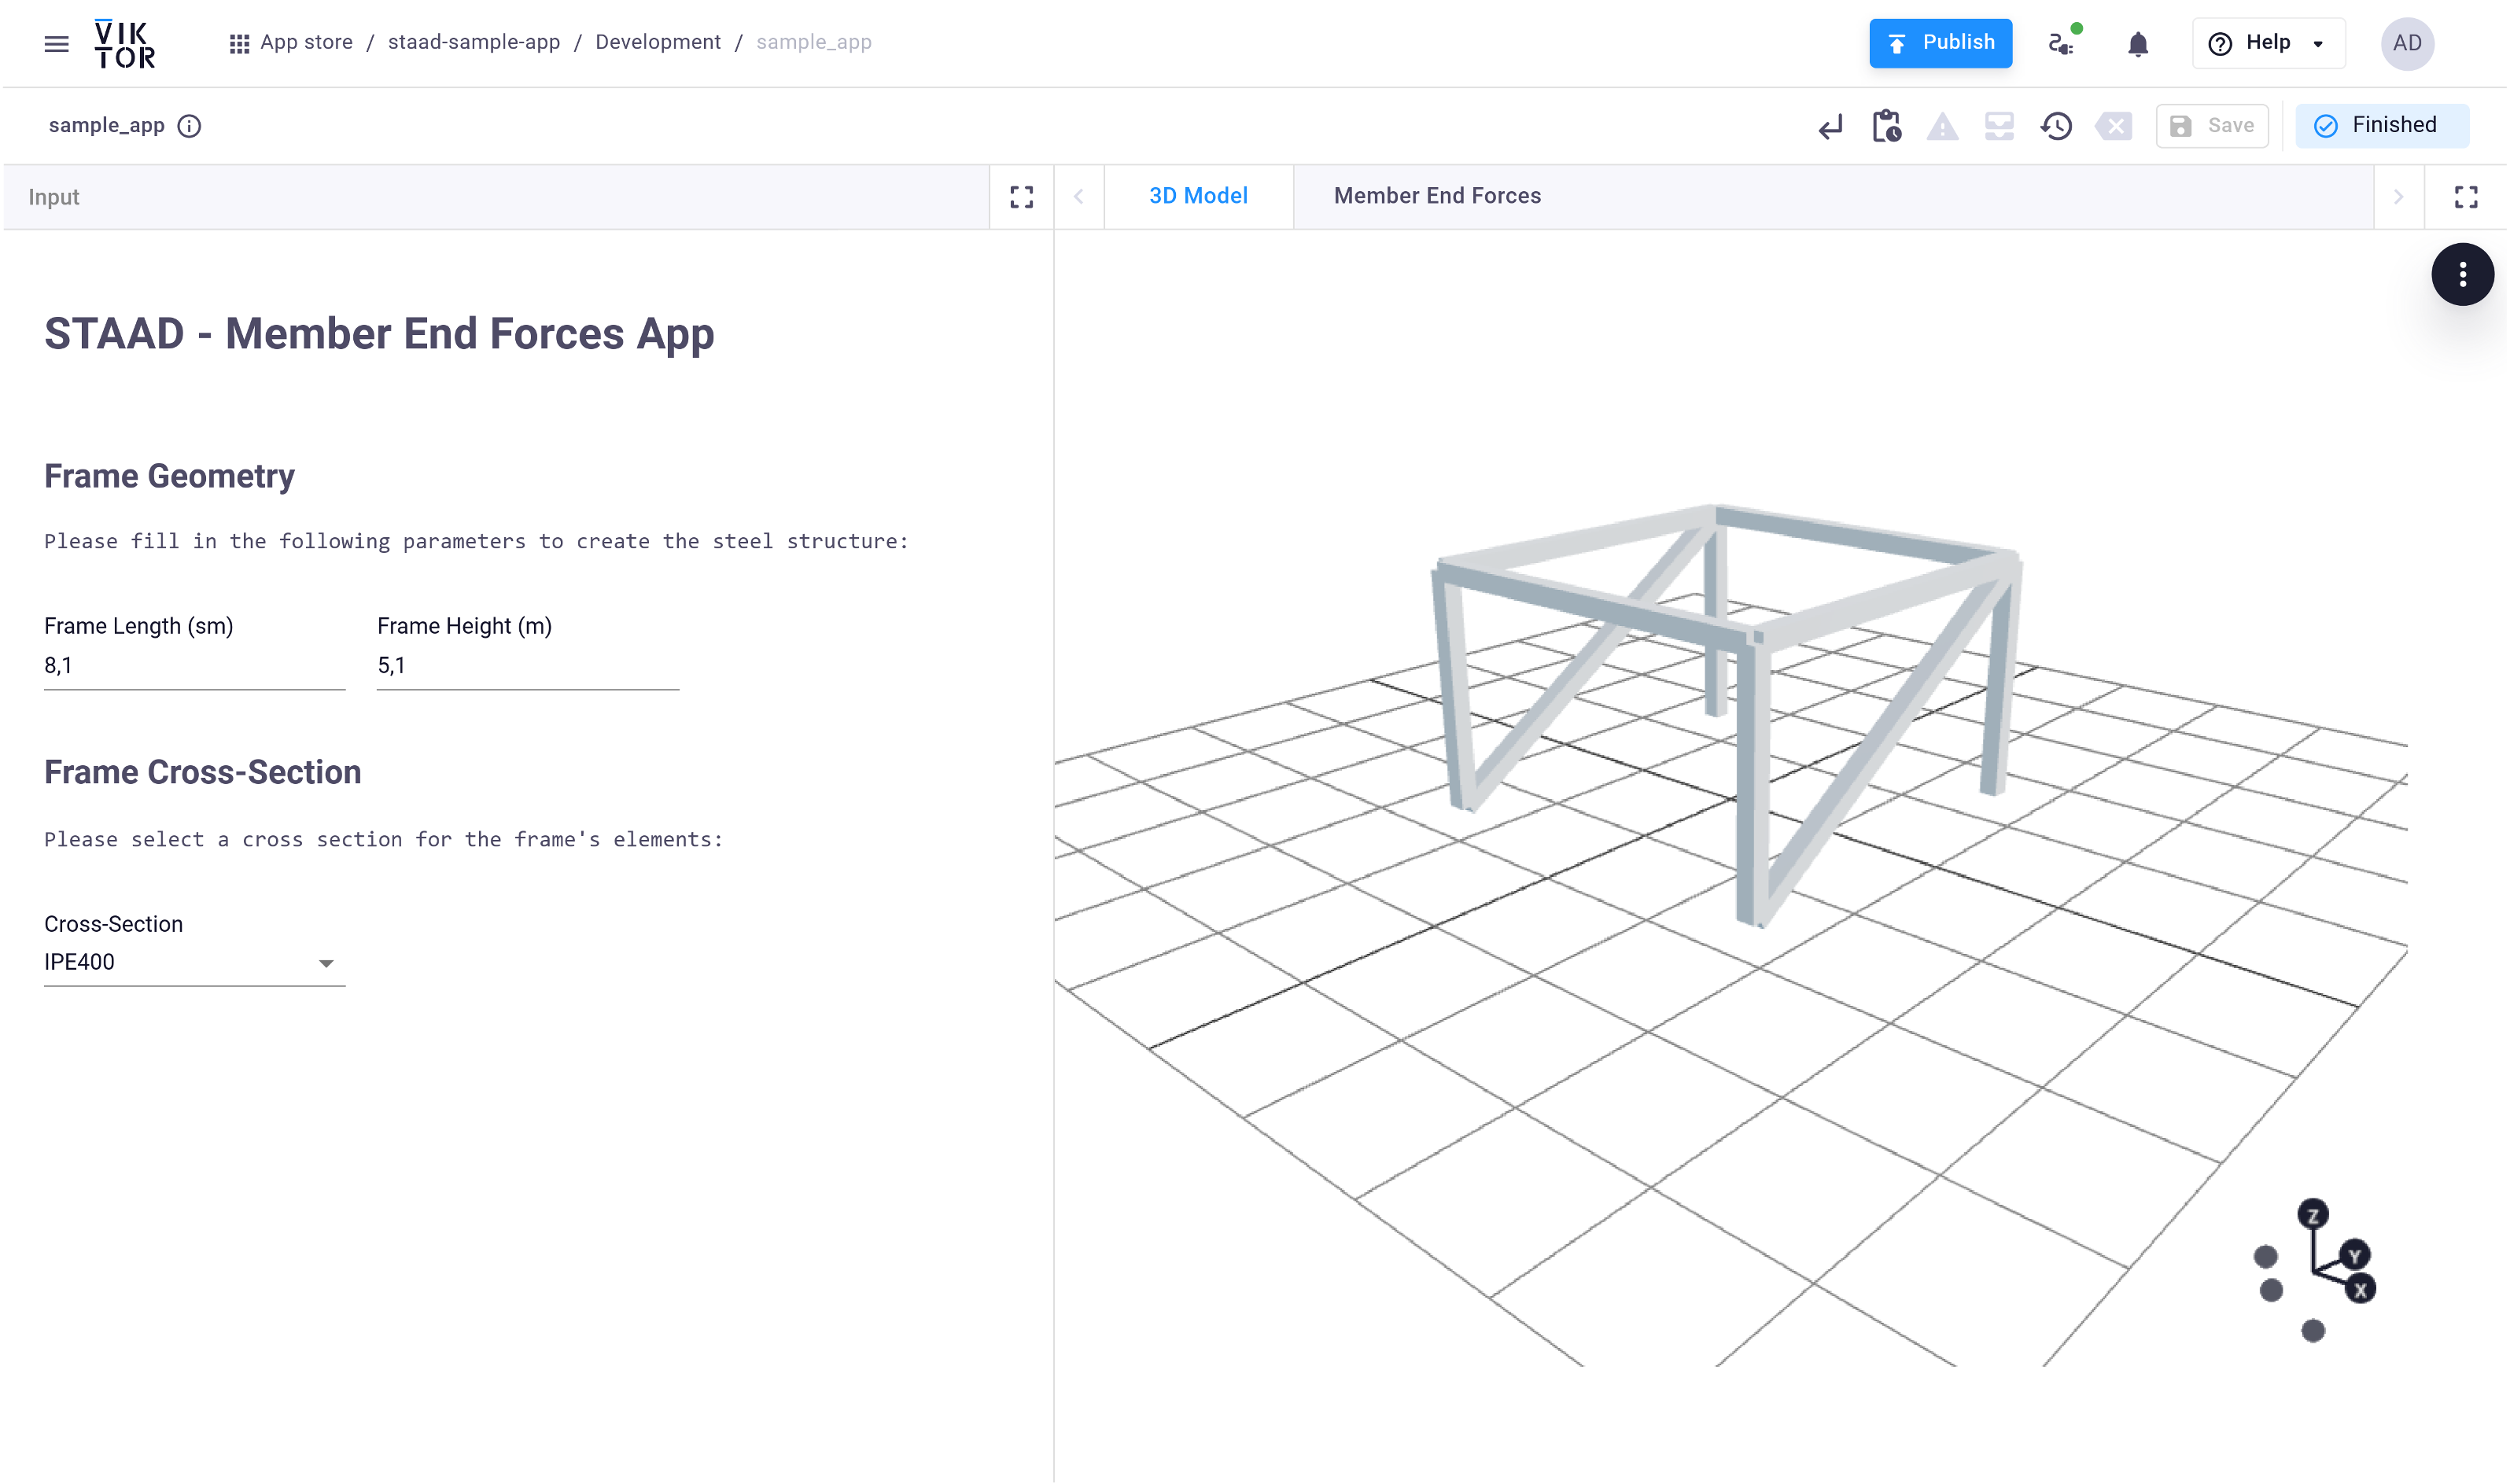
Here is a sneak peek at how the app will look:
Prerequisites and downloads
You have installed VIKTOR on your computer
You have some experience with reading Python code
You have some experience with STAAD.Pro
Before using the OpenSTAAD API in Python, ensure you have the official Bentley openstaadpy package installed in your main Python development environment. If it is not installed, you can add it using pip:
pip install git+https://github.com/BentleySystems/openstaadpy.git
Create a new VIKTOR app
Let's create, install and start an empty app. This will be the starting point for the rest of the tutorial. But before we start, make sure to shut down any app that is running (like the demo app) by closing the command-line shell (for example Powershell) or end the process using Ctrl + C.
Follow these steps to create, install and start an empty app:
-
Open a terminal and run the following command to create the app on the VIKTOR platform and generate the initial code locally:
viktor-cli create-app sample-staad-integration --init --app-type editor -
Open the newly created folder in your code editor and run
viktor-cli clean-startin the terminal to install dependencies and connect the app to the platform.
If all went well, your empty app is installed and connected to your development workspace. Do not close the terminal as this will break the connection with your app. The terminal in your code editor should show something like this:
INFO    : Connecting to cloud.viktor.ai...
INFO    : Connection is established (use Ctrl+C to close)
INFO    :
INFO    : Navigate to the link below to see your app in the browser
INFO    :     https://cloud.viktor.ai/workspaces/XXX/app
INFO    :
INFO    : App code loaded, waiting for jobs...
You only need to create an app template and install it once for each new app you want to make.
as long as you don't close the terminal or your code editor, the app will update automatically once you save code in app.py.
Did you close your code editor? Use viktor-cli start to start the app again. No need to install, clear, etc.
Configure the VIKTOR app
Before we start building the app logic, let's configure the viktor.config.toml file to declare the Python worker integration. Open the viktor.config.toml file in your project and make sure it includes the following configuration:
app_type = "editor"
python_version = "3.13"
registered_name = "sample-staad-integration"

worker_integrations = [
    "python",
]
The worker_integrations key tells VIKTOR that this app will use a Python worker to execute external scripts. This is essential for running STAAD.Pro analysis through the worker environment.
Let's define a simple frame
To create a basic steel structure, we use a parametric method by setting the frame's length and height as adjustable variables. The create_frame_data function defines the frame's topology through nodes and lines to represent its geometry. By modifying the length and height, we can produce various configurations of the frame.
In the following sections, we will demonstrate how this function integrates with the Controller class, activated when new inputs are provided by the Parametrization class. You can extend your app.py to look something like this:
import viktor as vkt
import json

def create_frame_data(length, height, cross_section="IPE400"):
    nodes = {
        1: {"node_id": 1, "x": 0, "z": 0, "y": 0},
        2: {"node_id": 2, "x": 0, "z": length, "y": 0},
        3: {"node_id": 3, "x": 0, "z": 0, "y": height},
        4: {"node_id": 4, "x": 0, "z": length, "y": height},
        5: {"node_id": 5, "x": length, "z": 0, "y": 0},
        6: {"node_id": 6, "x": length, "z": length, "y": 0},
        7: {"node_id": 7, "x": length, "z": 0, "y": height},
        8: {"node_id": 8, "x": length, "z": length, "y": height},
    }
    lines = {
        1: {"line_id": 1, "node_i": 1, "node_j": 3},
        2: {"line_id": 2, "node_i": 2, "node_j": 4},
        3: {"line_id": 3, "node_i": 3, "node_j": 4},
        4: {"line_id": 4, "node_i": 6, "node_j": 8},
        5: {"line_id": 5, "node_i": 5, "node_j": 7},
        6: {"line_id": 6, "node_i": 3, "node_j": 7},
        7: {"line_id": 7, "node_i": 4, "node_j": 8},
        8: {"line_id": 8, "node_i": 7, "node_j": 8},
        9: {"line_id": 9, "node_i": 1, "node_j": 4},
        10: {"line_id": 10, "node_i": 5, "node_j": 8},
    }
    return nodes, lines, cross_section

class Parametrization(vkt.Parametrization):
    pass

class Controller(vkt.Controller):
    parametrization = Parametrization
Let's create our 3D model
VIKTOR makes it easy to create various types of input fields for your application logic. You can use text fields, number fields, option fields, and many more to gather information from the user. You can find all available input components in the VIKTOR documentation. This range of components lets you build clear and structured user interfaces without complex coding.
The inputs defined in your Parametrization class are automatically available in the params object. You can retrieve a field's value, such as frame_length, by calling params.frame_length. This way, the parameter definitions stay decoupled from the rest of your logic, and you can easily access or modify the user input throughout your code.
Now that we have our input fields, components, and our function to create the structure's topology, the next step is to build a 3D model of the frame, as shown in the code below. For this, we also use a convenient component called GeometryView. You can find more information about working with 3D geometry in VIKTOR in the documentation.
import viktor as vkt
import json
from io import BytesIO
from pathlib import Path
from viktor.geometry import Point, Line, RectangularExtrusion

def create_frame_data(length, height, cross_section="IPE400"):
    ...

class Parametrization(vkt.Parametrization):
    intro = vkt.Text("# STAAD.Pro - Member End Forces App")
    inputs_title = vkt.Text("""## Frame Geometry
Fill in the following parameters to create the steel structure:"""
    )
    frame_length = vkt.NumberField("Frame Length", min=0.3, default=8, suffix="m")
    frame_height = vkt.NumberField("Frame Height", min=1, default=6, suffix="m")
    line_break = vkt.LineBreak()
    section_title = vkt.Text("""## Frame Cross-Section
Select a cross section for the frame elements:"""
    )
    cross_sect = vkt.OptionField(
        "Cross-Section", options=["IPE400", "IPE200"], default="IPE400"
    )


class Controller(vkt.Controller):
    parametrization = Parametrization

    @vkt.GeometryView("3D Model", duration_guess=1, x_axis_to_right=True)
    def create_render(self, params, **kwargs):
        nodes, lines, _ = create_frame_data(
            length=params.frame_length,
            height=params.frame_height,
            cross_section=params.cross_sect,
        )
        sections_group = []

        for line_id, line_data in lines.items():
            node_i = nodes[line_data["node_i"]]
            node_j = nodes[line_data["node_j"]]

            point_i = vkt.Point(node_i["x"], node_i["z"], node_i["y"])
            point_j = vkt.Point(node_j["x"], node_j["z"], node_j["y"])

            line = vkt.Line(point_i, point_j)
            section_size = float(params.cross_sect[3:]) / 1000
            section = vkt.RectangularExtrusion(
                section_size, section_size, line, identifier=str(line_id)
            )
            sections_group.append(section)

        return vkt.GeometryResult(geometry=sections_group)
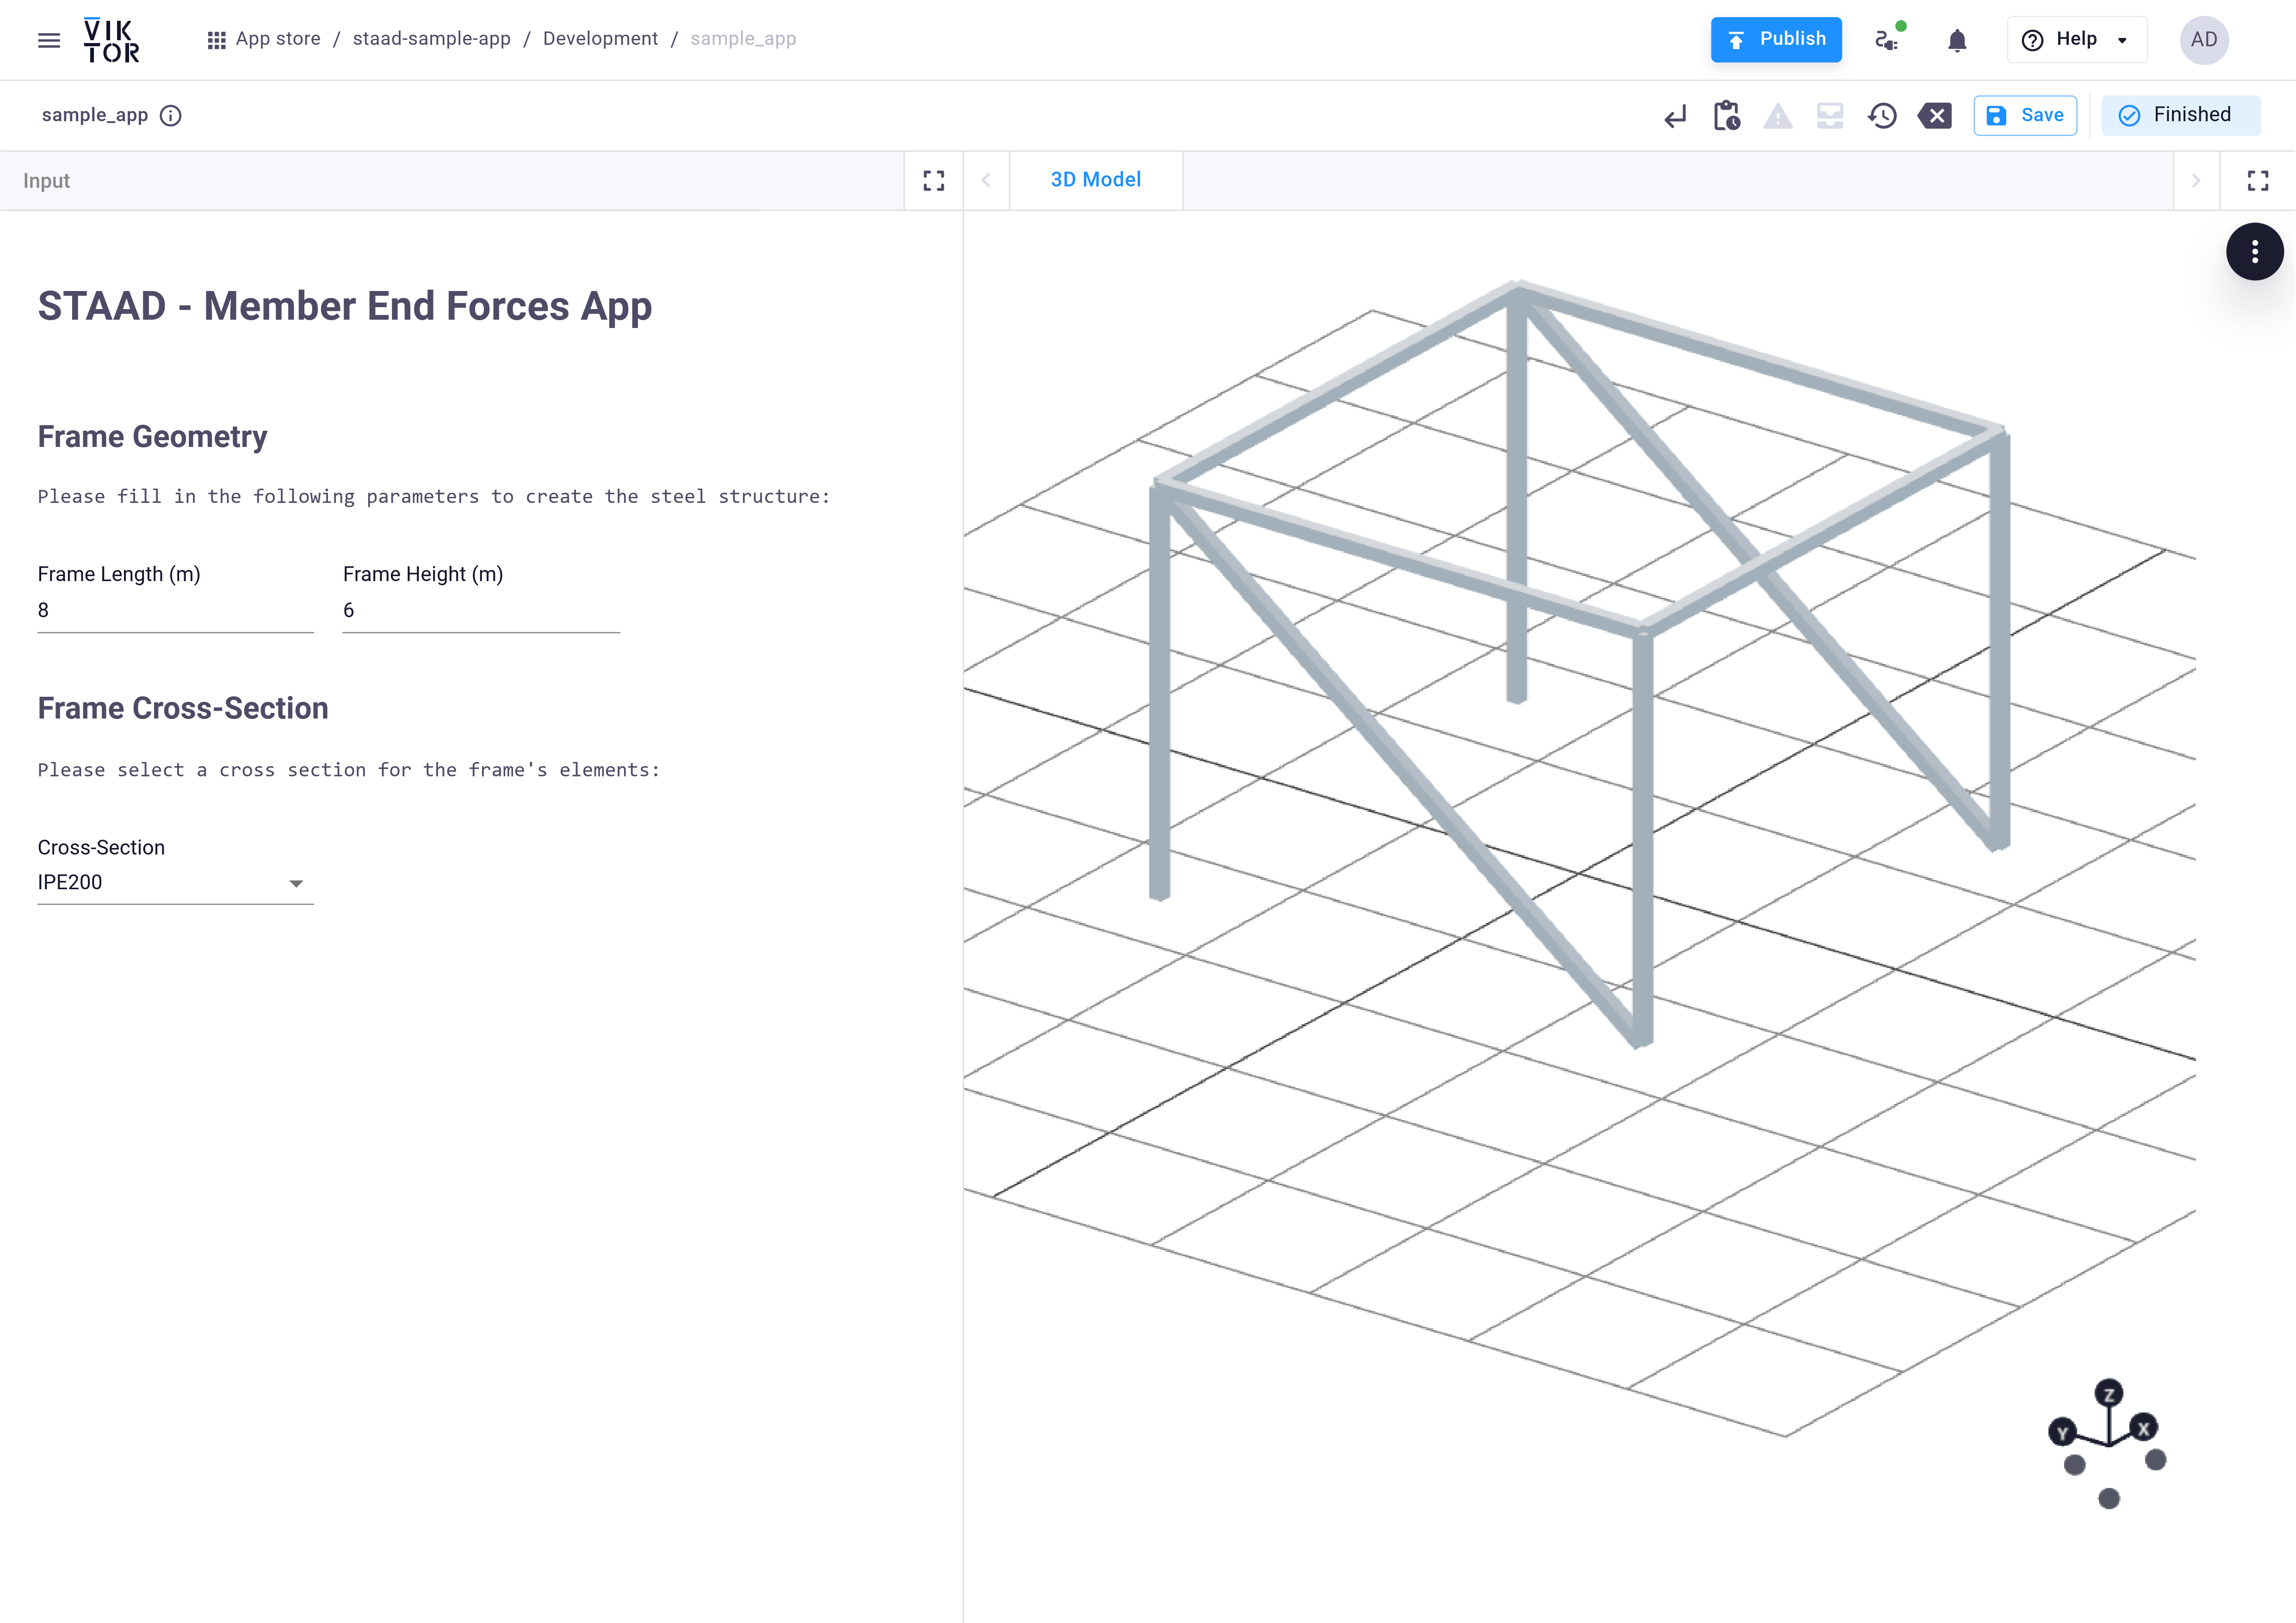
Great! You can now modify the frame's dimensions and select a different cross-section, and the model will update to reflect the new geometry. Your browser should display an app that looks like this:
Since you're here to learn how to integrate STAAD.Pro, let's move on and start using the OpenSTAAD API!
Working with OpenSTAAD in Python
Let's create a new Python file called run_staad_model.py in the same directory and add the run_staad function. This function contains the logic to create our STAAD.Pro model using Python. The first step is to initialize the program with subprocess and then connect to STAAD.Pro using the official Bentley openstaadpy package. Copy the snippet below, and make sure to update the staad_path to match your STAAD.Pro version. You can run this code in your Python environment, and it will launch STAAD.Pro and connect you to the OpenSTAAD API.
If STAAD.Pro is running on a remote server, the staad_path needs to match the STAAD.Pro location on the server where the worker is running.
For older STAAD.Pro versions (<2025), use the COM-based workflow with pywin32 and comtypes instead of openstaadpy. You can find a complete guide here.
import json
import subprocess
import time
from datetime import datetime
from pathlib import Path

from openstaadpy import os_analytical


def run_staad() -> None:
    # Replace with your version and file path.
    staad_path = Path(r"C:\Program Files\Bentley\Engineering\STAAD.Pro 2025\STAAD\Bentley.Staad.exe")
    if not staad_path.is_file():
        raise FileNotFoundError(f"STAAD.Pro executable was not found at: {staad_path}")

    # Launch STAAD.Pro
    staad_process = subprocess.Popen([str(staad_path)])
    print(f"Launching STAAD.Pro from: {staad_path}")
    time.sleep(30)

    # Connect to OpenSTAAD using openstaadpy
    staad = os_analytical.connect()
    staad.SetSilentMode(True)
Create the structure in STAAD.Pro
Next, let's extend the run_staad function to add nodes, beams, and supports. We'll load the nodes and lines geometry from the inputs.json file, then create the nodes and beams in STAAD.Pro, followed by defining the material properties and the cross-section for the frame. Here's how all this looks in code:
def run_staad() -> None:
    # Define constants for units and settings
    length_unit_meter = 4
    force_unit_kilonewton = 5
    section_table_european = 7

    # Launch STAAD.Pro and connect as before...

    # Load input data
    input_path = Path.cwd() / "inputs.json"
    with input_path.open(encoding="utf-8") as json_file:
        nodes, lines, section_name = json.load(json_file)

    # Convert node and line IDs to integers
    nodes = {int(node_id): values for node_id, values in nodes.items()}
    lines = {int(line_id): values for line_id, values in lines.items()}

    # Create a new STAAD file
    timestamp = datetime.now().strftime("%Y-%m-%d_%H-%M-%S")
    std_file_path = Path.cwd() / f"Structure_{timestamp}.std"
    staad.NewSTAADFile(str(std_file_path), length_unit_meter, force_unit_kilonewton)
    time.sleep(8)

    # Get geometry, property, support, and load objects
    geometry = staad.Geometry
    prop = staad.Property
    support = staad.Support
    load = staad.Load

    # Create nodes
    for node_id, coordinates in nodes.items():
        geometry.CreateNode(
            int(node_id),
            float(coordinates["x"]),
            float(coordinates["y"]),
            float(coordinates["z"])
        )

    # Create beams
    for line_id, line_data in lines.items():
        geometry.CreateBeam(
            int(line_id),
            int(line_data["node_i"]),
            int(line_data["node_j"])
        )

    # Create beam property from section table
    property_id = prop.CreateBeamPropertyFromTable(
        section_table_european, section_name, 0, 0.0, 0.0
    )

    member_ids = list(lines.keys())

    # Assign material and property to all members
    raw_property = prop._property
    raw_property.SetMaterialName("STEEL")

    for member_id in member_ids:
        raw_property.AssignBeamProperty(int(member_id), property_id)
        raw_property.AssignMaterialToMember("STEEL", int(member_id))

    # Create supports
    fixed_support_id = support.CreateSupportFixed()

    for node_id in [1, 2, 5, 6]:
        support._support.AssignSupportToNode(int(node_id), fixed_support_id)
Run the analysis
Now you can save the model and run the analysis. By default, we will create a load case that includes only the self-weight of the structure. After the analysis, we can extract the member end forces and save the results in a .json file to be used later in our VIKTOR app.
def run_staad():

    # Previous code...

    # Define constants
    self_weight_direction_global_y = 2
    results_local = 0
    start_end = 0
    final_end = 1

    # Create load case and add self-weight
    load_case = load.CreateNewPrimaryLoad("Self Weight")
    load.SetLoadActive(load_case)
    load.AddSelfWeightInXYZ(self_weight_direction_global_y, -1.0)

    # Update structure before analysis
    staad.UpdateStructure()
    time.sleep(2)

    # Run analysis
    staad.Command.PerformAnalysis(6)
    time.sleep(2)

    # Save model
    staad.SaveModel(True)
    time.sleep(2)

    # Start analysis
    staad.Analyze()

    # Wait for analysis to complete with timeout
    analysis_deadline = time.time() + 300

    while staad.IsAnalyzing():
        if time.time() > analysis_deadline:
            raise TimeoutError("STAAD.Pro analysis did not finish within the timeout.")

        print("...Analyzing")
        time.sleep(2)

    time.sleep(3)

    # Check analysis status
    analysis_status = staad.GetAnalysisStatus()
    print(f"Analysis status: {analysis_status}")

    if analysis_status["ReturnValue"] not in [2, 3]:
        raise RuntimeError(f"STAAD.Pro analysis did not complete successfully: {analysis_status}")

    time.sleep(3)

    # Extract results
    output = staad.Output

    # GetMemberEndForces returns FX, FY, FZ, MX, MY, and MZ (in order)
    end_forces = [
        output.GetMemberEndForces(int(line_id), final_end, int(load_case), results_local)
        for line_id in lines
    ]
    end_headers = [f"Beam:{lines[line_id]['line_id']}/Node:{lines[line_id]['node_j']}" for line_id in lines]

    # Retrieve start forces and headers
    start_forces = [
        output.GetMemberEndForces(int(line_id), start_end, int(load_case), results_local)
        for line_id in lines
    ]
    start_headers = [f"Beam:{lines[line_id]['line_id']}/Node:{lines[line_id]['node_i']}" for line_id in lines]

    # Combine forces and headers
    forces = end_forces + start_forces
    headers = end_headers + start_headers

    # Save to JSON file
    output_path = Path.cwd() / "output.json"
    with output_path.open("w", encoding="utf-8") as json_file:
        json.dump({"forces": forces, "headers": headers}, json_file)

    # Clean up
    staad.Quit()
    staad_process.terminate()

# Run the function
if __name__ == "__main__":
    run_staad()
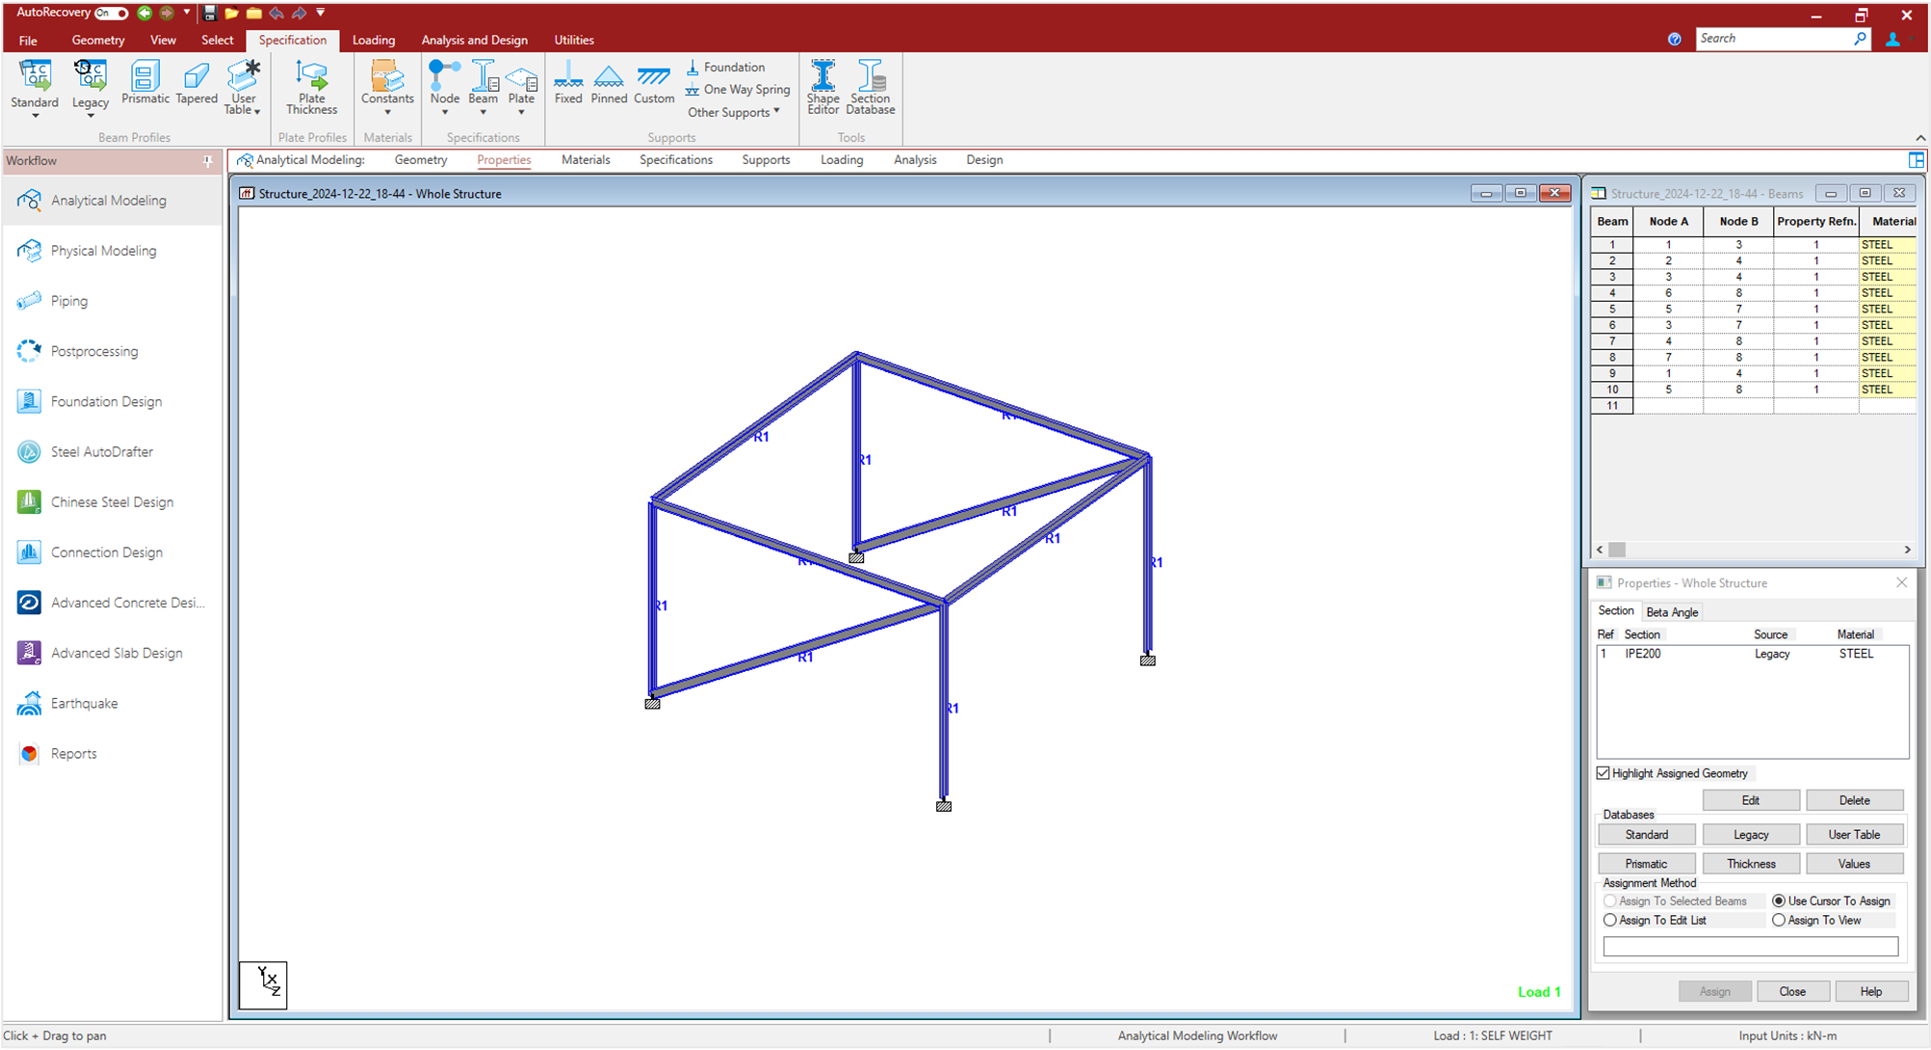
After running your run_staad_model.py in your Python environment, you should end up with a model like the following:
Let's Integrate the worker in our VIKTOR app
A worker is a simple program that lets you connect the app you have in the cloud to a server on which in this case STAAD.Pro and Python can run to execute scripts and analyses on models. Once we have a worker set up, we can connect our app! If you do not have access to a server with STAAD.Pro on it, do not worry, you can replicate this process on your local machine for the development of your applications.
The connection between VIKTOR and STAAD.Pro is managed by the generic worker. You can install the worker on your local machine to test the integration by following this guide.
Set up the worker environment
Before running the worker, make sure that the Python environment on your worker machine (local or remote) has the necessary dependencies installed. Install the openstaadpy package in your worker environment:
pip install git+https://github.com/BentleySystems/openstaadpy.git
Integrate the worker in the Controller
In the Controller of our VIKTOR app, we need to set up the communication with the worker. To call the worker, we use the PythonAnalysis class, which allows us to send inputs (files and objects) to the worker. In this example, we will send the inputs.json and run_staad_model.py to be executed in the Python environment set up for the worker. This environment can be on your own computer or a remote server. When run_staad_model.py is executed, it will generate the output.json file, and the worker will handle transferring this file from the server environment to our VIKTOR app. Here's how it looks in the code:
import json
from io import BytesIO
from pathlib import Path

from viktor.core import File
from viktor.external.python import PythonAnalysis


class Controller(vkt.Controller):

    # Previous code...

    @vkt.TableView("Member End Forces", duration_guess=10, update_label="Run STAAD.Pro Analysis")
    def run_staad(self, params, **kwargs):
        nodes, lines, cross_section = create_frame_data(
            length=params.frame_length,
            height=params.frame_height,
            cross_section=params.cross_sect,
        )
        input_json = json.dumps([nodes, lines, cross_section])
        script_path = Path(__file__).parent / "run_staad_model.py"

        staad_analysis = PythonAnalysis(
            script=File.from_path(script_path),
            files=[("inputs.json", BytesIO(input_json.encode("utf-8")))],
            output_filenames=["output.json"],
        )
        staad_analysis.execute(timeout=300)

        output_file = staad_analysis.get_output_file("output.json")
        output_raw = output_file.getvalue()

        if isinstance(output_raw, bytes):
            output_raw = output_raw.decode("utf-8")

        output = json.loads(output_raw)
        forces = [[round(force, 2) for force in row] for row in output["forces"]]

        return vkt.TableResult(
            forces,
            row_headers=output["headers"],
            column_headers=[
                "FX [kN]",
                "FY [kN]",
                "FZ [kN]",
                "MX [kN m]",
                "MY [kN m]",
                "MZ [kN m]",
            ],
        )
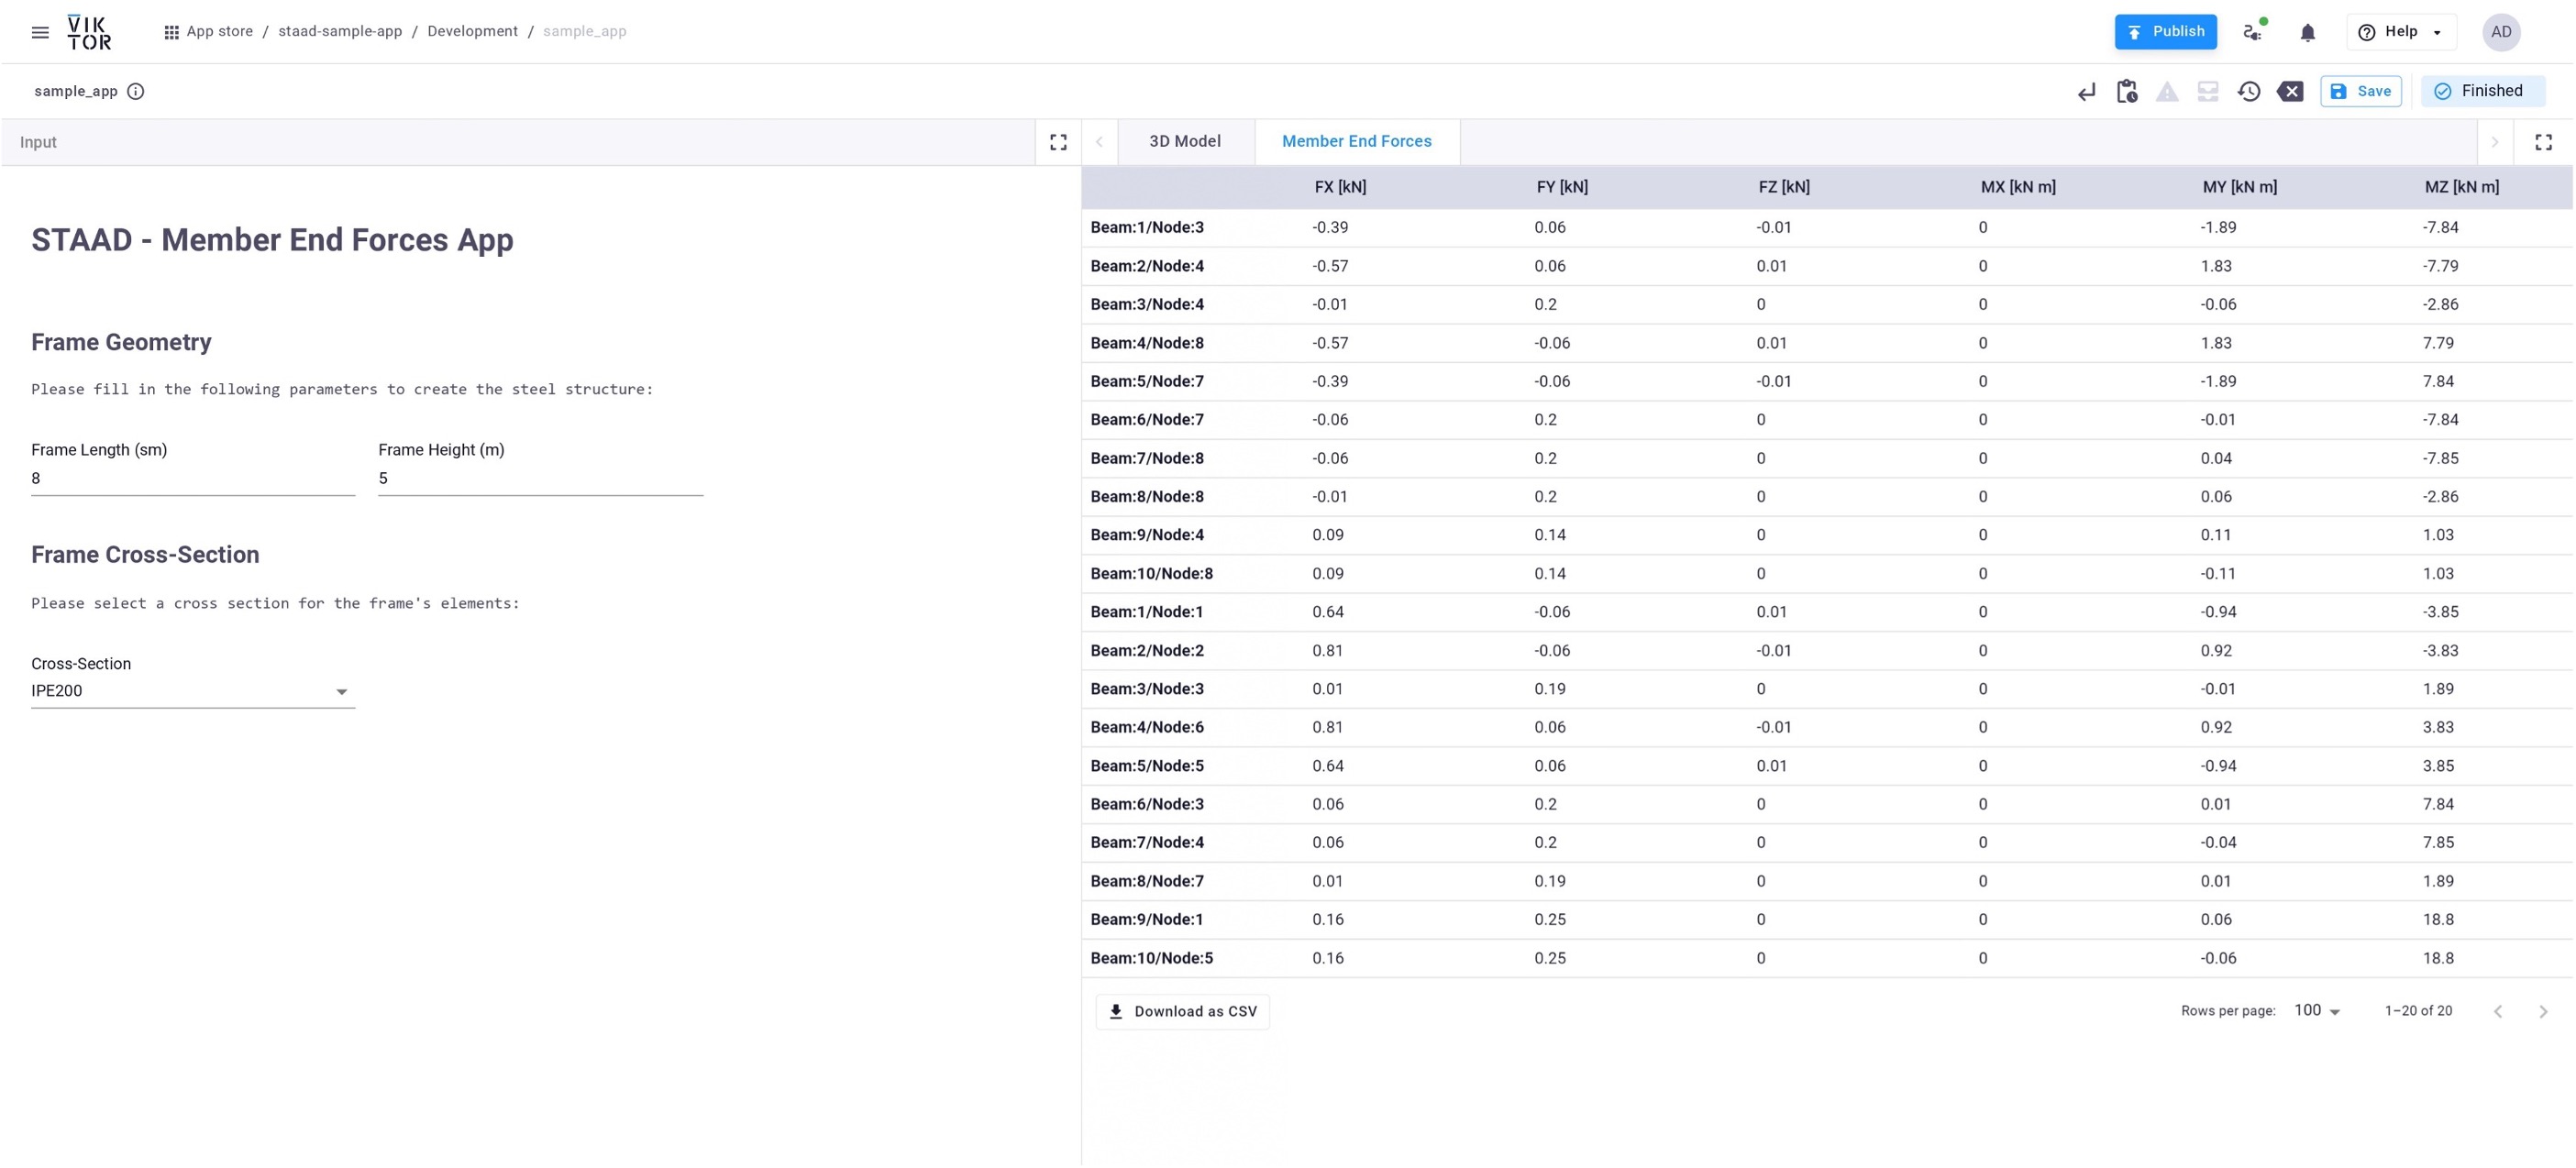
Now you're ready to test your app. Make sure your worker is running, then try generating the model. After the analysis, your app should look like this:
Would you like to see the complete code?
We have a convenient GitHub repository with the STAAD.Pro integration app. If you have a version of STAAD.Pro installed on your computer, you can try out the proof-of-concept app to get an idea of how such an app works and behaves.
Your turn to build
You now have everything you need to start building applications that integrate STAAD.Pro into your VIKTOR apps. You can also:
- Explore how to create and analyze transmission towers in STAAD.Pro (GitHub repo)
- Learn how to automate baseplate analysis in STAAD.Pro with Python (GitHub repo)
- Explore other integration tutorials to learn how to connect more structural or geotechnical software to your apps