Tutorial - Integrate ETABS and SAP2000
Estimated time: 55 minutes
Difficulty level: Intermediate

Introduction
ETABS and SAP2000 are two of the most commonly used software tools for structural engineering. They offer a range of features for modeling and design, along with a robust API that automates various workflows. In this tutorial, you will learn how to create a VIKTOR web app that integrates these tools behind the scenes. Although this tutorial is written specifically for ETABS, it can easily be modified to use SAP2000.
Here are the main sections we will cover:
- Create a new VIKTOR app.
- Create a simple parametric model.
- Calculate the reaction loads of your model.
- Display the reaction loads in your VIKTOR app.
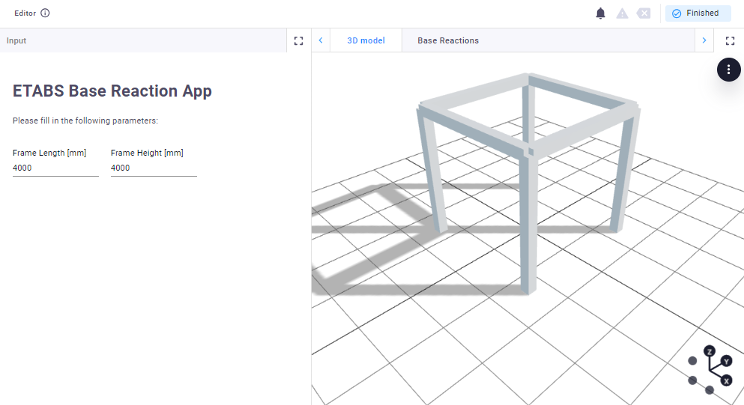
Here is a sneak peek at how the app will look:
Prerequisites and downloads
- You have installed VIKTOR
- You have some experience with reading Python code
- You have some experience with ETABS/SAP2000
Before using the ETABS API in Python, ensure you have pywin32 and comtypes installed in your Python environment. If they are not installed, you can add them using pip. Open Windows Powershell and run the following command:
pip install pywin32 comtypes
Create a new VIKTOR app
Let's create, install and start an empty app. This will be the starting point for the rest of the tutorial.
But before we start, make sure to shut down any app that is running (like the demo app) by closing the command-line shell
(for example Powershell) or end the process using Ctrl + C.
Follow these steps to create, install and start an empty app:
- Go to the App store in your VIKTOR environment to create a new app. After clicking 'Create app' choose the option 'Create blank app' and enter a name and description of your choice. Submit the form by clicking 'Create and setup'.
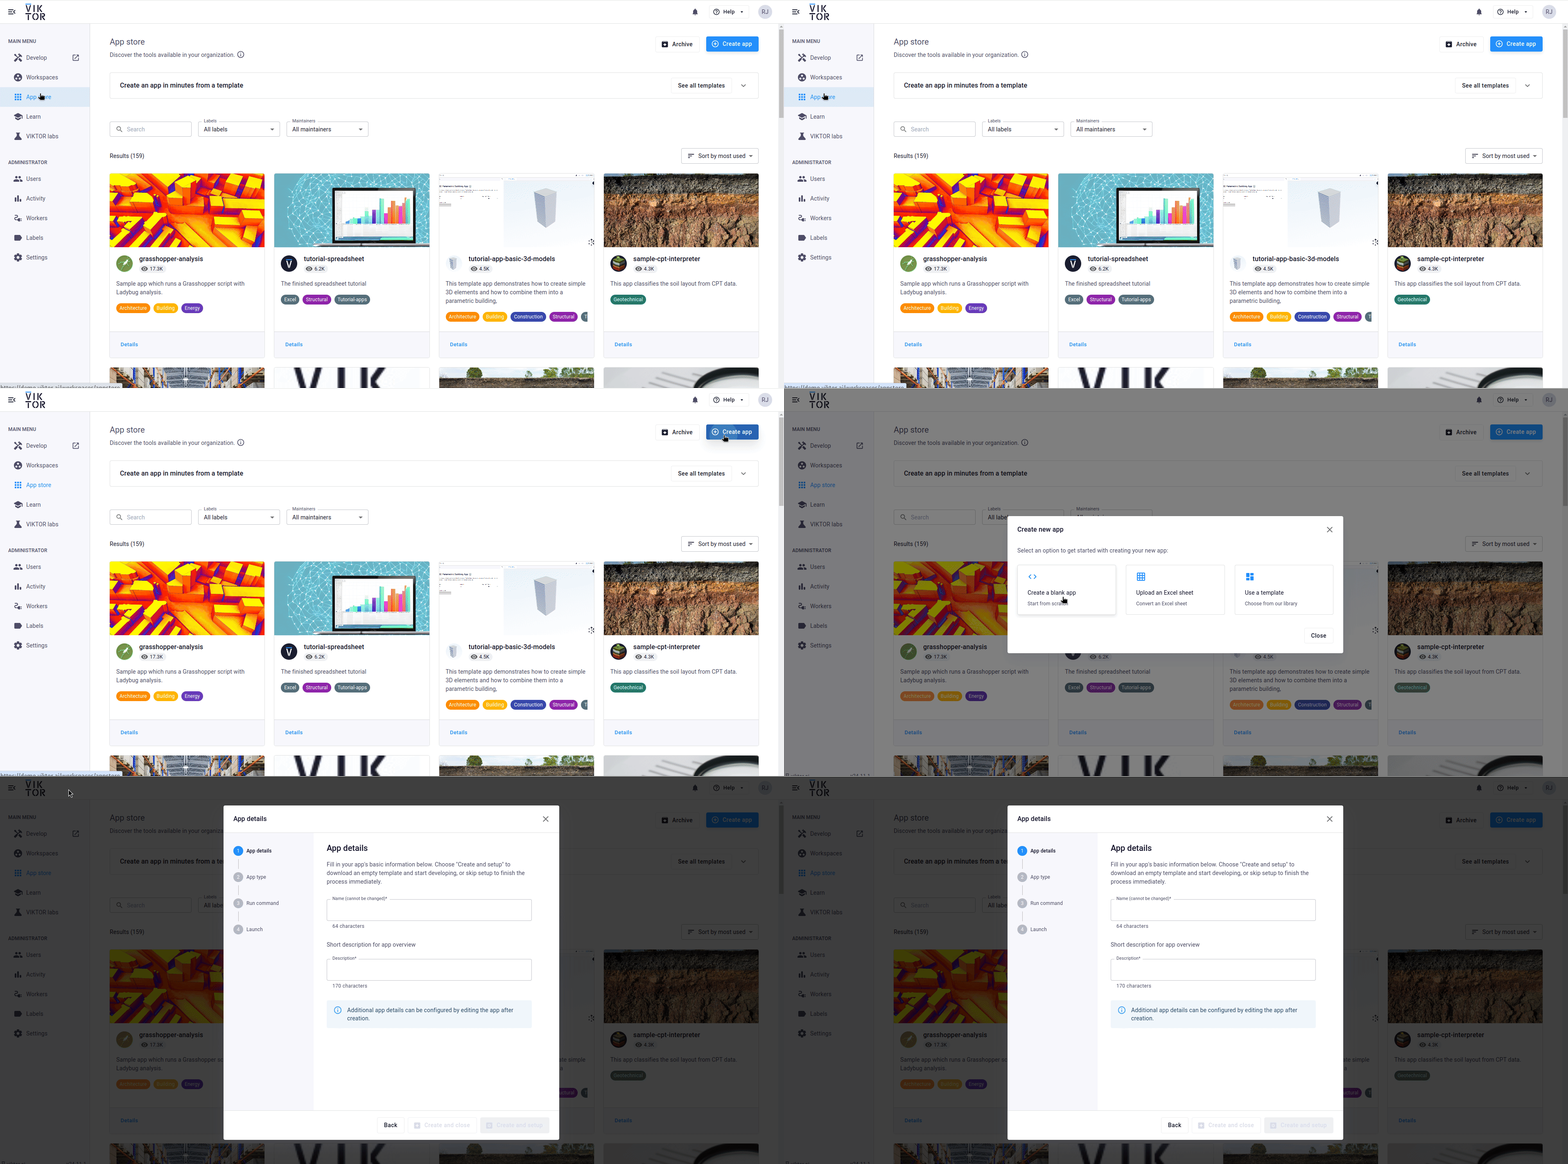
- Select 'Editor' as app type and click 'Next'.
- Now follow the instructions to run the
quickstartcommand to download the empty app template. After entering the command click 'I have run the command' to continue. The CLI will ask you to select your code editor of choice. Use the arrows and press enter to select a code editor. The app will now open in your code editor of choice.
If all went well, your empty app is installed and connected to your development workspace. Do not close the terminal as this will break the connection with your app. The terminal in your code editor should show something like this:
INFO    : Connecting to cloud.viktor.ai...
INFO    : Connection is established (use Ctrl+C to close)
INFO    :
INFO    : Navigate to the link below to see your app in the browser
INFO    :     https://cloud.viktor.ai/workspaces/XXX/app
INFO    :
INFO    : App code loaded, waiting for jobs...
- You only need create an app template and install it once for each new app you want to make.
- The app will update automatically once you start adding code in
app.py, as long as you don't close the terminal or your code editor. - Did you close your code editor? Use
viktor-cli startto start the app again. No need to install, clear, etc.
Let's define a simple structure
To generate a simple moment frame, we use a parametric approach by defining the frame's length and height as variables. The function create_frame_data creates the frame’s topology using nodes and lines to represent its geometry. This approach allows us to generate different configurations by adjusting the length and height values. Additionally, the geometry is saved to a json file each time the function is executed. In the next sections, we will show how this function is used within the Controller class, triggered when new inputs are defined in the Parametrization class. Take a moment to review the following code snippet before continuing with the tutorial.
import viktor as vkt
import json

def create_frame_data(length, height):
    nodes = {
        1:{"node_id": 1, "x": 0, "y": 0, "z": 0},
        2:{"node_id": 2, "x": 0, "y": length, "z": 0},
        3:{"node_id": 3, "x": 0, "y": 0, "z": height},
        4:{"node_id": 4, "x": 0, "y": length, "z": height},
        5:{"node_id": 5, "x": length, "y": 0, "z": 0},
        6:{"node_id": 6, "x": length, "y": length, "z": 0},
        7:{"node_id": 7, "x": length, "y": 0, "z": height},
        8:{"node_id": 8, "x": length, "y": length, "z": height},
    }
    lines = {
        1:{"line_id": 1, "node_i": 1, "node_j": 3},
        2:{"line_id": 2, "node_i": 2, "node_j": 4},
        3:{"line_id": 3, "node_i": 3, "node_j": 4},
        4:{"line_id": 4, "node_i": 6, "node_j": 8},
        5:{"line_id": 5, "node_i": 5, "node_j": 7},
        6:{"line_id": 6, "node_i": 3, "node_j": 7},
        7:{"line_id": 7, "node_i": 4, "node_j": 8},
        8:{"line_id": 8, "node_i": 7, "node_j": 8},
    }
    return nodes, lines


class Parametrization(vkt.Parametrization):
    pass


class Controller(vkt.Controller):
    parametrization = Parametrization
Let's create the 3D model
Now that we have a function to generate the topology of our structure, it's time to define the inputs in our Parametrization class and implement the logic to create a 3D model of the frame in a GeometryView. You can refer to the documentation for more details on how to work with 3D geometry in VIKTOR. The resulting code of your app is shown below:
import json

import viktor as vkt


def create_frame_data(length, height):
    nodes = {
        1:{"node_id": 1, "x": 0, "y": 0, "z": 0},
        2:{"node_id": 2, "x": 0, "y": length, "z": 0},
        3:{"node_id": 3, "x": 0, "y": 0, "z": height},
        4:{"node_id": 4, "x": 0, "y": length, "z": height},
        5:{"node_id": 5, "x": length, "y": 0, "z": 0},
        6:{"node_id": 6, "x": length, "y": length, "z": 0},
        7:{"node_id": 7, "x": length, "y": 0, "z": height},
        8:{"node_id": 8, "x": length, "y": length, "z": height},
    }
    lines = {
        1:{"line_id": 1, "node_i": 1, "node_j": 3},
        2:{"line_id": 2, "node_i": 2, "node_j": 4},
        3:{"line_id": 3, "node_i": 3, "node_j": 4},
        4:{"line_id": 4, "node_i": 6, "node_j": 8},
        5:{"line_id": 5, "node_i": 5, "node_j": 7},
        6:{"line_id": 6, "node_i": 3, "node_j": 7},
        7:{"line_id": 7, "node_i": 4, "node_j": 8},
        8:{"line_id": 8, "node_i": 7, "node_j": 8},
    }
    return nodes, lines

class Parametrization(vkt.Parametrization):
    intro = vkt.Text(""" # ETABS Base Reaction App

Please fill in the following parameters:
"""
    )

    frame_length = vkt.NumberField("Frame Length", min=100, default=4000, suffix="mm")
    frame_height = vkt.NumberField("Frame Height", min=100, default=4000, suffix="mm")


class Controller(vkt.Controller):
    parametrization = Parametrization

    @vkt.GeometryView("3D Model", duration_guess=1, x_axis_to_right=True)
    def create_render(self, params, **kwargs):
        nodes, lines = create_frame_data(length=params.frame_length, height=params.frame_height)
        sections_group = []

        for line_id, dict_vals in lines.items():
            node_id_i = dict_vals["node_i"]
            node_id_j = dict_vals["node_j"]

            node_i = nodes[node_id_i]
            node_j = nodes[node_id_j]

            point_i = vkt.Point(node_i["x"], node_i["y"], node_i["z"])
            point_j = vkt.Point(node_j["x"], node_j["y"], node_j["z"])

            line_k = vkt.Line(point_i, point_j)

            section_k = vkt.RectangularExtrusion(300, 300, line_k, identifier=str(line_id))
            sections_group.append(section_k)

        return vkt.GeometryResult(geometry=sections_group)
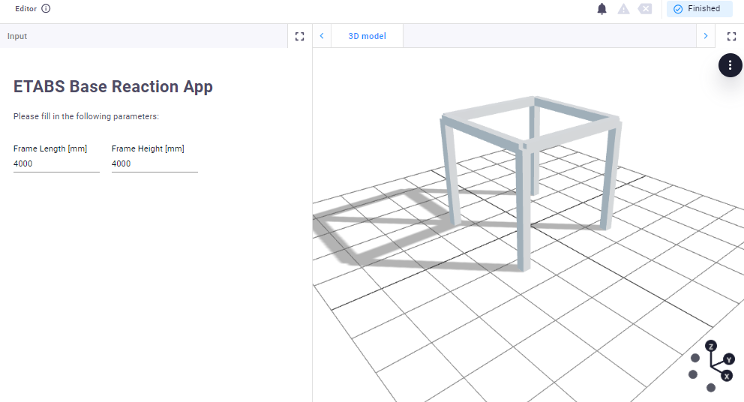
Great! Now, you can change the dimensions of your frame, and the model will render with the updated geometry. You should see an app like this in your browser:
However, since you're here to learn how to integrate ETABS or SAP2000, let's move on and start using the CSI API!
Hands on the ETABS API
Let's create a new Python file called run_etabs_model.py in the same directory and add a create_etabs_model function. This function contains the logic to create our ETABS model using Python. The first step is to initialize the program with comtypes. Copy the snippet below, and make sure to update the program_path to match your ETABS version. You can run this code in your Python environment, and it will open a blank ETABS model.
If ETABS is running on a remote server, the program_path needs to match the ETABS location on the server where the worker is running.
import comtypes.client
import pythoncom
import json
from pathlib import Path

def create_etabs_model():
    # Initialize ETABS model
    program_path=r"C:\Program Files\Computers and Structures\ETABS 22\ETABS.exe"
    pythoncom.CoInitialize()
    try:
        helper = comtypes.client.CreateObject("ETABSv1.Helper")
        helper = helper.QueryInterface(comtypes.gen.ETABSv1.cHelper)
        EtabsEngine = helper.CreateObject(program_path)
        EtabsEngine.ApplicationStart()
        EtabsObject = EtabsEngine.SapModel
        EtabsObject.InitializeNewModel(9)  # Set units to mm
        EtabsObject.File.NewBlank()
    finally:
        pythoncom.CoUninitialize()

if __name__ == "__main__":
    create_etabs_model()
Create the structure in ETABS
Next, let's extend the create_etabs_model function to add joints, members, and rigid supports. We'll load the nodes and lines geometry from the inputs.json file, then create the nodes and members in ETABS, followed by defining the material properties for the frame. Here's how all this looks in code:
def create_etabs_model():
    # Initialize ETABS model
    program_path=r"C:\Program Files\Computers and Structures\ETABS 22\ETABS.exe"
    pythoncom.CoInitialize()
    try:
        helper = comtypes.client.CreateObject("ETABSv1.Helper")
        helper = helper.QueryInterface(comtypes.gen.ETABSv1.cHelper)
        EtabsEngine = helper.CreateObject(program_path)
        EtabsEngine.ApplicationStart()
        EtabsObject = EtabsEngine.SapModel
        EtabsObject.InitializeNewModel(9)  # Set units to mm
        EtabsObject.File.NewBlank()
    finally:
        pythoncom.CoUninitialize()

    # Create joints
    input_json = Path.cwd() / "inputs.json" #only works when running python from the working directory!
    with open(input_json) as jsonfile:
        data = json.load(jsonfile)
    nodes, lines = data[:]

    # Create nodes
    for node_id, node in nodes.items():
        ret, _ = EtabsObject.PointObj.AddCartesian(
            node["x"], node["y"], node["z"], " ", str(node_id))
        )

    # Create members
    MATERIAL_CONCRETE = 2
    ret = EtabsObject.PropMaterial.SetMaterial("CONC", MATERIAL_CONCRETE)
    ret = EtabsObject.PropMaterial.SetMPIsotropic("CONC", 30000, 0.2, 0.0000055)
    section_name = "300x300 RC"
    ret = EtabsObject.PropFrame.SetRectangle(section_name, "CONC", 300, 300)
    for line_id, line in lines.items():
        point_i = line["node_i"]
        point_j = line["node_j"]
        ret, _ = EtabsObject.FrameObj.AddByPoint(
            str(point_i), str(point_j), str(line_id), section_name, "Global"
        )

    # Add rigid supports
    list_nodes = [1, 2, 5, 6]
    for node_id in list_nodes:
        ret = EtabsObject.PointObj.SetRestraint(str(node_id), [1, 1, 1, 1, 1, 1])

    EtabsObject.View.RefreshView(0, False)

if __name__ == "__main__":
    create_etabs_model()
Run the model
Now you can save the model and run the analysis. By default, ETABS creates a load case called Dead, which includes only the self-weight of the structure. After the analysis, we can extract the reaction loads and save the results in a .json file to be used later in our VIKTOR app.
def create_etabs_model():
    # Initialize ETABS model
    program_path=r"C:\Program Files\Computers and Structures\ETABS 22\ETABS.exe"
    pythoncom.CoInitialize()
    try:
        helper = comtypes.client.CreateObject("ETABSv1.Helper")
        helper = helper.QueryInterface(comtypes.gen.ETABSv1.cHelper)
        EtabsEngine = helper.CreateObject(program_path)
        EtabsEngine.ApplicationStart()
        EtabsObject = EtabsEngine.SapModel
        EtabsObject.InitializeNewModel(9)  # Set units to mm
        EtabsObject.File.NewBlank()
    finally:
        pythoncom.CoUninitialize()

    # Create joints
    input_json = Path.cwd() / "inputs.json" #only works when running python from the working directory!
    with open(input_json) as jsonfile:
        data = json.load(jsonfile)
    nodes, lines = data[:]

    # Create nodes
    for node_id, node in nodes.items():
        ret, _ = EtabsObject.PointObj.AddCartesian(
            node["x"], node["y"], node["z"], " ", str(node_id))
        )

    # Create members
    MATERIAL_CONCRETE = 2
    ret = EtabsObject.PropMaterial.SetMaterial("CONC", MATERIAL_CONCRETE)
    ret = EtabsObject.PropMaterial.SetMPIsotropic("CONC", 30000, 0.2, 0.0000055)
    section_name = "300x300 RC"
    ret = EtabsObject.PropFrame.SetRectangle(section_name, "CONC", 300, 300)
    for line_id, line in lines.items():
        point_i = line["node_i"]
        point_j = line["node_j"]
        ret, _ = EtabsObject.FrameObj.AddByPoint(
            str(point_i), str(point_j), str(line_id), section_name, "Global"
        )

    # Add rigid supports
    list_nodes = [1, 2, 5, 6]
    for node_id in list_nodes:
        ret = EtabsObject.PointObj.SetRestraint(str(node_id), [1, 1, 1, 1, 1, 1])

    EtabsObject.View.RefreshView(0, False)

    # Create the model and run the analysis
    file_path = Path.cwd() / "etabsmodel.edb"
    EtabsObject.File.Save(str(file_path))
    EtabsObject.Analyze.RunAnalysis()

    # Get the reaction loads
    load_case = "Dead"
    ret = EtabsObject.Results.Setup.DeselectAllCasesAndCombosForOutput()
    reactions_list = list()
    ret = EtabsObject.Results.Setup.SetCaseSelectedForOutput(load_case)
    for node in list_nodes:
        *_, U1, U2, U3, R1, R2, R3, ret = EtabsObject.Results.JointReact(
            str(node), 0, 0
        )
        reaction = {
            "Node": str(node),
            "LoadCase": load_case,
            "U1": U1[0],
            "U2": U2[0],
            "U3": U3[0],
            "R1": R1[0],
            "R2": R2[0],
            "R3": R3[0],
        }
        reactions_list.append(reaction)

    # Save the output in a JSON
    output = Path.cwd() / "output.json"
    with open(output, "w") as jsonfile:
        json.dump(reactions_list, jsonfile)

    ret = EtabsEngine.ApplicationExit(False)

    return ret

if __name__ == "__main__":
    create_etabs_model()
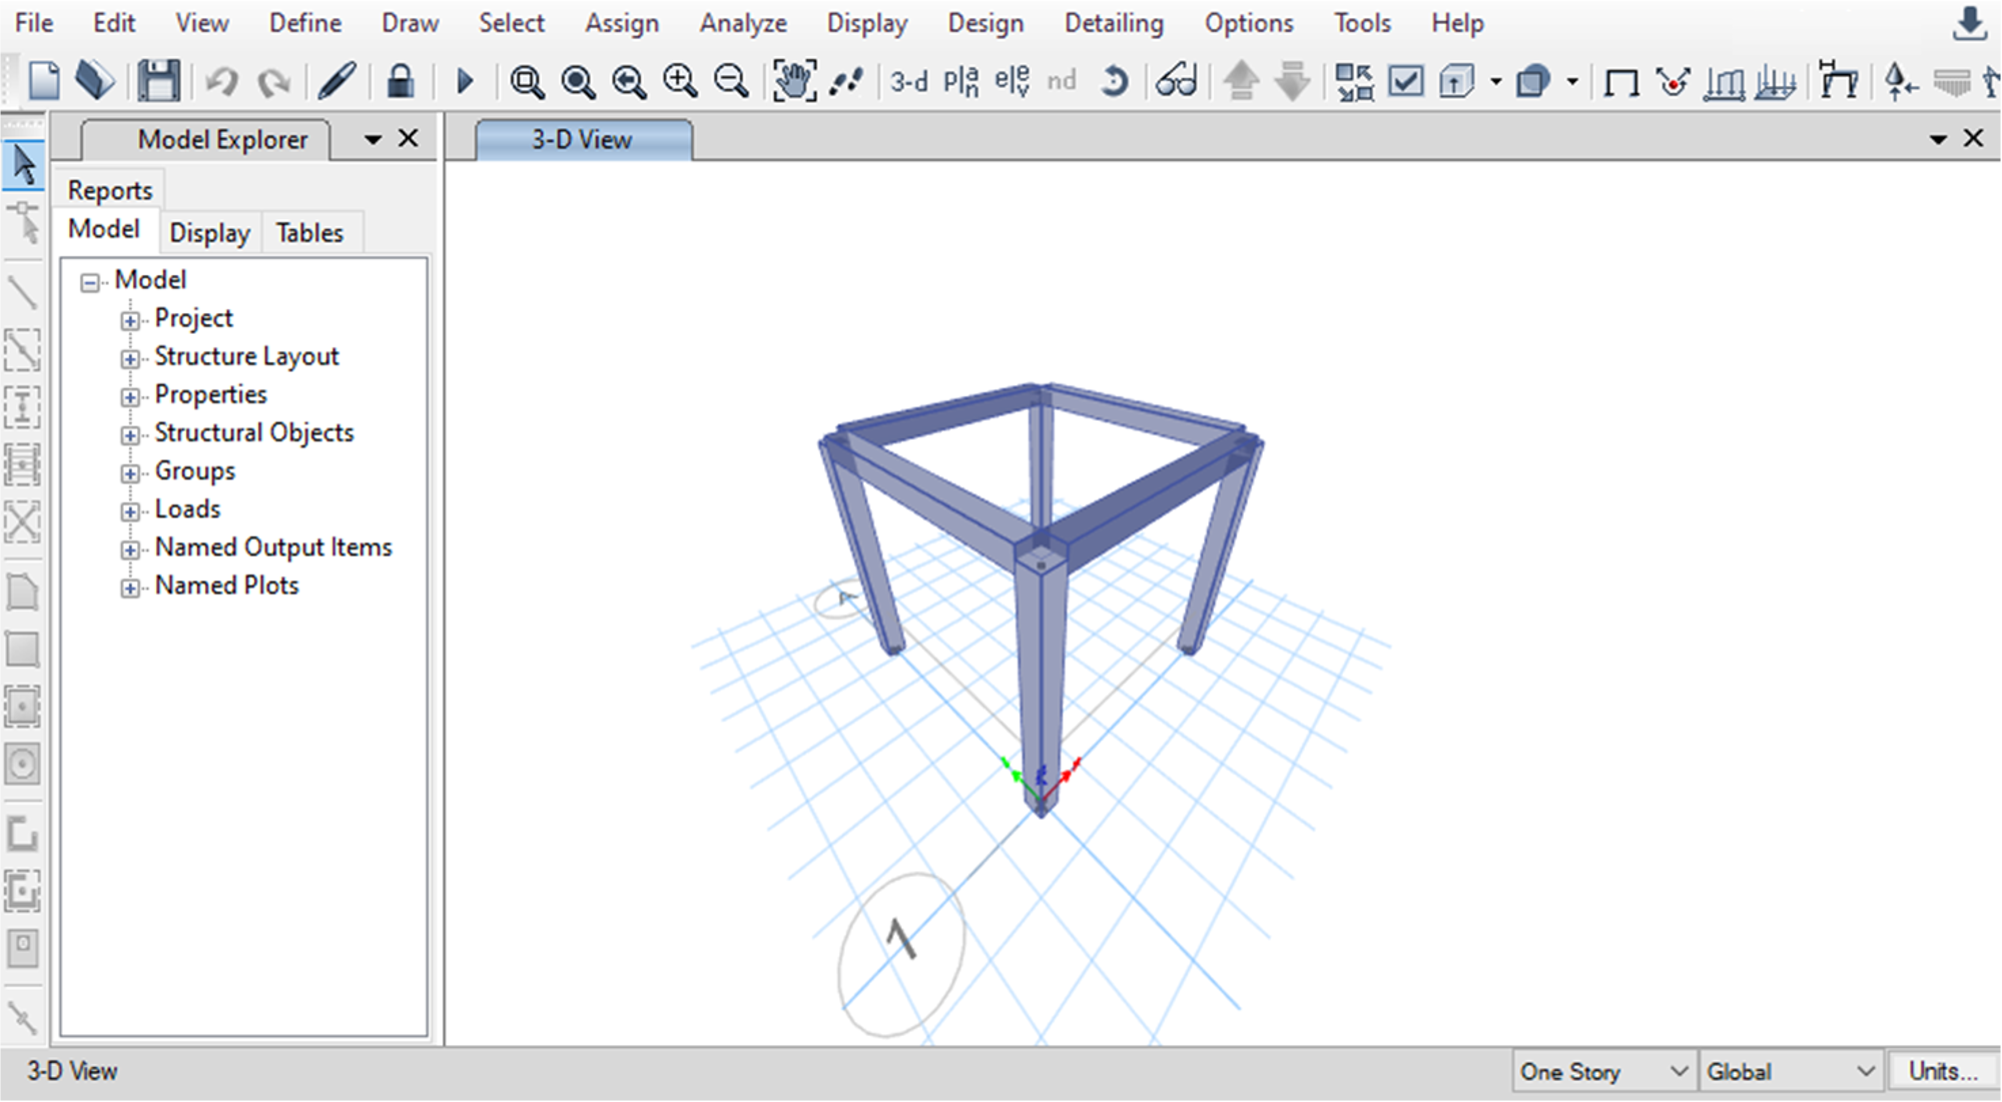
After running your run_etabs_model.py in your Python environment, you should end up with a model like the following:
How to connect your VIKTOR app with the CSI API?
The connection between VIKTOR and SAP2000 or ETABS is managed by a “worker.” A worker is a program that connects the VIKTOR platform to third-party software running outside the platform. You can install the worker on your local machine to test the integration by following this tutorial.
Let's integrate the worker in our VIKTOR app
In the Controller of our VIKTOR app, we need to set up the communication with the worker. To call the worker, we use the ETABSAnalysis class, which allows us to send inputs (files and objects) to the worker. In this example, we will send the inputs.json and run_etabs_model.py to be executed in the environment set up for the worker. This environment can be on your own computer or a remote server. When run_etabs_model.py is executed, it will generate the output.json file, and the worker will handle transferring this file from the server environment to our VIKTOR app. Here's how it looks in the code:
import json
from io import BytesIO
from pathlib import Path

import viktor as vkt


def create_frame_data(length, height):
    nodes = {
        1:{"node_id": 1, "x": 0, "y": 0, "z": 0},
        2:{"node_id": 2, "x": 0, "y": length, "z": 0},
        3:{"node_id": 3, "x": 0, "y": 0, "z": height},
        4:{"node_id": 4, "x": 0, "y": length, "z": height},
        5:{"node_id": 5, "x": length, "y": 0, "z": 0},
        6:{"node_id": 6, "x": length, "y": length, "z": 0},
        7:{"node_id": 7, "x": length, "y": 0, "z": height},
        8:{"node_id": 8, "x": length, "y": length, "z": height},
    }
    lines = {
        1:{"line_id": 1, "node_i": 1, "node_j": 3},
        2:{"line_id": 2, "node_i": 2, "node_j": 4},
        3:{"line_id": 3, "node_i": 3, "node_j": 4},
        4:{"line_id": 4, "node_i": 6, "node_j": 8},
        5:{"line_id": 5, "node_i": 5, "node_j": 7},
        6:{"line_id": 6, "node_i": 3, "node_j": 7},
        7:{"line_id": 7, "node_i": 4, "node_j": 8},
        8:{"line_id": 8, "node_i": 7, "node_j": 8},
    }
    return nodes, lines

class Parametrization(vkt.Parametrization):
    intro = vkt.Text(
        "# ETABS Base Reaction App"
        "\n\n Please fill in the following parameters:"
    )
    frame_length = vkt.NumberField("Frame Length", min=100, default=4000, suffix="mm")
    frame_height = vkt.NumberField("Frame Height", min=100, default=4000, suffix="mm")


class Controller(vkt.Controller):
    parametrization = Parametrization

    @vkt.GeometryView("3D Model", duration_guess=1, x_axis_to_right=True)
    def create_render(self, params, **kwargs):
        nodes, lines = create_frame_data(length=params.frame_length, height=params.frame_height)
        sections_group = []

        for line_id, dict_vals in lines.items():
            node_id_i = dict_vals["node_i"]
            node_id_j = dict_vals["node_j"]

            node_i = nodes[node_id_i]
            node_j = nodes[node_id_j]

            point_i = vkt.Point(node_i["x"], node_i["y"], node_i["z"])
            point_j = vkt.Point(node_j["x"], node_j["y"], node_j["z"])

            line_k = vkt.Line(point_i, point_j)

            section_k = vkt.RectangularExtrusion(300, 300, line_k, identifier=str(line_id))
            sections_group.append(section_k)

        return vkt.GeometryResult(geometry=sections_group)

    def run_etabs(self, params, **kwargs):
        nodes, lines = create_frame_data(length=params.frame_length, height= params.frame_height)
        input_json = json.dumps([nodes, lines])
        script_path = Path(__file__).parent / "run_etabs_model.py"

        files = [("inputs.json", BytesIO(bytes(input_json, 'utf8')))]
        etabs_analysis = vkt.etabs.ETABSAnalysis(
            script=vkt.File.from_path(script_path), files=files, output_filenames=["output.json"]
        )
        etabs_analysis.execute(timeout=300)
        output_file = etabs_analysis.get_output_file("output.json", as_file=True)
And of course, we would like to see the results in a nice table, so we will decorate the previous function with a TableView and post-process the results from the output.json file, as shown below:
import json
from io import BytesIO
from pathlib import Path

import viktor as vkt


def create_frame_data(length, height):
    nodes = {
        1:{"node_id": 1, "x": 0, "y": 0, "z": 0},
        2:{"node_id": 2, "x": 0, "y": length, "z": 0},
        3:{"node_id": 3, "x": 0, "y": 0, "z": height},
        4:{"node_id": 4, "x": 0, "y": length, "z": height},
        5:{"node_id": 5, "x": length, "y": 0, "z": 0},
        6:{"node_id": 6, "x": length, "y": length, "z": 0},
        7:{"node_id": 7, "x": length, "y": 0, "z": height},
        8:{"node_id": 8, "x": length, "y": length, "z": height},
    }
    lines = {
        1:{"line_id": 1, "node_i": 1, "node_j": 3},
        2:{"line_id": 2, "node_i": 2, "node_j": 4},
        3:{"line_id": 3, "node_i": 3, "node_j": 4},
        4:{"line_id": 4, "node_i": 6, "node_j": 8},
        5:{"line_id": 5, "node_i": 5, "node_j": 7},
        6:{"line_id": 6, "node_i": 3, "node_j": 7},
        7:{"line_id": 7, "node_i": 4, "node_j": 8},
        8:{"line_id": 8, "node_i": 7, "node_j": 8},
    }
    return nodes, lines

class Parametrization(vkt.Parametrization):
    intro = vkt.Text(
        "# ETABS Base Reaction App"
        "\n\n Please fill in the following parameters:"
    )
    frame_length = vkt.NumberField("Frame Length", min=100, default=4000, suffix="mm")
    frame_height = vkt.NumberField("Frame Height", min=100, default=4000, suffix="mm")


class Controller(vkt.Controller):
    parametrization = Parametrization

    @vkt.GeometryView("3D Model", duration_guess=1, x_axis_to_right=True)
    def create_render(self, params, **kwargs):
        nodes, lines = create_frame_data(length=params.frame_length, height=params.frame_height)
        sections_group = []

        for line_id, dict_vals in lines.items():
            node_id_i = dict_vals["node_i"]
            node_id_j = dict_vals["node_j"]

            node_i = nodes[node_id_i]
            node_j = nodes[node_id_j]

            point_i = vkt.Point(node_i["x"], node_i["y"], node_i["z"])
            point_j = vkt.Point(node_j["x"], node_j["y"], node_j["z"])

            line_k = vkt.Line(point_i, point_j)

            section_k = vkt.RectangularExtrusion(300, 300, line_k, identifier=str(line_id))
            sections_group.append(section_k)

        return vkt.GeometryResult(geometry=sections_group)

    @vkt.TableView("Base Reactions",duration_guess=10, update_label="Run ETABS analysis")
    def run_etabs(self, params, **kwargs):
        nodes, lines = create_frame_data(length=params.frame_length, height= params.frame_height)
        input_json = json.dumps([nodes, lines])
        script_path = Path(__file__).parent / "run_etabs_model.py"

        files = [("inputs.json", BytesIO(bytes(input_json, 'utf8')))]
        etabs_analysis = vkt.etabs.ETABSAnalysis(
            script=vkt.File.from_path(script_path), files=files, output_filenames=["output.json"]
        )
        etabs_analysis.execute(timeout=300)

        output_file = etabs_analysis.get_output_file("output.json", as_file=True)
        reactions = json.loads(output_file.getvalue())
        data = []
        for reaction in reactions:
            data.append([
                reaction.get("Node", 0),
                reaction.get("LoadCase", "Dead"),
                round(reaction.get("U1", 0), 0),
                round(reaction.get("U2", 0), 0),
                round(reaction.get("U3", 0), 0)
            ])
        return vkt.TableResult(
            data,
            row_headers=["Sup 1","Sup 2","Sup 3","Sup 4"],
            column_headers=["Node", "Load Case","U1[N]", "U2[N]", "U3[N]"],
        )
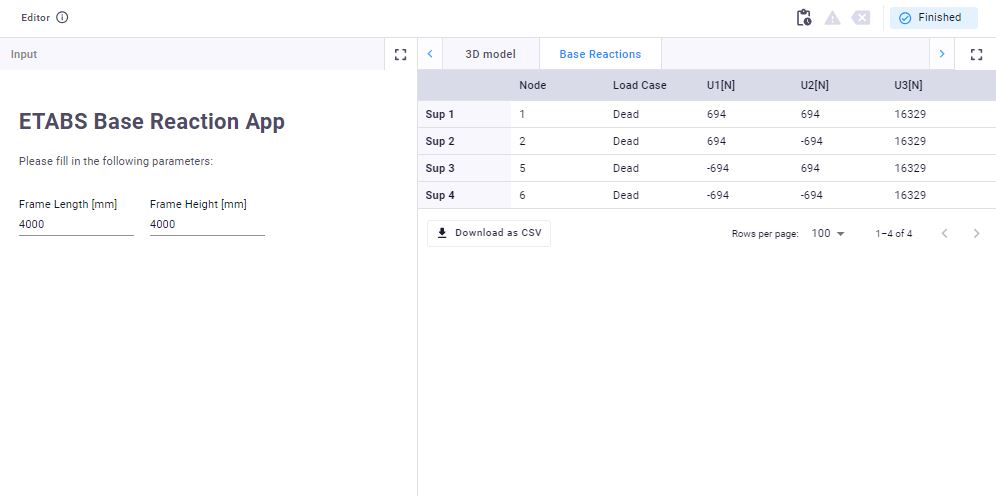
Now you're ready to test your app. Make sure your worker is running and connected to your VIKTOR workspace, then try generating the model. After the analysis, your app should look like this:
What about SAP2000?
You can integrate SAP2000 in the same way we did for ETABS. All you need to do is change the program path and the helper, as shown below.
import pythoncom
import comtypes.client

def initialize_sap2000(
    program_path=r"C:\Program Files\Computers and Structures\SAP2000 25\SAP2000.exe",
):
    pythoncom.CoInitialize()
    try:
        helper = comtypes.client.CreateObject("SAP2000v1.Helper")
        helper = helper.QueryInterface(comtypes.gen.SAP2000v1.cHelper)
        SapEngine = helper.CreateObject(program_path)
        SapEngine.ApplicationStart()
        SapObject = SapEngine.SapModel
        SapObject.InitializeNewModel()
        SapObject.File.NewBlank()
        return SapObject, SapEngine
    finally:
        pythoncom.CoUninitialize()
Your turn to build
You now have everything you need to start building powerful applications that integrate ETABS and SAP2000 into your VIKTOR apps. But the journey doesn’t end here, you can explore our other tutorials or try integrating your own ETABS or SAP2000 model.
