Microsoft
Microsoft services such as SharePoint, OneDrive, and other resources exposed through the Microsoft Graph API can be integrated with VIKTOR using the OAuth 2.0 workflow for token based authentication and authorization. Authentication is handled by Microsoft Entra ID (formerly Azure Active Directory). A general introduction to OAuth 2.0 can be found here.
This guide uses SharePoint as the running example, but the same setup applies to any Microsoft Graph resource. You only need to adjust the scopes and the endpoints your app calls.
Prerequisites
To create this integration you need:
- A Microsoft Entra ID tenant and an account that is allowed to register applications in the Microsoft Entra admin center (or the Azure portal). Registering apps or granting admin consent for tenant-wide permissions typically requires an administrator.
- Access to the SharePoint sites (or other Microsoft resources) you want to read from, with the account that will log in to the app.
This tutorial registers a Microsoft Web application because VIKTOR's OAuth2Integration expects a confidential client with a client_id, client_secret, and a redirect callback.
Registering an application in Microsoft Entra
Open the Microsoft Entra admin center and go to Identity > Applications > App registrations > New registration. This application acts as the bridge between VIKTOR and your Microsoft tenant, allowing secure data exchange through OAuth 2.0.
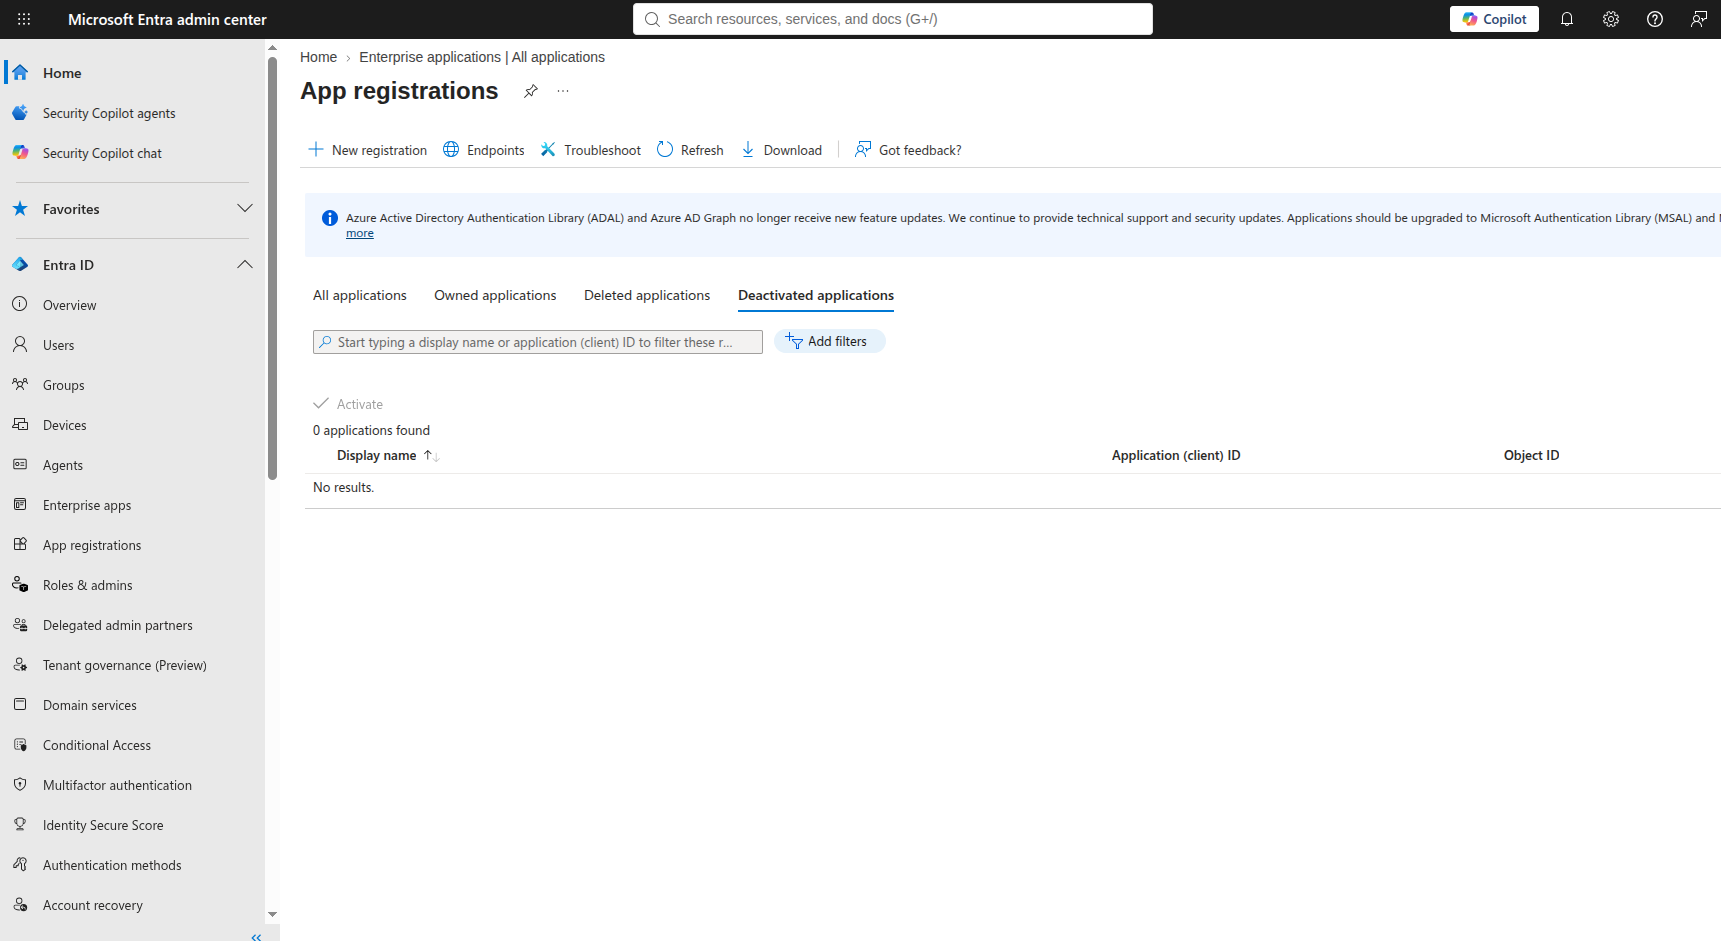
Configure the registration as follows:
-
Name: choose a descriptive name, for example
viktor-sharepoint-integration. -
Supported account types: select Accounts in this organizational directory only for a single tenant. Choose a multi-tenant option only if you explicitly need to support external tenants.
-
Redirect URI: set the platform to Web and add your VIKTOR callback URL:
<your-viktor-environment-url>/api/integrations/oauth2/callback/Your environment URL should be
https://cloud.viktor.ai/or similar, depending on your organization. For example, if your VIKTOR environment is hosted atdemo.viktor.ai, your redirect URI should be:https://demo.viktor.ai/api/integrations/oauth2/callback/NoteThe redirect URI must match your VIKTOR environment URL exactly, otherwise the integration will fail.
After registering, note the following values from the application Overview page:
- Application (client) ID
- Directory (tenant) ID (used to build the authentication and token URLs)
Adding API permissions
Go to API permissions > Add a permission > Microsoft Graph > Delegated permissions, and add the permissions your app needs. For browsing SharePoint sites and reading files, add:
User.ReadSites.Read.AllFiles.Read.All
Add offline_access as well if you want refresh-token support so the user does not have to log in again as often.
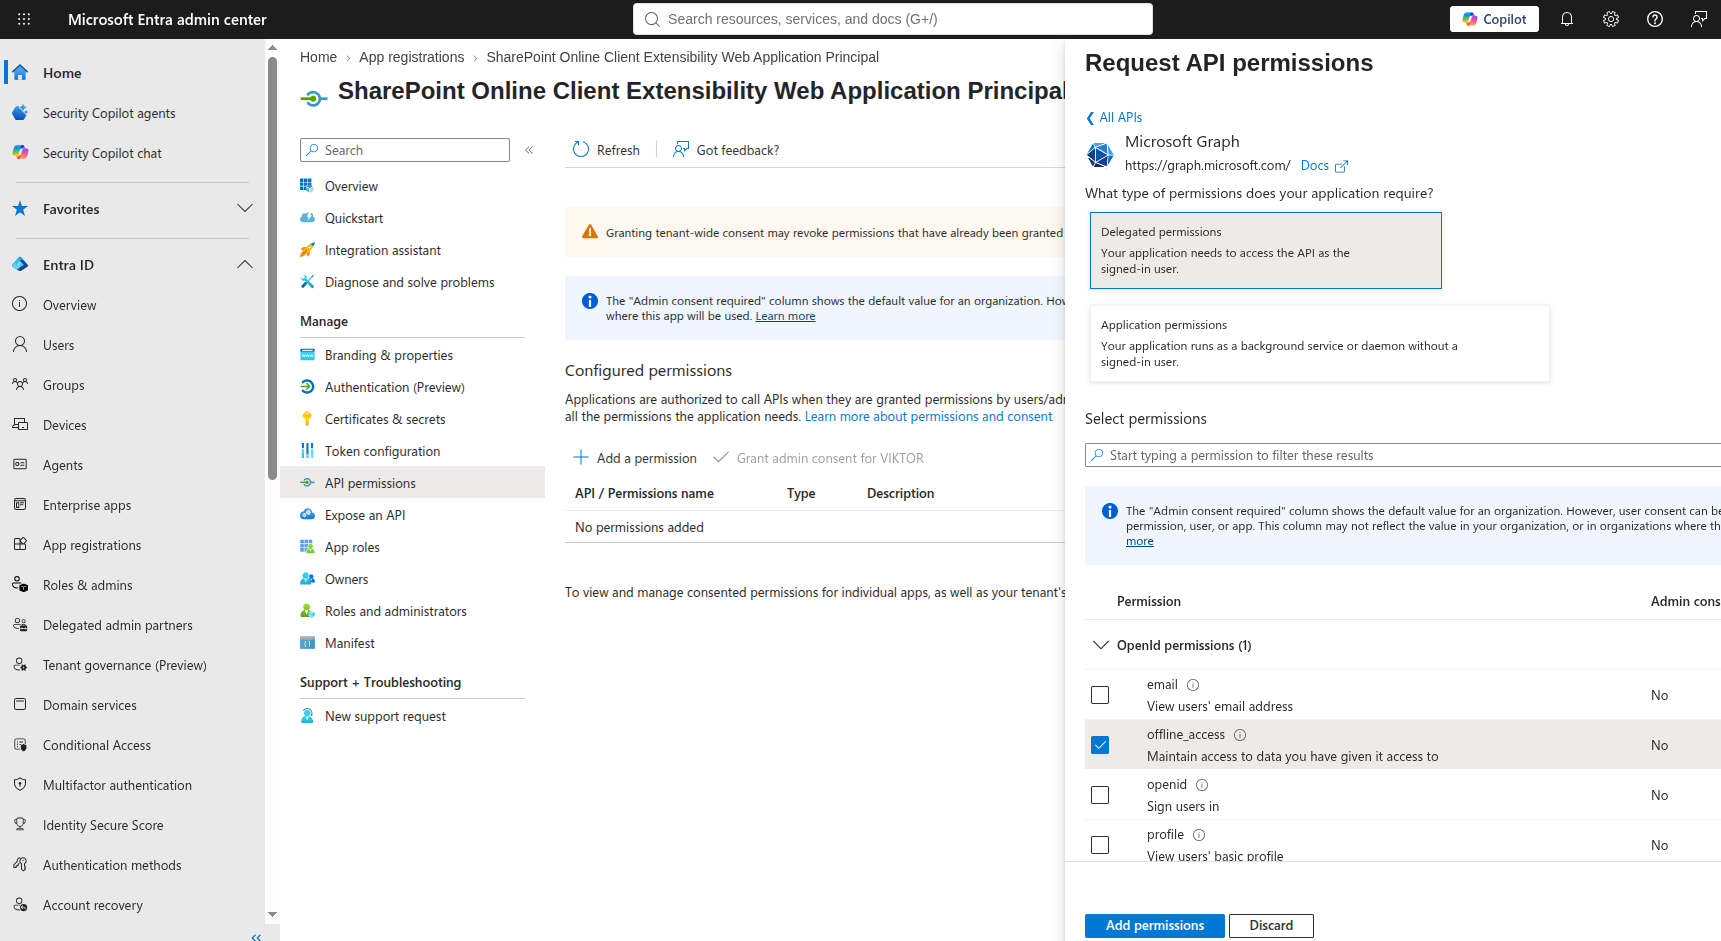
Which permissions you need depends on what the app does:
| What the app does | Delegated permissions to add |
|---|---|
| Sign in and read the user profile | User.Read |
| Browse SharePoint sites and read files | Sites.Read.All, Files.Read.All |
| Upload, replace, or delete SharePoint files | Sites.ReadWrite.All, Files.ReadWrite.All |
| Send email as the logged-in user | Mail.Send |
The write permissions include the read permissions, so you do not need to add both Files.Read.All and
Files.ReadWrite.All.
Use the minimum permissions required for your application to function. For example, if your app only reads data, do not request write permissions. This limits the impact in case of misuse.
Some permissions require admin consent. If the Status column shows that consent is required, an administrator must click Grant admin consent for <tenant>.
Creating a client secret
Go to Certificates & secrets > Client secrets > New client secret. Add a description and an expiration period, then create the secret.
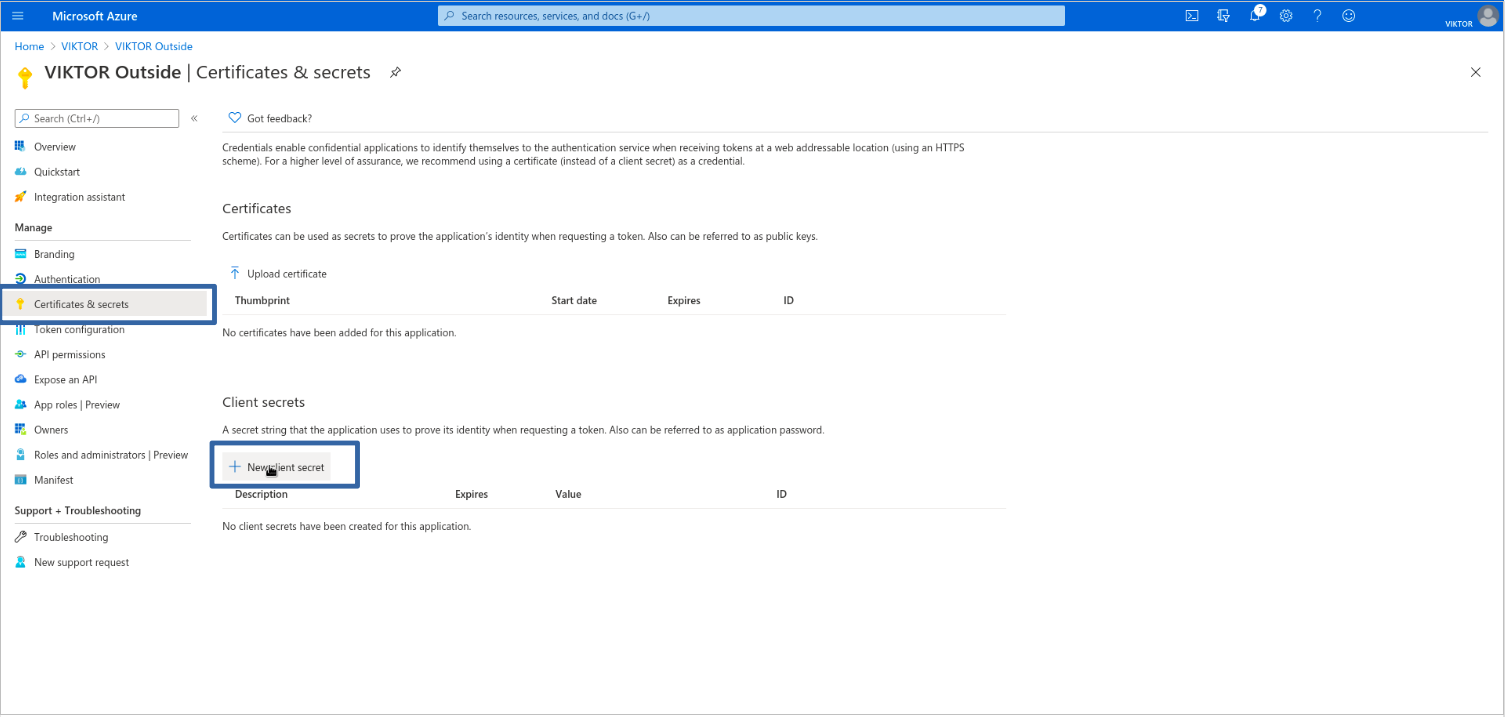
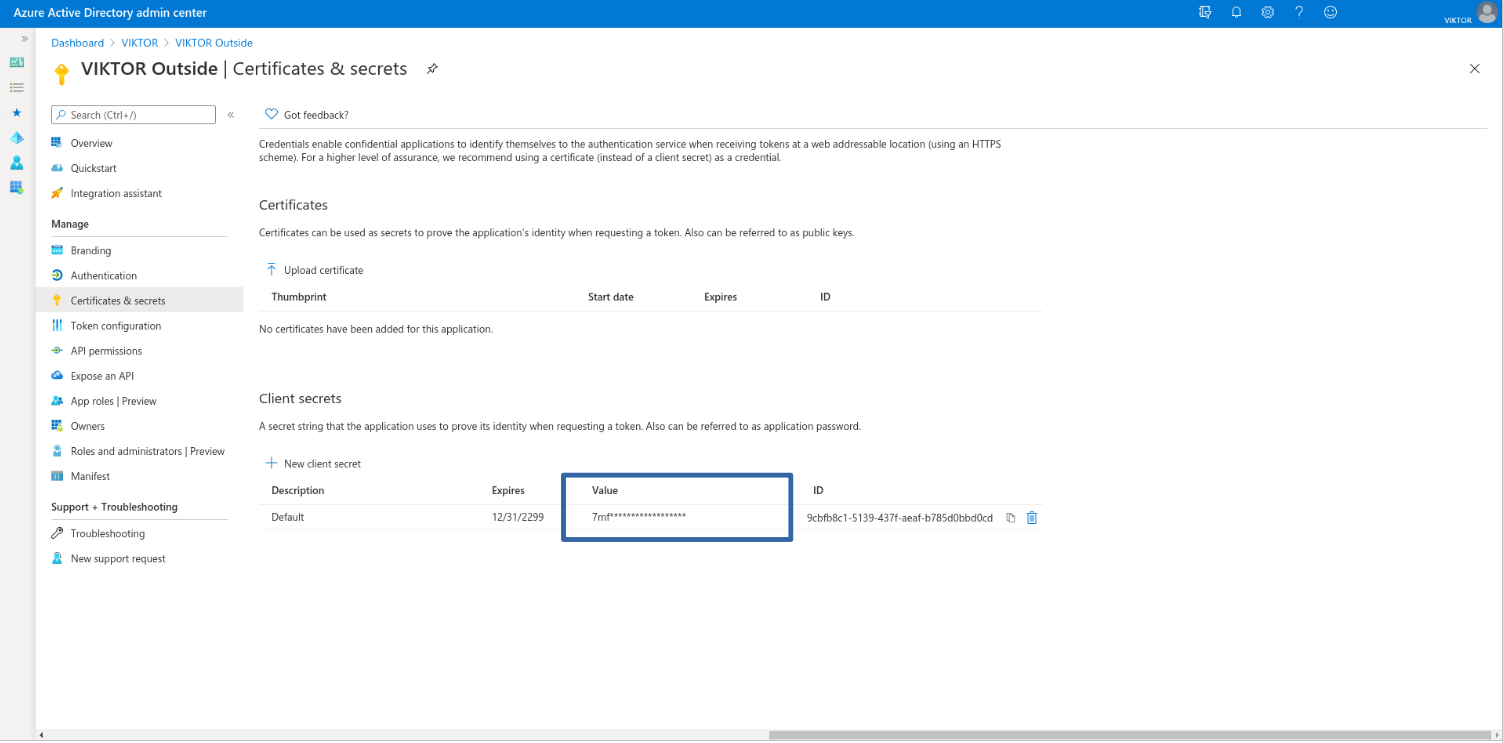
Copy the client secret Value (not the Secret ID) immediately. You will not be able to view it again after leaving the page.
Use a short expiration for your client secret and rotate it regularly. Use a short Time-to-Live for your access tokens as well.
After completing this section you should have the following values ready:
- Application (client) ID
- Client secret value
- Directory (tenant) ID
Creating an OAuth 2.0 integration (admin)
After registering the application, a VIKTOR admin can generate an OAuth 2.0 integration.
VIKTOR does not have a dedicated Microsoft integration yet, so you set up the connection using the Generic OAuth 2.0 integration. The steps below are identical, you only fill in Microsoft's endpoints, credentials, and scopes.
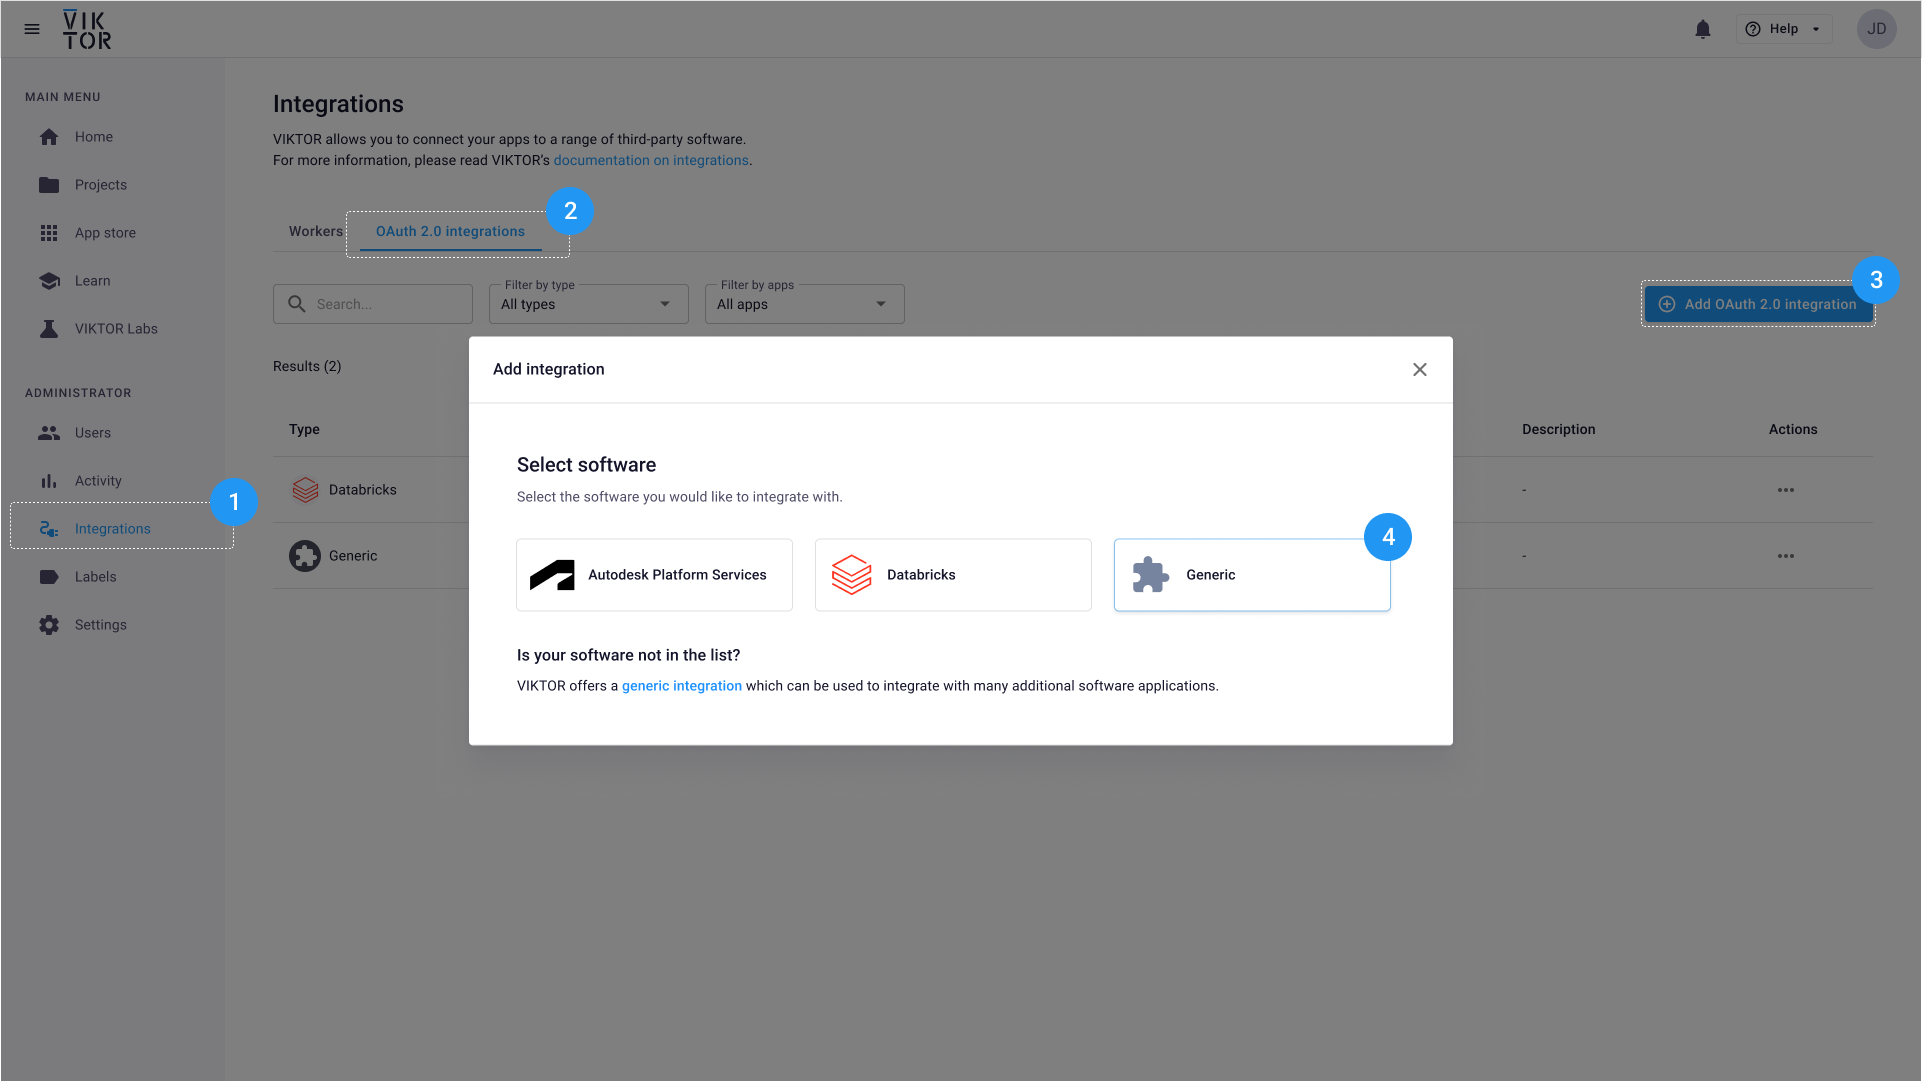
Start in the Administrator panel and create a new OAuth 2.0 integration with Generic as the selected software.
-
Navigate to the Integrations tab in the Administrator panel.
-
Select the OAuth 2.0 tab.
-
Follow the steps in the modal:
- Select Generic.
- Go to the Basic Information tab and fill in the required fields, including a descriptive integration name, and select the applications that will use the integration. You can choose to limit the integration to specific apps or allow all apps in the environment to use it.
noteThroughout this guide we use
microsoft-entraas the example integration name. When you see this name in code samples or configuration steps, replace it with your own chosen name. This name is referenced in your application code, so make it memorable and meaningful.- Then, in the Configuration tab, add the Authentication URL and Token URL. Replace
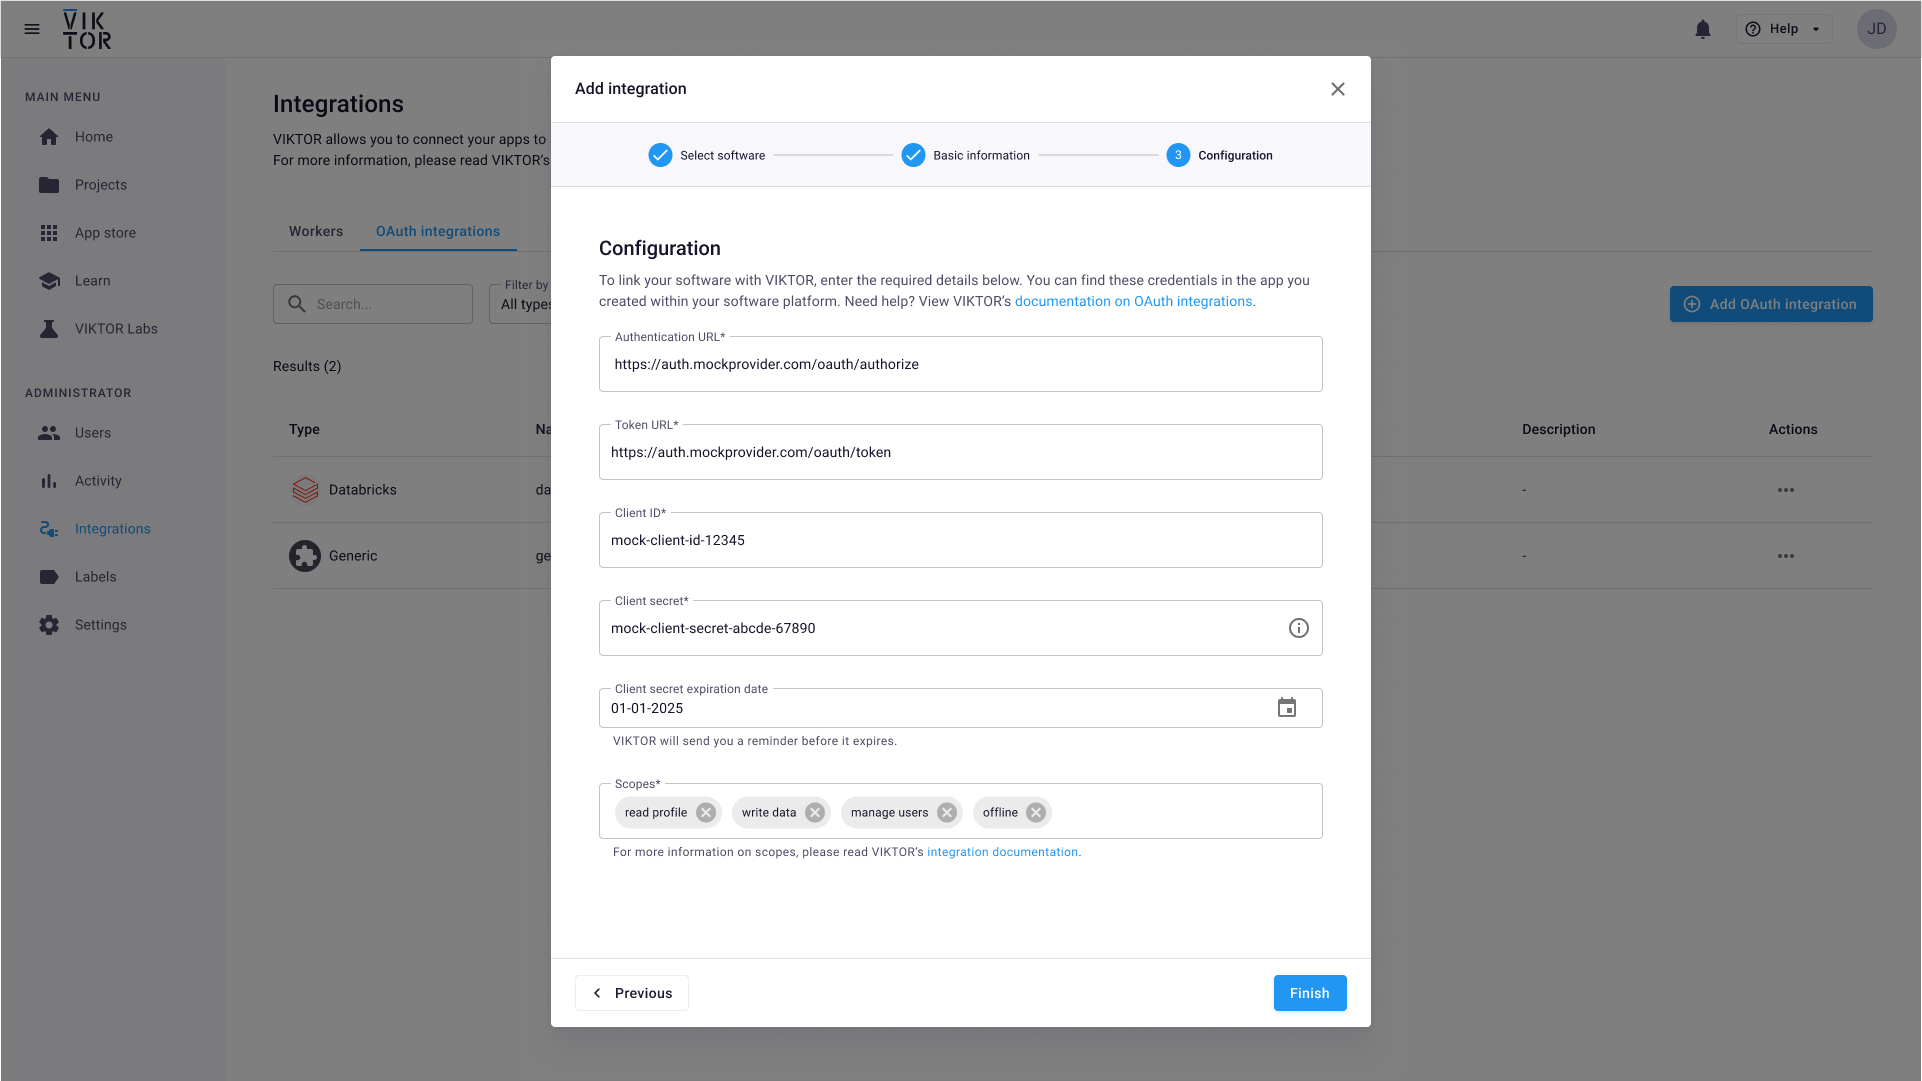
<tenant-id>with your Directory (tenant) ID from the previous section:- Authentication URL:
https://login.microsoftonline.com/<tenant-id>/oauth2/v2.0/authorize - Token URL:
https://login.microsoftonline.com/<tenant-id>/oauth2/v2.0/token
- Authentication URL:
NoteMake sure to use the v2.0 endpoints as shown above. The v2.0 endpoints are the ones compatible with the scope-based OAuth 2.0 configuration used by VIKTOR.
-
Fill in the Client ID (Application ID) and Client Secret (the secret value) from your Microsoft Entra application.
-
For the scopes, use the same delegated permissions you configured in the app registration, separated by spaces:
offline_access User.Read Sites.Read.All Files.Read.AllIf the app also writes files or sends email, extend the list with the matching scopes, for example:
offline_access User.Read Sites.ReadWrite.All Files.ReadWrite.All Mail.SendnoteIf your tenant requires it, you can prefix the Microsoft Graph scopes with the resource URL, for example
https://graph.microsoft.com/Sites.Read.All. The short form shown above works for the v2.0 endpoint in most tenants.
Implementing the integration
Once an administrator sets up the OAuth 2.0 integration, the developer can start the implementation. You have two alternatives to develop apps that integrate Microsoft services:
Using the App Builder
The App Builder provides a no-code approach to create applications with a Microsoft integration. Simply provide a natural language prompt describing what you want to build, and the App Builder will generate the application for you.
To create an app that lists the SharePoint sites you have access to, you can run the following prompt (make sure to replace microsoft-entra with the name of the integration you created in the previous steps):
Create an app using my OAuth2 integration 'microsoft-entra' to fetch SharePoint sites from:
URL: https://graph.microsoft.com/v1.0/sites?search=*

The API returns JSON with a 'value' list, where each site has 'displayName' and 'webUrl' fields. Display these in a table.
After submitting the prompt, the App Builder will ask you to set up the integration by following these 3 steps:
- Click the App details button
- Select the integration name
microsoft-entra - Save the current selection
Using local development
For local development, the developer should add the integration name to the app configuration (after the administrator has assigned the integration to the app). The platform uses it to show a login button when the user opens the app. Make sure your viktor.config.toml contains the name exactly as configured in the Administrator panel.
Remember to use your own integration name in viktor.config.toml. In the examples below we continue using microsoft-entra, but you should replace this with the custom name you defined earlier in the Administrator panel.
viktor.config.toml:
app_type = "editor"
python_version = "3.13"
registered_name = "your-app-name"
oauth2_integrations = [
    "microsoft-entra"
]
Then implement the logic that uses the integration in the code. You can use raw REST requests or a Python SDK, as long as it is compatible with the VIKTOR OAuth flow. A popular library is requests. You can add it in your requirements.txt:
viktor
requests
To obtain an access token, instantiate OAuth2Integration with the integration name and call get_access_token. All Microsoft Graph requests use the token as a bearer token in the Authorization header. The example below fetches the SharePoint sites the user has access to and displays them in a TableView. It works when the VIKTOR OAuth 2.0 integration is assigned to your app and the user has granted access:
import viktor as vkt
import requests

class Parametrization(vkt.Parametrization):
    text = vkt.Text("# Microsoft SharePoint OAuth2 Integration")

class Controller(vkt.Controller):
    parametrization = Parametrization

    @vkt.TableView("SharePoint sites")
    def get_sites(self, params, **kwargs):
        integration = vkt.external.OAuth2Integration("microsoft-entra")
        token = integration.get_access_token()

        headers = {
            "Authorization": f"Bearer {token}",
            "Accept": "application/json",
        }
        endpoint = "https://graph.microsoft.com/v1.0/sites?search=*"
        response = requests.get(endpoint, headers=headers, timeout=15)
        response.raise_for_status()

        sites = response.json().get("value", [])

        data = []
        for site in sites:
            site_name = site.get("displayName", "")
            site_url = site.get("webUrl", "")
            data.append([site_name, site_url])

        return vkt.TableResult(data, column_headers=["Site name", "URL"])
The integration name in OAuth2Integration must match the value in viktor.config.toml. Make sure the user has access to the relevant SharePoint sites (or other Microsoft resources) in the connected account.
Reading and modifying SharePoint files
SharePoint files are reached through the Microsoft Graph drive endpoints. A site contains one or more document libraries (drives), and each drive contains folders and files (drive items). Reading and writing a file therefore takes two steps: look up the drive of the site, then address the file inside that drive.
The examples below reuse the same headers as in the previous section:
integration = vkt.external.OAuth2Integration("microsoft-entra")
token = integration.get_access_token()
headers = {"Authorization": f"Bearer {token}", "Accept": "application/json"}
Looking up a site and its document library
You can address a site by its hostname and path, which avoids hardcoding an internal site ID:
BASE = "https://graph.microsoft.com/v1.0"

# https://contoso.sharepoint.com/sites/engineering
site = requests.get(f"{BASE}/sites/viktor.sharepoint.com:/sites/engineering", headers=headers, timeout=15)
site.raise_for_status()
site_id = site.json()["id"]

# the default document library ("Documents") of the site
drive = requests.get(f"{BASE}/sites/{site_id}/drive", headers=headers, timeout=15)
drive.raise_for_status()
drive_id = drive.json()["id"]
Use /sites/{site-id}/drives instead of /sites/{site-id}/drive to list all document libraries of a site, and
/drives/{drive-id}/root/children to list the items in the root folder of a library.
Reading a file
Files are read with the content endpoint, either by item ID or by path. The example below downloads a file by its
path in the document library and hands it to the user with a
DownloadButton:
import viktor as vkt
import requests

BASE = "https://graph.microsoft.com/v1.0"
DRIVE_ID = "..."  # see "Looking up a site and its document library"
FILE_PATH = "Projects/beam-loads.xlsx"

class Parametrization(vkt.Parametrization):
    download = vkt.DownloadButton("Download from SharePoint", method="download_file")

class Controller(vkt.Controller):
    parametrization = Parametrization

    def download_file(self, params, **kwargs):
        integration = vkt.external.OAuth2Integration("microsoft-entra")
        token = integration.get_access_token()
        headers = {"Authorization": f"Bearer {token}"}

        response = requests.get(
            f"{BASE}/drives/{DRIVE_ID}/root:/{FILE_PATH}:/content",
            headers=headers,
            timeout=60,
        )
        response.raise_for_status()

        return vkt.DownloadResult(vkt.File.from_data(response.content), "beam-loads.xlsx")
The response body is the raw file content, so you can also feed it straight into your own processing logic, for
example openpyxl for a spreadsheet or vkt.File.from_data(response.content) for any VIKTOR function that accepts a
File.
Modifying a file
Writing a file uses the same path with a PUT request. Uploading to a path that already exists replaces the file and
creates a new version in SharePoint; uploading to a path that does not exist creates the file. This requires the
Files.ReadWrite.All and Sites.ReadWrite.All scopes.
Do this in an action rather than in a view, because views are re-evaluated whenever the user changes an input and would write to SharePoint every time:
import viktor as vkt
import requests

BASE = "https://graph.microsoft.com/v1.0"
DRIVE_ID = "..."

class Parametrization(vkt.Parametrization):
    upload_file = vkt.FileField("File to upload", file_types=[".xlsx"])
    upload = vkt.ActionButton("Upload to SharePoint", method="upload_to_sharepoint")

class Controller(vkt.Controller):
    parametrization = Parametrization

    def upload_to_sharepoint(self, params, **kwargs):
        if not params.upload_file:
            raise vkt.UserError("Select a file first.")

        integration = vkt.external.OAuth2Integration("microsoft-entra")
        token = integration.get_access_token()

        content = params.upload_file.file.getvalue_binary()
        target = f"Projects/{params.upload_file.filename}"

        response = requests.put(
            f"{BASE}/drives/{DRIVE_ID}/root:/{target}:/content",
            headers={
                "Authorization": f"Bearer {token}",
                "Content-Type": "application/octet-stream",
            },
            data=content,
            timeout=60,
        )
        response.raise_for_status()

        vkt.UserMessage.success(f"Uploaded {params.upload_file.filename} to SharePoint.")
A simple PUT upload is limited to 4 MB. For larger files, create an upload session with
POST /drives/{drive-id}/root:/{path}:/createUploadSession and send the file in chunks. See
upload large files in the Microsoft Graph
documentation.
Other common operations on drive items follow the same pattern: PATCH /drives/{drive-id}/items/{item-id} renames or
moves an item, DELETE /drives/{drive-id}/items/{item-id} removes it, and
POST /drives/{drive-id}/items/{parent-item-id}/children creates a folder. See the
Microsoft Graph SharePoint documentation for the
full list of endpoints.
Sending email from an app
Email is sent through the Microsoft Graph sendMail endpoint. Because the integration uses delegated permissions, the
message is sent from the mailbox of the user who is logged in to the app, and it appears in their Sent Items. Add the
Mail.Send scope to both the app registration and the VIKTOR integration to use this.
import viktor as vkt
import requests

class Parametrization(vkt.Parametrization):
    recipient = vkt.TextField("Send results to")
    send = vkt.ActionButton("Send email", method="send_email")

class Controller(vkt.Controller):
    parametrization = Parametrization

    def send_email(self, params, **kwargs):
        integration = vkt.external.OAuth2Integration("microsoft-entra")
        token = integration.get_access_token()

        message = {
            "message": {
                "subject": "Calculation results",
                "body": {
                    "contentType": "HTML",
                    "content": "<p>The calculation finished. The results are attached.</p>",
                },
                "toRecipients": [{"emailAddress": {"address": params.recipient}}],
            },
            "saveToSentItems": True,
        }

        response = requests.post(
            "https://graph.microsoft.com/v1.0/me/sendMail",
            headers={
                "Authorization": f"Bearer {token}",
                "Content-Type": "application/json",
            },
            json=message,
            timeout=30,
        )
        response.raise_for_status()

        vkt.UserMessage.success(f"Email sent to {params.recipient}.")
A successful call returns status 202 Accepted with an empty body, which means Microsoft accepted the message for
delivery.
Adding an attachment
Attachments are sent inline as base64-encoded content in the same request. The example below attaches a PDF report generated by the app:
import base64

report = ...  # a vkt.File, for example the result of a report generation
encoded = base64.b64encode(report.getvalue_binary()).decode()

message = {
    "message": {
        "subject": "Calculation results",
        "body": {"contentType": "Text", "content": "The report is attached."},
        "toRecipients": [{"emailAddress": {"address": params.recipient}}],
        "attachments": [
            {
                "@odata.type": "#microsoft.graph.fileAttachment",
                "name": "report.pdf",
                "contentType": "application/pdf",
                "contentBytes": encoded,
            }
        ],
    },
    "saveToSentItems": True,
}
The total size of a message including its attachments is limited to 4 MB on the sendMail endpoint. For larger
attachments, create a draft message with POST /me/messages, add the attachment with an upload session, and send the
draft with POST /me/messages/{id}/send.
FAQs
How do I read or modify SharePoint files?
Address the file through the Microsoft Graph drive endpoints: look up the document library of the site, then read the
file with GET /drives/{drive-id}/root:/{path}:/content or write it with a PUT to the same path. Reading needs the
Files.Read.All and Sites.Read.All scopes, writing needs Files.ReadWrite.All and Sites.ReadWrite.All. See
Reading and modifying SharePoint files for full examples.
How do I send emails from an app?
Add the Mail.Send scope to the app registration and the VIKTOR integration, then post the message to
https://graph.microsoft.com/v1.0/me/sendMail with the access token of the integration. The email is sent from the
mailbox of the user who is logged in to the app. See Sending email from an app for a
working example, including attachments.
Can the app act on its own, without a user logging in?
No. This integration uses the OAuth 2.0 authorization code flow with delegated permissions, so every call is made on behalf of the logged-in user and is limited to what that user may see and do. A background job or a shared service account is not supported by this integration.
I get a 403 Forbidden from Microsoft Graph
The token was accepted but the requested scope is missing or was never consented to. Check that the permission is listed in API permissions of the app registration, that its Status shows granted consent, and that the same scope is present in the scopes field of the VIKTOR integration. After changing the scopes, the user has to log in again so a new token is issued.
I get a 404 Not Found for a site or file that exists
Microsoft Graph returns 404 for items the logged-in user cannot access, so this is often a permission issue on the
SharePoint site rather than a wrong path. Confirm that the account used to log in to the app has access to the site,
and check the path: paths in root:/{path}: are relative to the root of the document library, not to the site URL.