TabLogs
TabLogs can be integrated with VIKTOR using the OAuth 2.0 workflow for token based authentication and authorization. A general introduction to OAuth 2.0 can be found here.
- You have access to a TabLogs account that can manage OAuth integrations
- You have a VIKTOR administrator account that can create OAuth 2.0 integrations and assign them to VIKTOR apps
Creating a TabLogs application
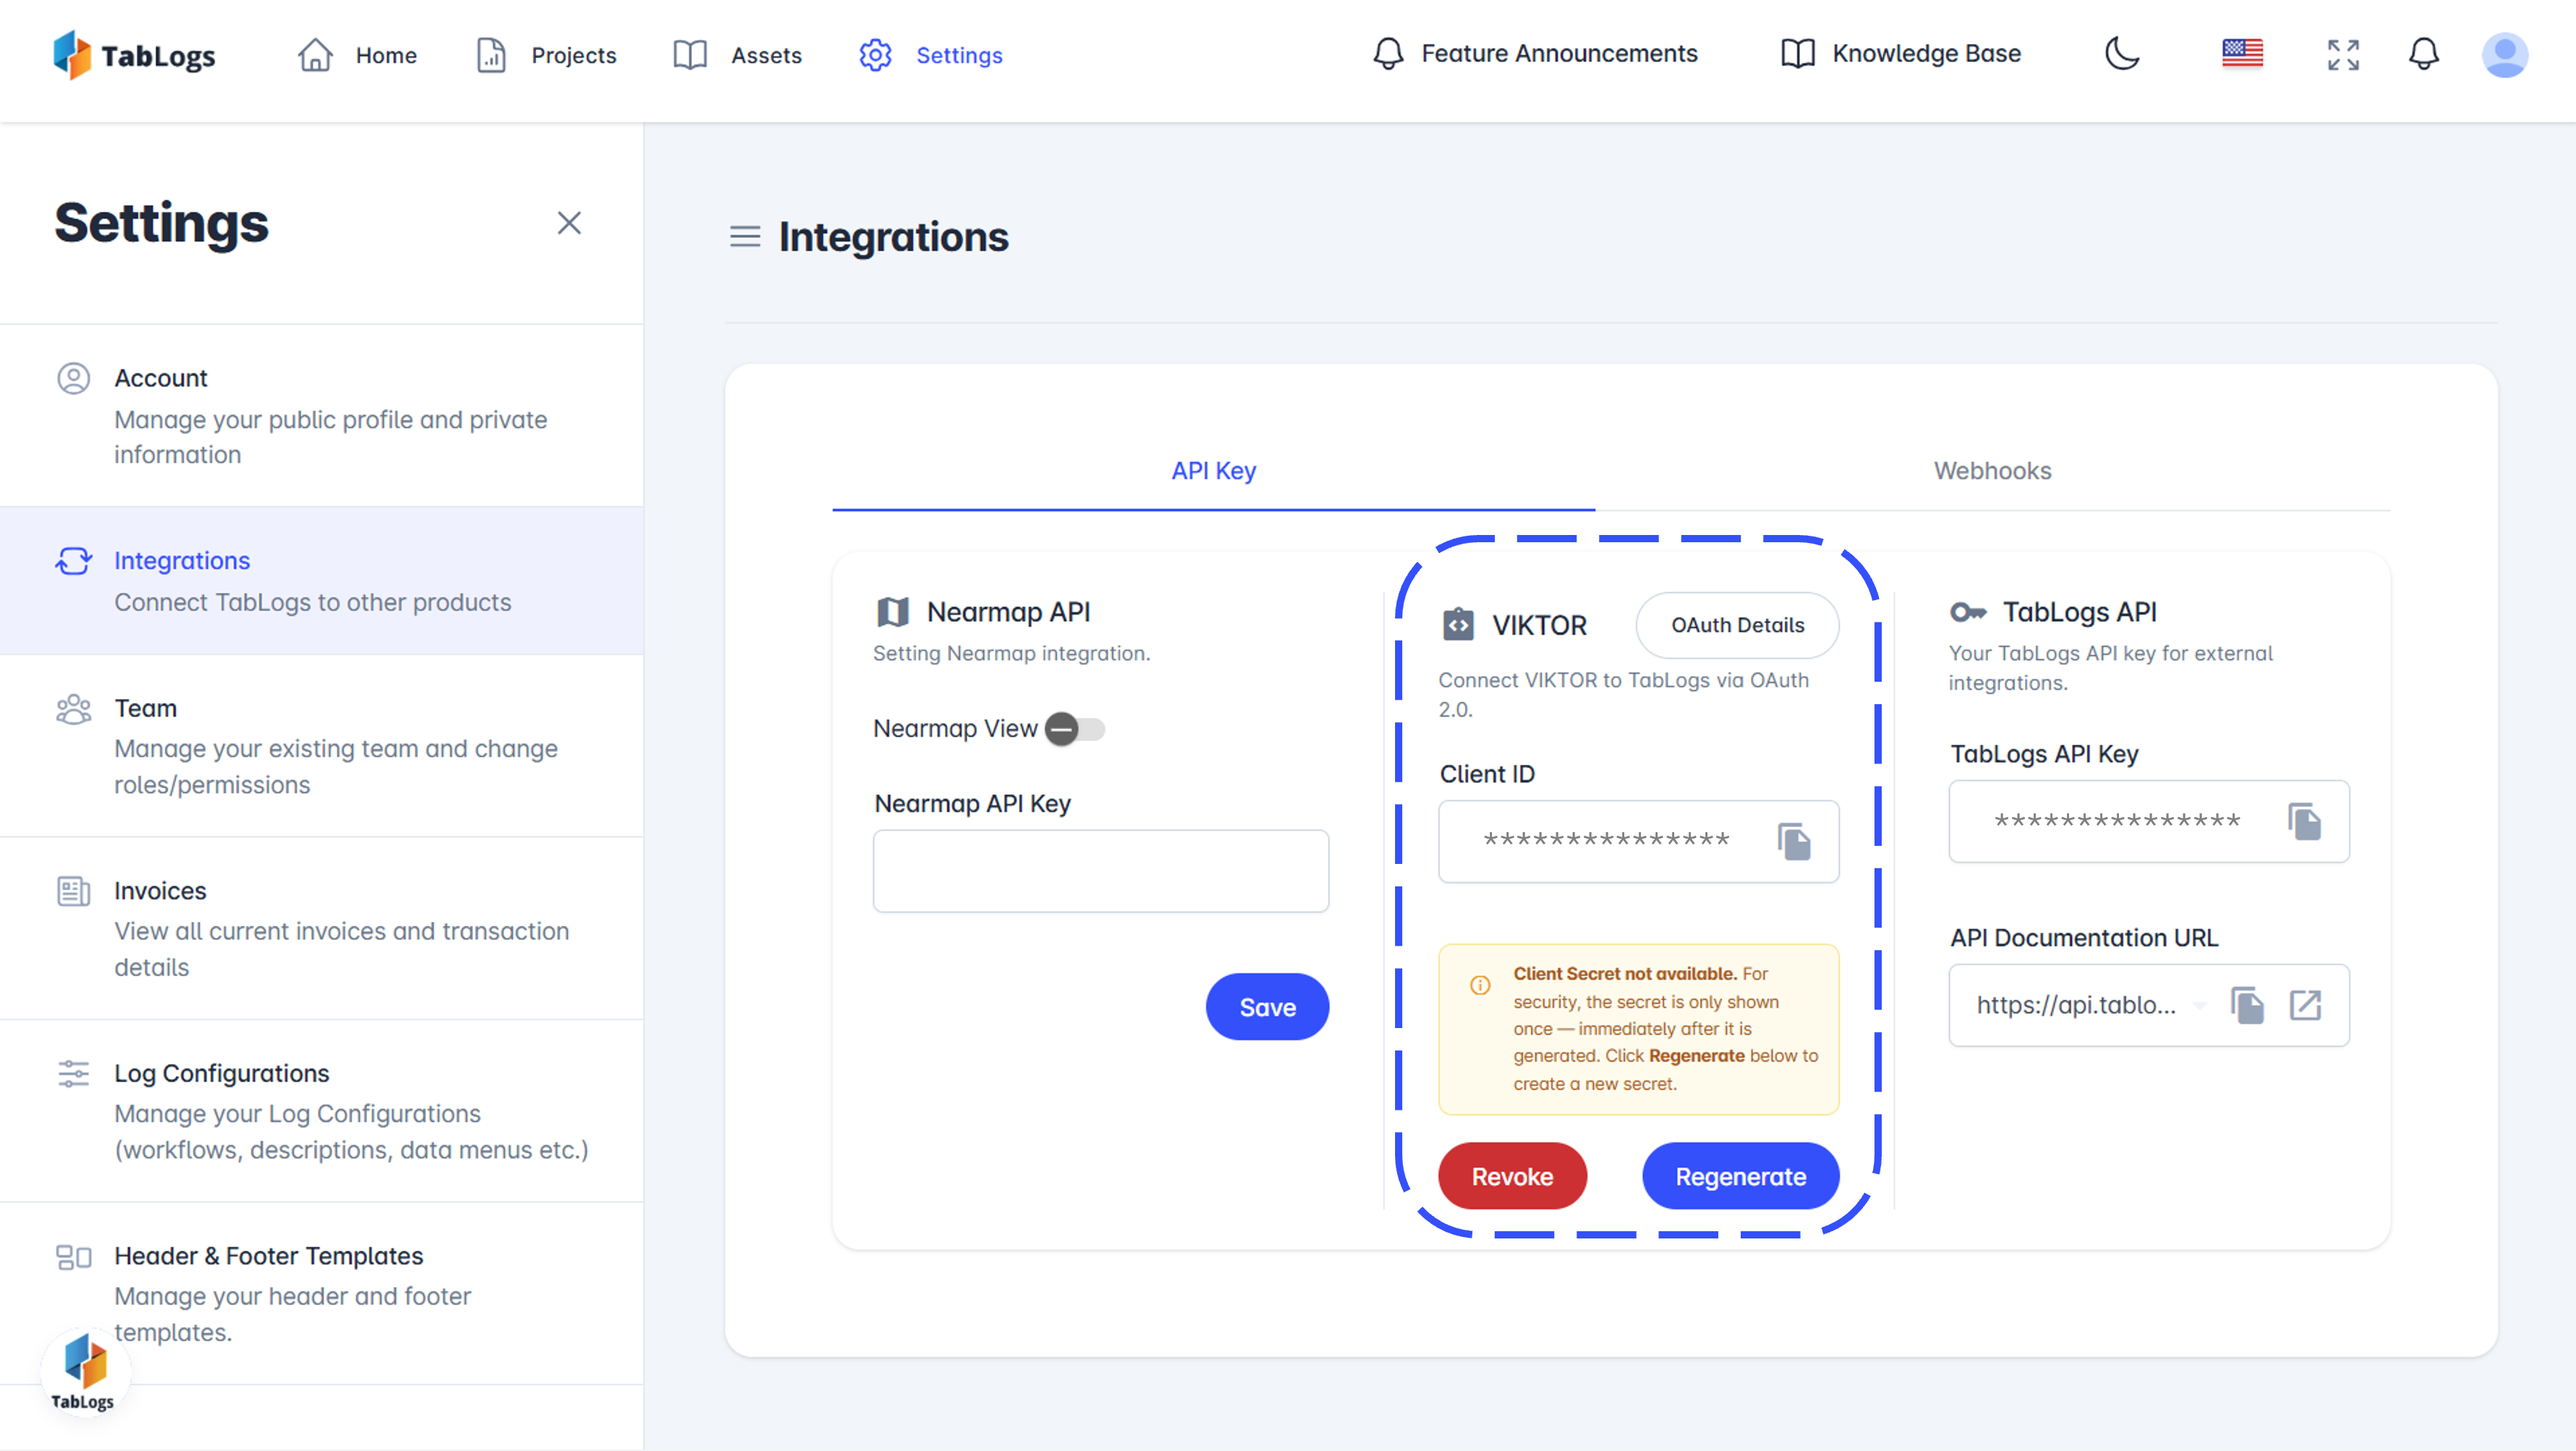
Open TabLogs Integrations and select the VIKTOR integration card, then open OAuth Details.
The TabLogs OAuth details provide the values needed to configure the integration in VIKTOR:
- Client ID: A unique public identifier for your application
- Client Secret: A confidential password used to authenticate your application
If the client secret is not available, click Regenerate to create a new secret.
The screenshot below shows the expected TabLogs OAuth details page.
Unlike other OAuth 2.0 integrations, TabLogs manages the redirect callback URL internally on their end. You do not need to configure or provide a callback URL when setting up the integration - TabLogs handles this automatically as part of their VIKTOR integration.
Creating an OAuth 2.0 integration (admin)
After receiving the Client ID and Client Secret, a VIKTOR admin can generate an OAuth 2.0 integration.
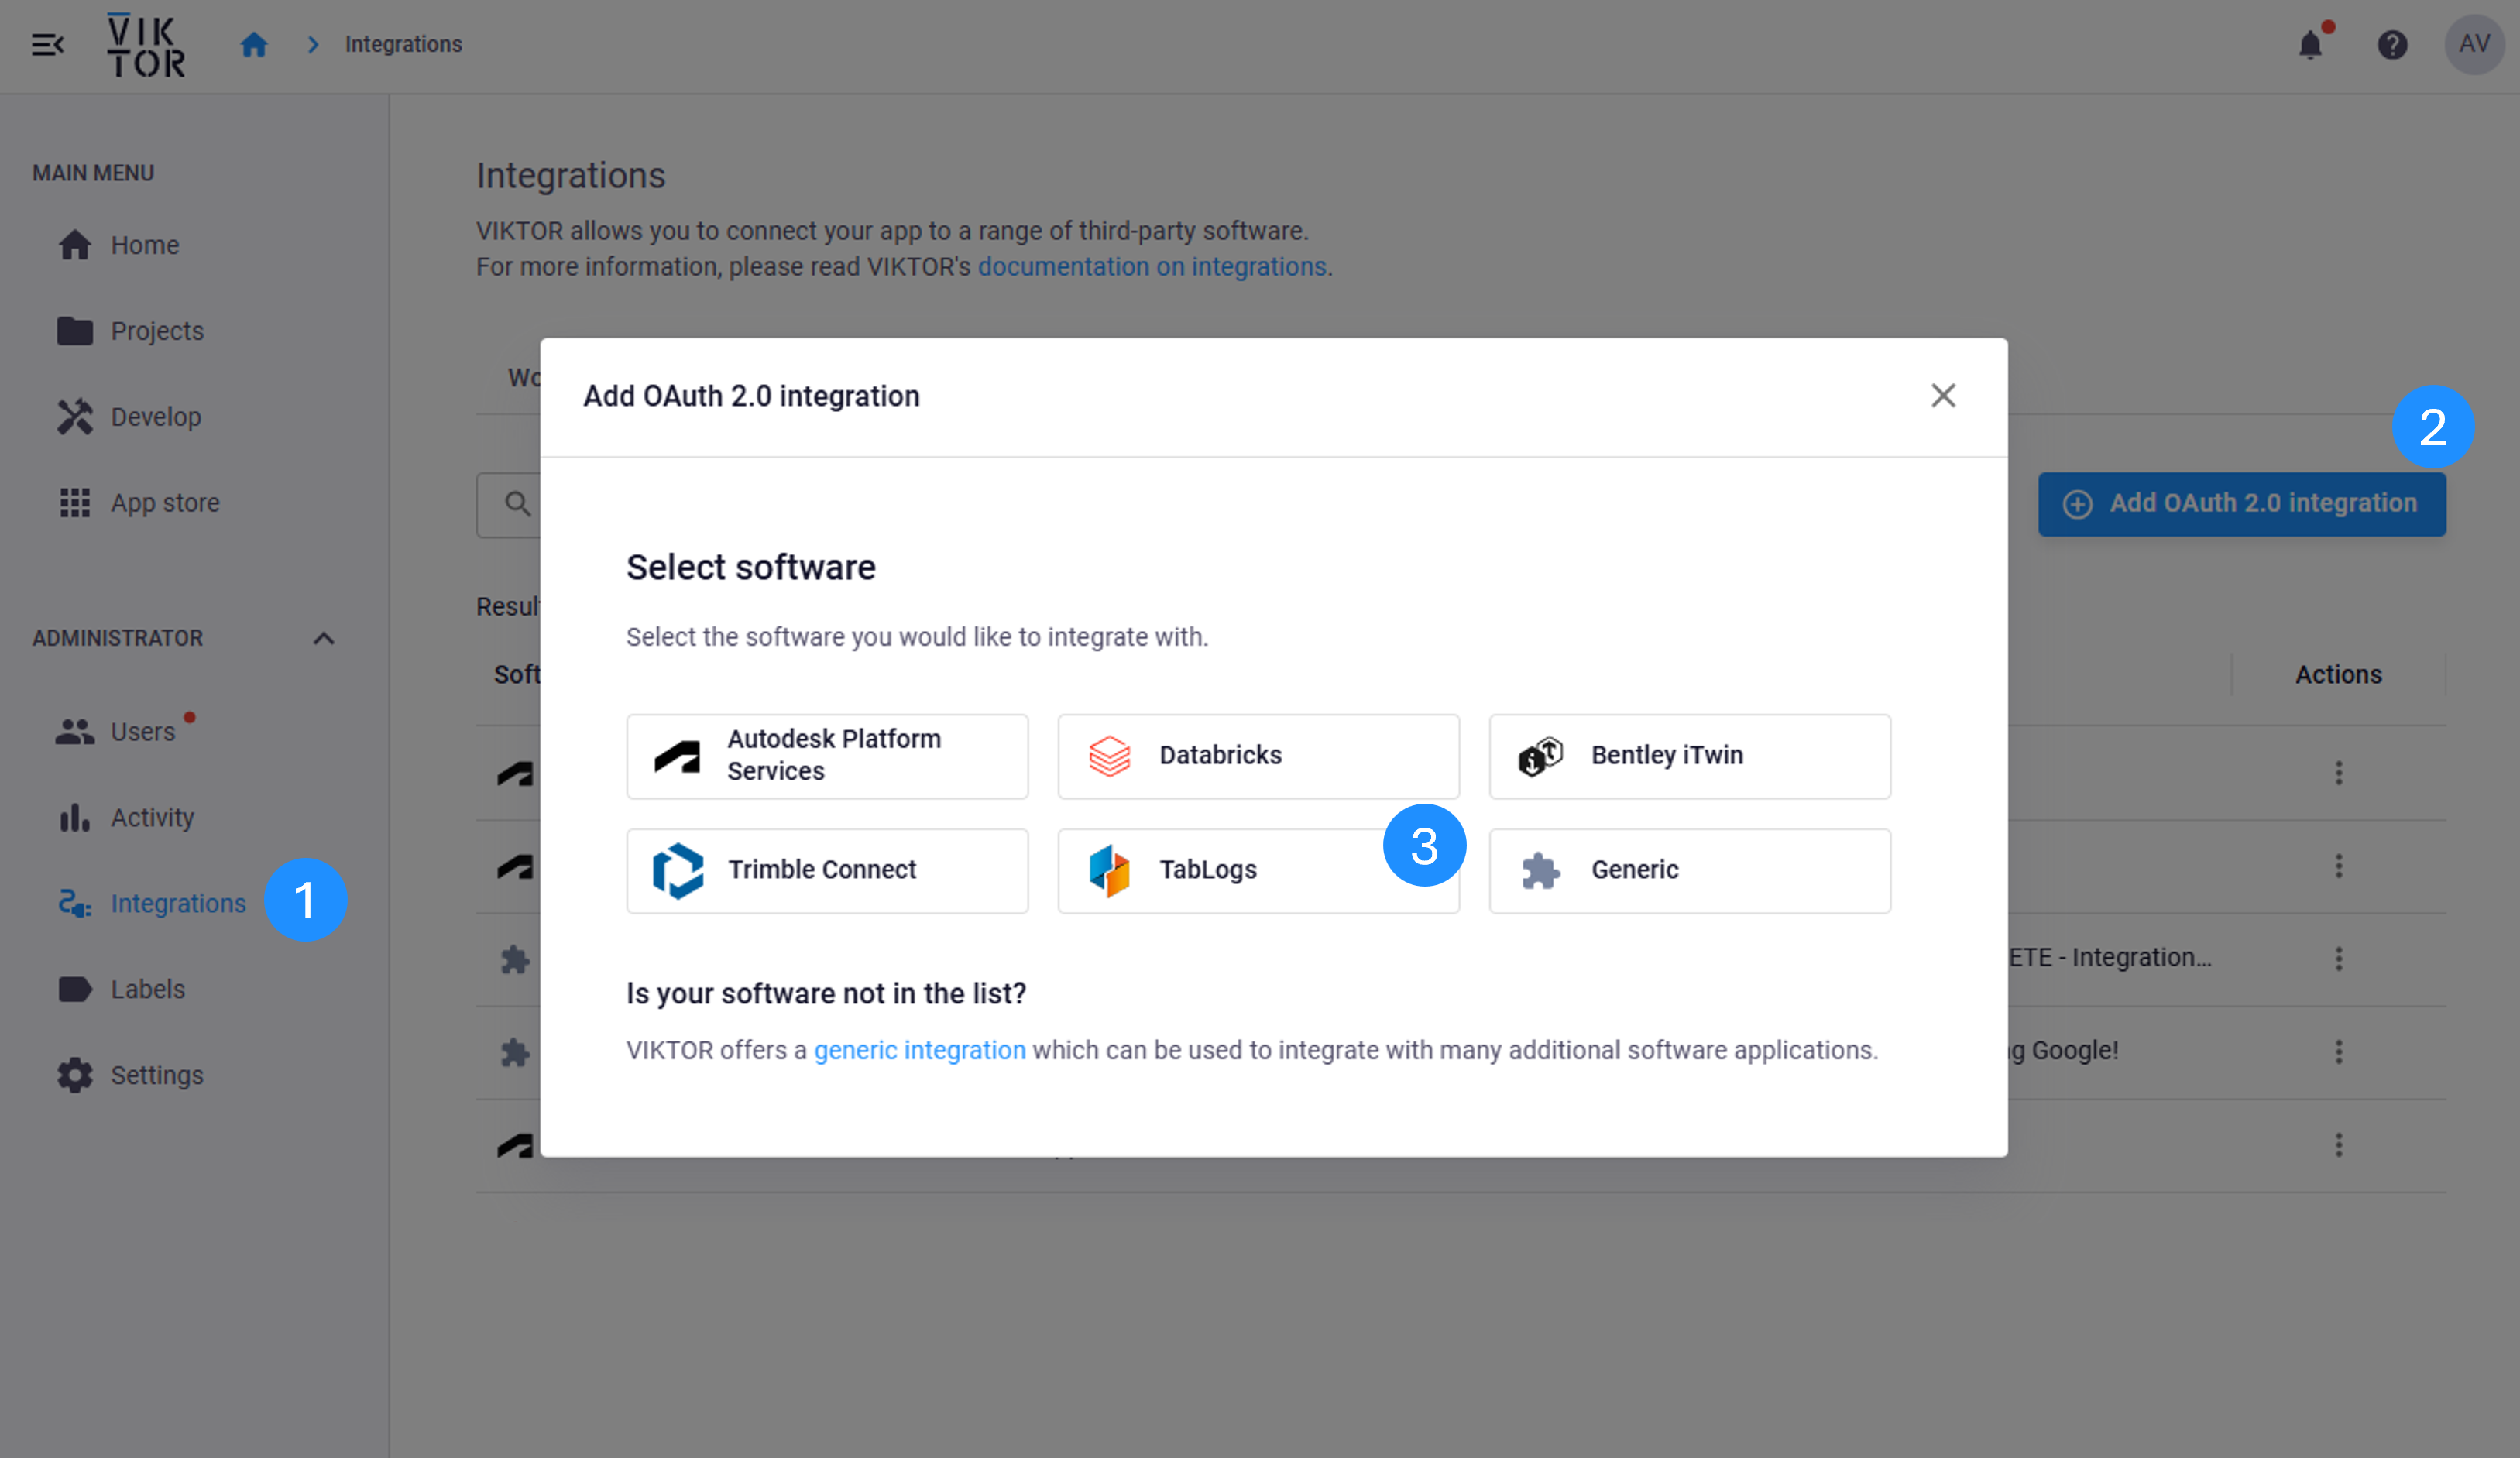
Start in the Administrator panel and create a new OAuth 2.0 integration with TabLogs as the selected software.
In the Basic Information step, choose a descriptive integration name that clearly identifies this connection. In this tutorial we will use viktor-tablogs-integration, but you can use any custom name that makes sense for your organization. This name will be referenced in your application code, so make it memorable and meaningful.
Throughout this guide, we use viktor-tablogs-integration as the example integration name. When you see this name in code samples or configuration steps, replace it with your own chosen name.
Add a clear description that explains the purpose of this integration (e.g., "OAuth 2.0 integration for accessing TabLogs projects and logs"), and assign the integration to the VIKTOR applications that should have access to it.
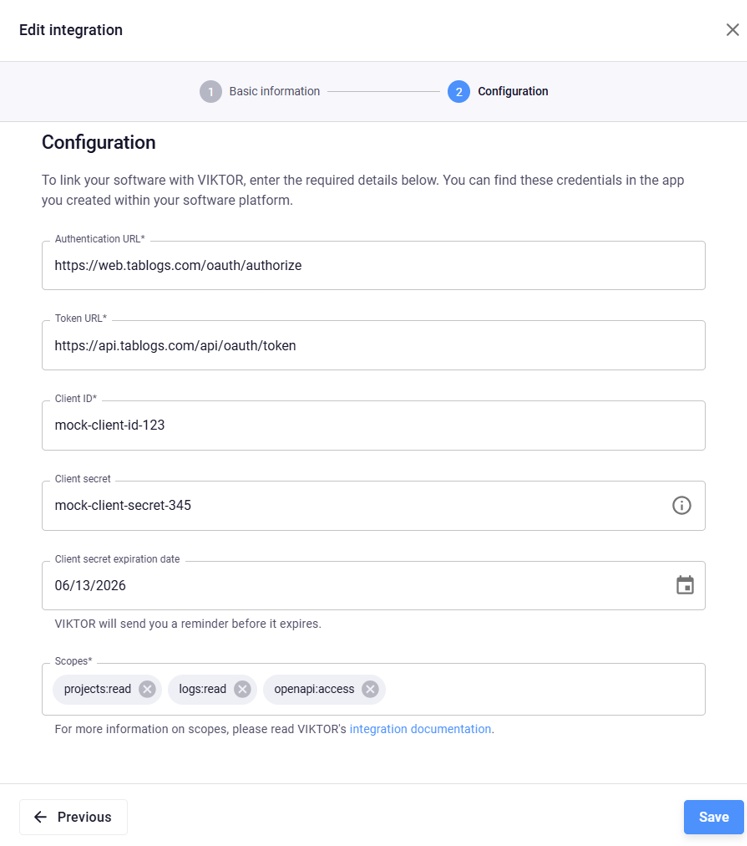
Then, in the Configuration step, use the TabLogs OAuth values shown below:
- Authentication URL:
https://web.tablogs.com/oauth/authorize - Token URL:
https://api.tablogs.com/api/oauth/token - Client ID:
<your TabLogs client id> - Client Secret:
<your TabLogs client secret> - Client secret expiration date:
<expiration date shown in TabLogs> - Scopes:
projects:readlogs:readopenapi:access
The following scopes are used for this integration:
projects:read— allows access to available TabLogs projects.logs:read— allows access to available TabLogs logs.openapi:access— allows access to the TabLogs OpenAPI-backed API
Implementing the integration
Once an administrator sets up the OAuth 2.0 integration, the developer can start the implementation. You have two alternatives to develop apps that integrate TabLogs:
Using the App Builder
The App Builder provides a no-code approach to create applications with TabLogs integration. You can describe the app in natural language and let the App Builder generate the first version for you.
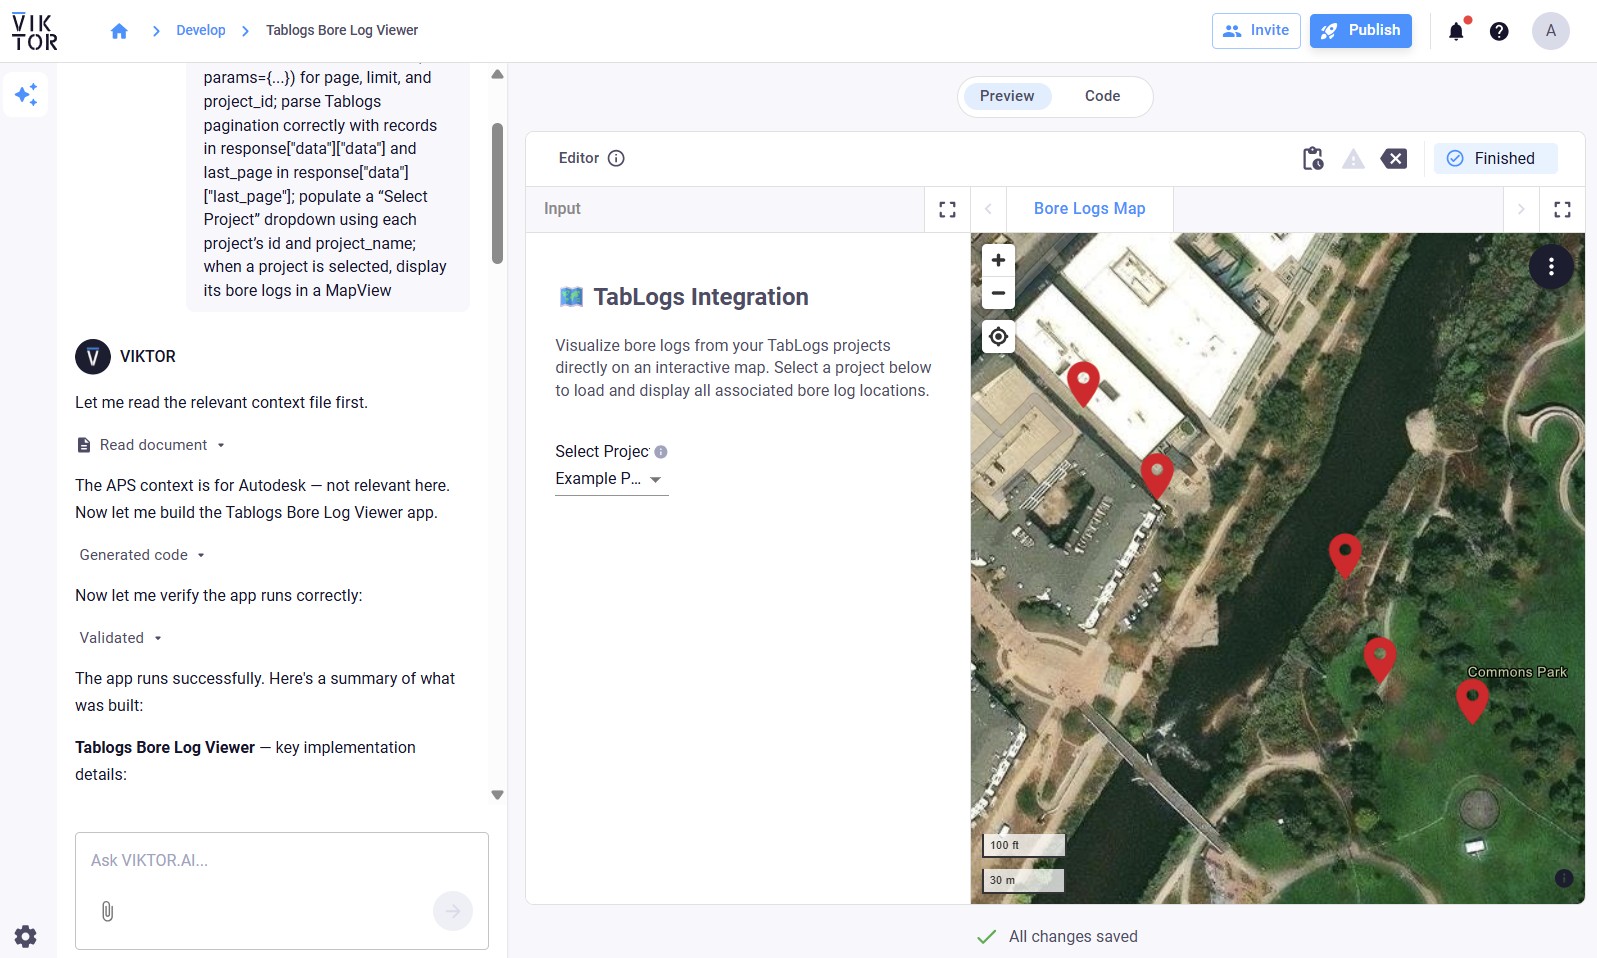
Use the following prompt to create an application that allows users to visualize the geographic location of bore logs (geotechnical boreholes) from a selected project:
Create a VIKTOR app that uses the OAuth2 integration “viktor-tablogs-integration” to fetch TabLogs projects from https://api.tablogs.com/openapi/v1.1.0/projects and bore logs from https://api.tablogs.com/openapi/v1.1.0/logs, using requests.get(..., params={...}) for page, limit, and project_id; parse TabLogs pagination correctly with records in response[“data”][“data”] and last_page in response[“data”][“last_page”]; populate a “Select Project” dropdown using each project’s id and project_name; when a project is selected, display its bore logs in a MapView to visualize their geographic locations.
A generated App Builder result can look like this:
After submitting the prompt, the App Builder will ask you to connect the integration in the app settings:
- Click the App details button
- Select the integration name
viktor-tablogs-integration - Save the current selection

For more complex applications or to use a more natural language approach with the App Builder, you can download the TabLogs OpenAPI documentation as a text file and attach it to your App Builder prompt. This provides the App Builder with complete API endpoint details, allowing it to generate more sophisticated integrations with access to all available TabLogs features and data structures.
Using local development
For local development, the developer should add the integration name to the app configuration after the administrator has assigned the integration to the app. The platform uses it to show a login button when the user opens the app. Make sure your viktor.config.toml contains the name exactly as configured in the Administrator panel.
Remember to use your own integration name in viktor.config.toml. In the examples below, we continue using viktor-tablogs-integration, but you should replace this with the custom name you defined earlier in the Administrator panel.
viktor.config.toml:
app_type = “editor”
python_version = “3.13”
registered_name = “your-app-name”
oauth2_integrations = [
    “viktor-tablogs-integration”
]
Then implement the logic that uses the integration in the code. You can use raw REST requests or a Python SDK, as long as it is compatible with the VIKTOR OAuth flow. A popular library is requests. You can add it in your requirements.txt:
viktor
requests
To obtain an access token, instantiate OAuth2Integration with the integration name and call get_access_token. The example below fetches the user’s accessible TabLogs projects, then fetches the bore logs for the selected project, and displays them in a MapView.
import requests
import viktor as vkt

BASE_URL = "https://api.tablogs.com/openapi/v1.1.0"
INTEGRATION = "viktor-tablogs-integration"


def get_token():
    return vkt.external.OAuth2Integration(INTEGRATION).get_access_token()


def get_records(endpoint, token, params):
    response = requests.get(
        BASE_URL + endpoint,
        headers={"Authorization": "Bearer " + token},
        params=params,
        timeout=15,
    )

    if response.status_code != 200:
        raise vkt.UserError("TabLogs request failed: " + str(response.status_code))

    return response.json().get("data", {}).get("data", [])


def get_project_options(params, **kwargs):
    token = get_token()
    projects = get_records("/projects", token, {"page": 1, "limit": 5})
    options = []

    for project in projects:
        project_id = project.get("id")
        project_name = project.get("project_name") or project.get("name") or str(project_id)

        if project_id:
            options.append(vkt.OptionListElement(str(project_id), project_name))

    return options


class Parametrization(vkt.Parametrization):
    project = vkt.OptionField("Select Project", options=get_project_options)


class Controller(vkt.Controller):
    parametrization = Parametrization

    @vkt.MapView("Bore Logs Map", duration_guess=2)
    def get_map_view(self, params, **kwargs):
        if not params.project:
            return vkt.MapResult([])

        token = get_token()
        logs = get_records("/logs", token, {"project_id": params.project, "page": 1, "limit": 100})
        features = []

        for log in logs:
            lat = log.get("latitude") or log.get("lat")
            lon = log.get("longitude") or log.get("lon") or log.get("lng")

            try:
                lat = float(lat)
                lon = float(lon)
            except (TypeError, ValueError):
                continue

            title = log.get("log_no") or log.get("name") or log.get("log_name") or str(log.get("id"))
            features.append(vkt.MapPoint(lat, lon, title=str(title)))

        return vkt.MapResult(features)
The integration name in OAuth2Integration must match the value in viktor.config.toml. Make sure the user has access to the relevant TabLogs projects and logs in the connected account.