Tutorial - Integrate Rhino/Grasshopper
Estimated time: 45 minutes
Difficulty level: Intermediate

Introduction
Welcome to this tutorial on integrating Grasshopper with VIKTOR! In this tutorial, you will learn how to create a VIKTOR web app with a Grasshopper model running behind it by the following steps:
By the end of this tutorial, you will have created a simple VIKTOR application that creates a geometry and data view of a simple box, see the image below:
So, let's get started and learn how to create a VIKTOR app based on a Grasshopper model!
Pre-requisites and downloads
- You have installed VIKTOR on your computer
- You have some experience with reading Python code
- You have some experience with Rhino/Grasshopper
This code requires support for the GrasshopperAnalysis, which is available since SDK v14.8.0. Make sure use this SDK
version or higher in your requirements.txt file.
Explanation of setup
Before diving into the steps, let's explain how the integration will work. See the following diagram:
The following will happen:
- The user fills in input parameters in the VIKTOR UI
- In VIKTOR app.py these input parameters will be sent together with a Grasshopper script (sample_box_grasshopper.gh) to the worker.
- The Grasshopper worker will run Rhino/Grasshopper (on your local machine), based on the Grasshopper script (sample_box_grasshopper.gh) and the input parameters.
- The Grasshopper model generates output data, which is sent back by the worker.
- In VIKTOR app.py, the output data is converted into a 3dm geometry file, which will be visualized in the VIKTOR UI.
Now let's setup everything to get this running! We will go through the diagram from right to left.
In order to install some older plug-ins, you may have had to set your .NET such that it is running in .NET Framework. If you did, please change it back to the default setting
(.NET Core) for the integration to work using the SetDotNetRuntime in the Rhino command line.
1. Setup integration with Grasshopper
A worker (integration) is a program that connects a VIKTOR app with third-party software to execute tasks and send back results. In this case, the worker will start Rhino/Grasshopper with the input data and send the resulting output data back. Before we setup the worker, we must first install the Hops plugin for Grasshopper.
Install Hops plugin
Hops is a plugin for Grasshopper, which will be used to make it possible to call the Grasshopper script externally, using a local Rhino Compute server. Follow these steps to install Hops:
- Install Hops via the Package Manager in Rhino (type
PackageManageron the Rhino command line and search for "Hops")
- Make sure Rhino Compute will be launched at start up. In Grasshopper, go to
File -> Preferencesand check the following settings:
We recommend to uncheck Hide Rhino.Compute Console Window, because you can then easily see if Rhino Compute is running and debug when necessary.
The full documentation of Hops can be found in the Rhino documentation.
Install Grasshopper worker
Follow these steps to install the worker:
- Development
- Published App
Personal workers are installed and managed with VIKTOR Desktop:
- Download and install VIKTOR Desktop and log in with your VIKTOR account, if you haven't done so already
- In VIKTOR Desktop, click "Add" and select Grasshopper
- Configure the worker where needed and start it
Grasshopper workers that were installed with the previous per-worker installer keep running, but new personal workers can only be added through VIKTOR Desktop.
You need to be an environment administrator in order to install a worker for a published app.
-
Navigate to the "Integrations" tab in the Administrator panel
-
Click "Add integration"
-
Follow the steps provided in the modal
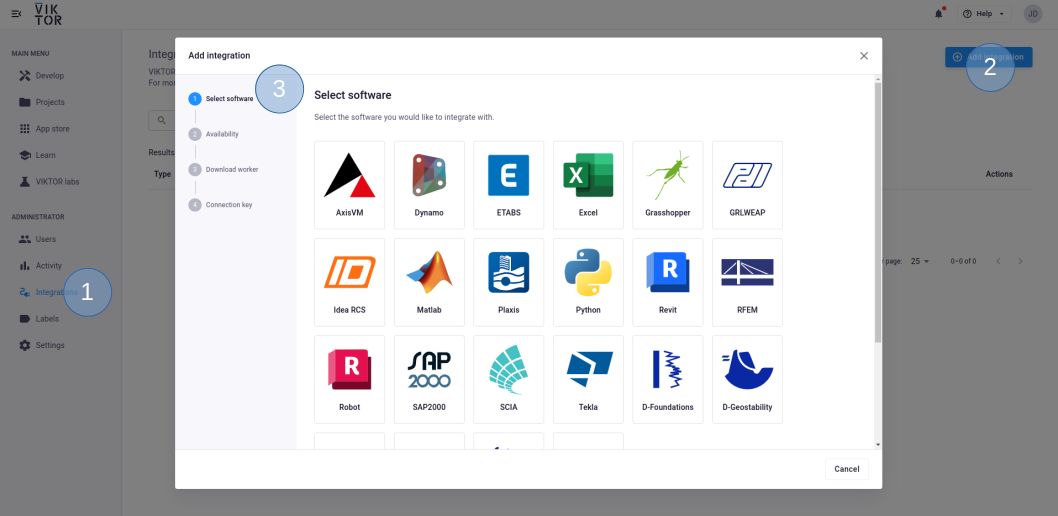
3.1. Select Grasshopper
3.2. Select the workspace(s) the integration should be available to
3.3. Download the worker .msi (Microsoft Installer) and run it on the machine of choice
3.4. Copy the generated connection key and paste it when the installer asks for it
The generated connection key should be copied immediately as VIKTOR will not preserve this data for security reasons.
By default, the local RhinoCompute server runs on http://localhost:6500/, so this has been preselected in the worker setup.
If you have configured RhinoCompute to a different port, please update this accordingly when configuring the worker.
Once the worker is enabled in VIKTOR Desktop, the app shows whether it is connected. If you installed the worker with the per-worker installer (as used for organization workers), the worker starts up automatically after installation and you will be presented with the worker terminal in which the message: "Successfully connected to the server" is displayed. In the top right corner in your viktor environment you should see a green indicator in your integrations overview, see the figure below.

Nice work! The integration is ready to use, let's test the VIKTOR app.
(optional) Check out Grasshopper model
Before we start building the app, you might be curious to know what kind of Grasshopper model we will be integrating. If you want to check out
the Grasshopper model, open the Grasshopper file (sample_box_grasshopper.gh) with the Grasshopper plugin and this should lead to the following view:
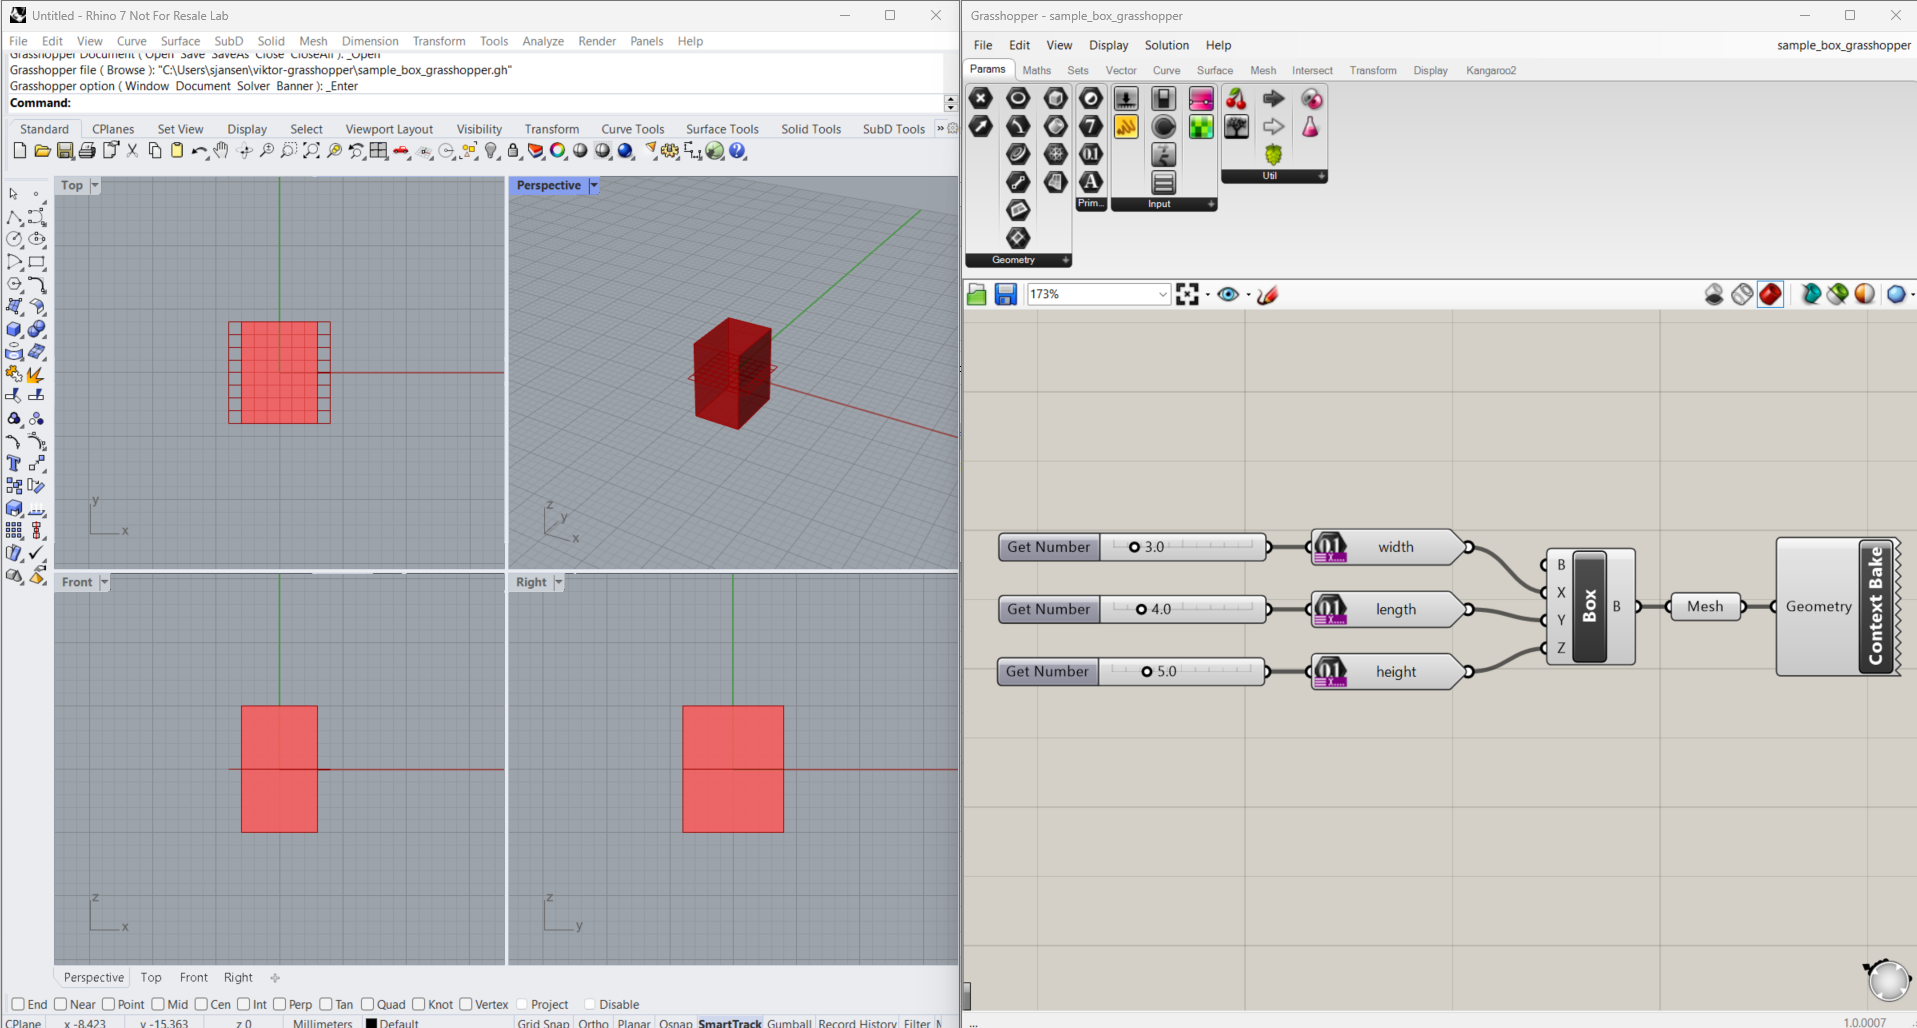
Let's take some time to check out what is happening in the Grasshopper script:
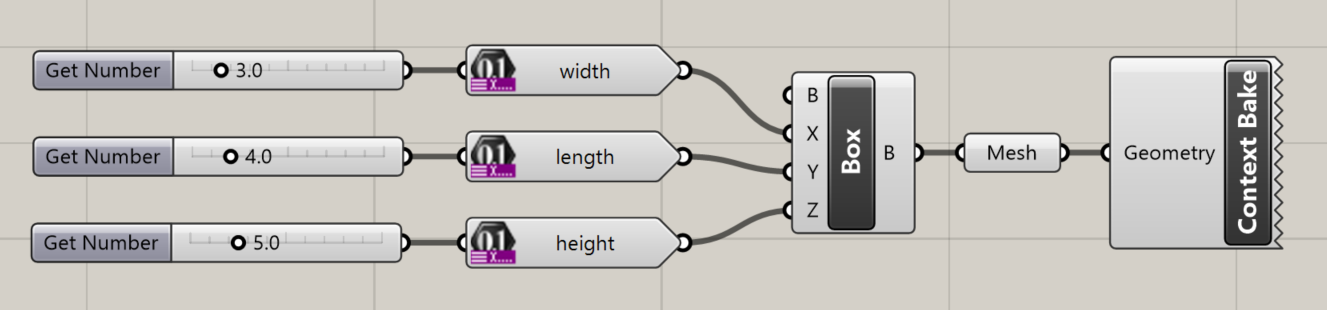
-
Three Hops input parameters (
width,lengthandheight) are defined based on theGet Numbercomponent of Hops. -
A simple box is created based on the width, length and height, which is subsequently meshed.
-
The mesh is baked into Rhino using the
Context Bakecomponent of Hops.
If you change the input parameters, you will see that a box is drawn in Rhino. With this setup, we are ready to run this Grasshopper file from a Python script.
2. Build the VIKTOR app
Create an empty app
Let's create, install and start an empty app. This will be the starting point for the rest of the tutorial.
But before we start, make sure to shut down any app that is running (like the demo app) by closing the command-line shell
(for example Powershell) or end the process using Ctrl + C.
Follow these steps to create, install and start an empty app:
-
Open a terminal and run the following command to create the app on the VIKTOR platform and generate the initial code locally:
viktor-cli create-app "Grasshopper tutorial" --init --app-type editor -
Open the newly created folder in your code editor and run
viktor-cli clean-startin the terminal to install dependencies and connect the app to the platform.
If all went well, your empty app is installed and connected to your development workspace. Do not close the terminal as this will break the connection with your app. The terminal in your code editor should show something like this:
INFO    : Connecting to cloud.viktor.ai...
INFO    : Connection is established (use Ctrl+C to close)
INFO    :
INFO    : Navigate to the link below to see your app in the browser
INFO    :     https://cloud.viktor.ai/workspaces/XXX/app
INFO    :
INFO    : App code loaded, waiting for jobs...
- You only need to create an app template and install it once for each new app you want to make.
- The app will update automatically once you start adding code in
app.py, as long as you don't close the terminal or your code editor. - Did you close your code editor? Use
viktor-cli startto start the app again. No need to install, clear, etc.
Add input fields
We will add 3 input fields to our app: width, length and height using the NumberField.
- Open
app.py, import viktor and add the relevant fields to your parametrization. In the end yourapp.pyfile should look like this:
import viktor as vkt


class Parametrization(vkt.Parametrization):
    intro = vkt.Text("## Grasshopper app \n This app parametrically generates and visualises a 3D model of a box using a Grasshopper script. \n\n Please fill in the following parameters:")

    # Input fields
    width = vkt.NumberField('Width', default=5)
    length = vkt.NumberField('Length', default=6)
    height = vkt.NumberField('Height', default=7)


class Controller(vkt.Controller):
    parametrization = Parametrization
- Refresh your app in the browser, and you should see the input fields appear.
Install additional dependencies
In the next step we will need the rhino3dm package. To be able to use this, we have to add it as dependency in the
requirements.txt file so
that the contents look like this:
viktor==14.30.0
rhino3dm
If your terminal is still running, close the connection using Ctrl+C.
Install the rhino3dm dependency:
viktor-cli install
And start your app:
viktor-cli start
Add the Python code to run Grasshopper
Now the app code can be extended to integrate the Grasshopper script.
First, place the sample_box_grasshopper.gh file in the 'my-grasshopper-app' folder.
Then change the code in app.py to the code below:
import viktor as vkt
import json
import rhino3dm
from pathlib import Path


class Parametrization(vkt.Parametrization):
    intro = vkt.Text("## Grasshopper app \n This app parametrically generates and visualizes a 3D model of a box using a Grasshopper script. \n\n Please fill in the following parameters:")

    # Input fields
    width = vkt.NumberField('Width', default=5)
    length = vkt.NumberField('Length', default=6)
    height = vkt.NumberField('Height', default=7)


class Controller(vkt.Controller):
    parametrization = Parametrization

    @vkt.GeometryView("Geometry", duration_guess=10, x_axis_to_right=True, update_label='Run Grasshopper')
    def run_grasshopper(self, params, **kwargs):
        grasshopper_script_path = Path(__file__).parent / "sample_box_grasshopper.gh"
        script = vkt.File.from_path(grasshopper_script_path)
        input_parameters = dict(params)

        # Run the Grasshopper analysis and obtain the output data
        analysis = vkt.grasshopper.GrasshopperAnalysis(script=script, input_parameters=input_parameters)
        analysis.execute(timeout=30)
        output = analysis.get_output()

        # Convert output data to mesh
        file3dm = rhino3dm.File3dm()
        obj = rhino3dm.CommonObject.Decode(json.loads(output["values"][0]["InnerTree"]['{0}'][0]["data"]))
        file3dm.Objects.Add(obj)

        # Write to geometry_file
        geometry_file = vkt.File()
        file3dm.Write(geometry_file.source, version=7)
        return vkt.GeometryResult(geometry=geometry_file, geometry_type="3dm")
If you now refresh your app, you should see the following:
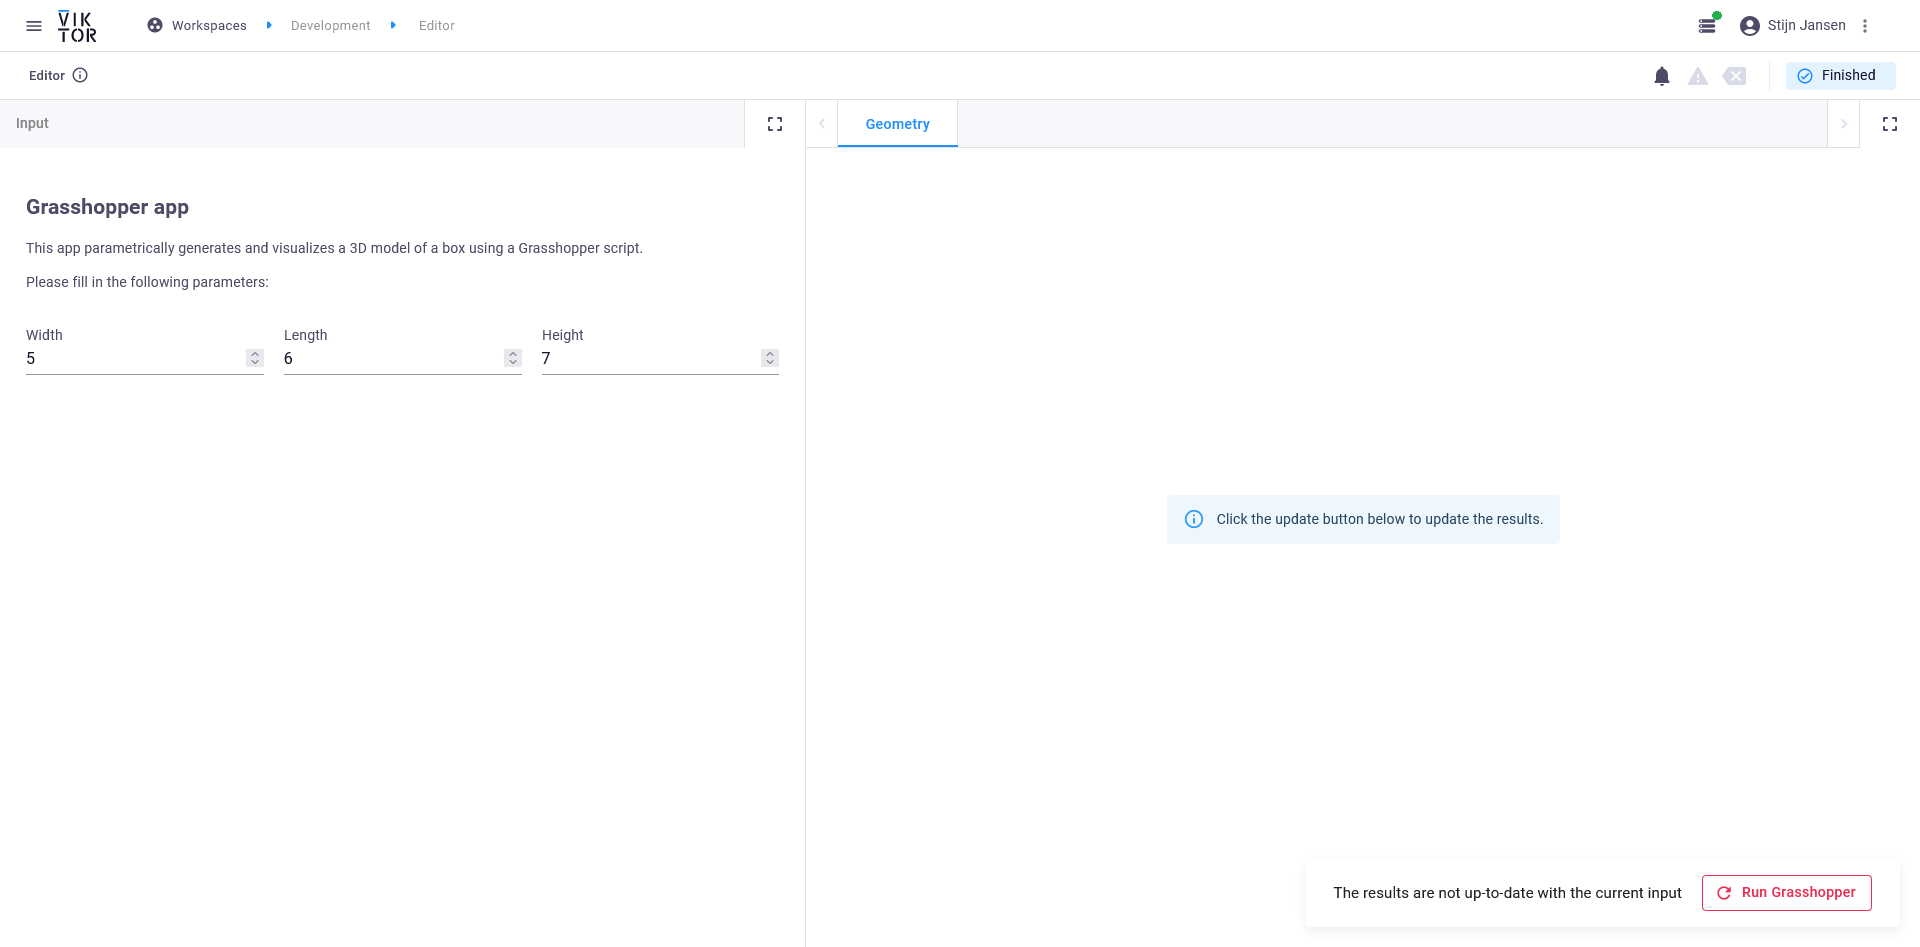
Now press the Run Grasshopper button (be sure that the worker, Rhino and Grasshopper are running). You should see that Rhino Compute is run by the worker which will result in the following:
Congratulations, you now have made a VIKTOR app with a Grasshopper model running behind it!
3. Use your own Grasshopper model
If you would like to integrate your own Grasshopper model in VIKTOR, you can adapt the app you just created. Take the following steps:
Extend your Grasshopper model
As explained in this section, some specific things need to be defined in the Grasshopper model to make the integration work.
- Connect your specific input parameters by Hops components. In order to update the parameters via Rhino Compute, create Hops Get Components for the parameters you want to update. As you can see highlighted in the image below, the names need to be exactly the same for the integration to work.
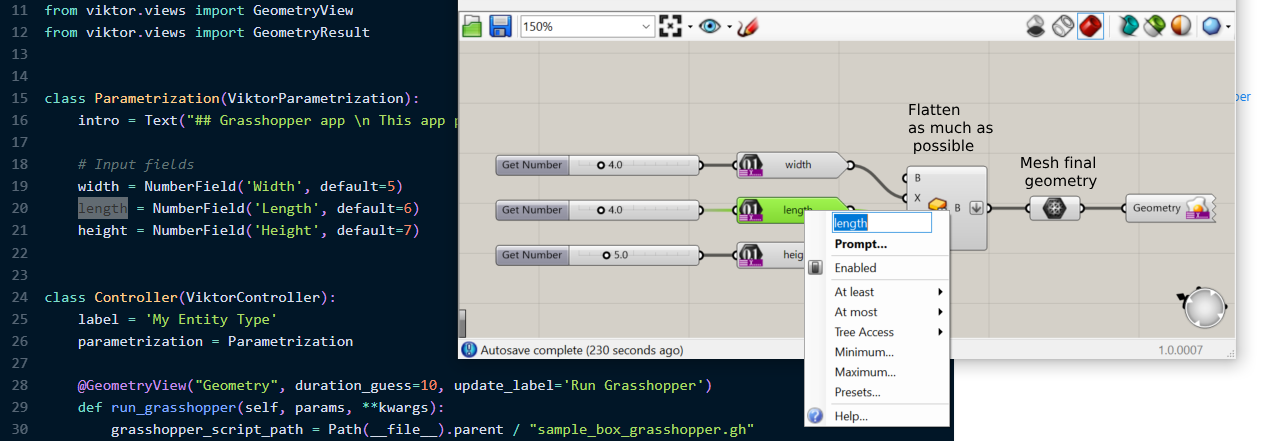
-
Mesh your final geometry. In order for Rhino Compute to successfully export your geometry you need to mesh it because Rhino Compute can only export a mesh. If you don't, your geometry will not appear in the environment.
-
Add the Context Bake component. The Grasshopper node Context Bake is needed to bake the model.
It is recommended to flatten the inputs in your grasshopper script, especially for simpler/smaller scripts. For larger grasshopper scripts, this may still be true, but it may be more efficient to use the Tree structure as input.
Want to find out more? Check out the thread on the community.
Adjust the VIKTOR app code
In the VIKTOR app code adjust the parametrization to match with your required input parameters.
The rest of the code should not require any changes to work.
To infinity and beyond
Great work! You are now able to create an app that can integrate with an external installation of Grasshopper through a Grasshopper Worker!
Of course, the journey doesn't end here. Check out some of our other tutorials or go to the next section or try to connect your own Grasshopper script to your VIKTOR app!