Tekla Structures
This guide provides the basic information about the Tekla integration.
If this is your first time setting up an integration, we recommend to follow one of the Intermediate tutorials.
System requirements:
- 💻 Windows PC
- 🐍 Python =< 3.11 (pyTekla requirement)
- PyTekla (Tekla Open API wrapper)
- Tekla Structures (with an active model on the worker)
Additional information
Below you can find some useful information for this integration.
Download and install pyTekla
PyTekla is a Python wrapper that provides a thin wrapper around the Tekla Open API. The Tekla Open API is an API that provides a range of tools and functions that allow developers to automate processes, integrate with other software (VIKTOR in this case) and customise the behaviour of Tekla Structures software. You can follow the instructions to installing PyTekla here.
Setup environment
Before you can start building your VIKTOR - Tekla apps, you will need to complete some steps for the setup.
Step 1: Start a VIKTOR app
You will need to create, install and start an empty app.
If you would like a quick reminder on how to do this, you can follow the steps
here.
For your VIKTOR app, you will not need to add any extra packages to your requirements.txt as they will be installed on
the worker.
Furthermore you can copy app.py below to get started with the VIKTOR - Tekla integration. In this example, the
app.py dumps the parameters into a .json file that the worker will be able to use for run_tekla.py.
import viktor as vkt
import json
from pathlib import Path


class Parametrization(vkt.Parametrization):
    # Add your parameters here


class Controller(vkt.Controller):
    parametrization = Parametrization

    @vkt.IFCView("IFC Viewer", duration_guess=5)
    def show_ifc(self, params, entity_id, **kwargs):
        # Create empty file to dump the params json in
        file = File()
        params['export_ifc'] = True
        with file.open() as f:
            json.dump(params, f)

        # Run the python script and obtain the output files
        analysis = vkt.tekla.TeklaAnalysis(files=[('input.json', file)], output_filenames=["output.ifc"])
        analysis.execute(timeout=60)

        return_ifc = analysis.get_output_file("output.ifc", as_file=True)

        return vkt.IFCResult(return_ifc)
Step 2: Install Tekla worker
Follow these steps to install the worker:
- Development
- Published App
-
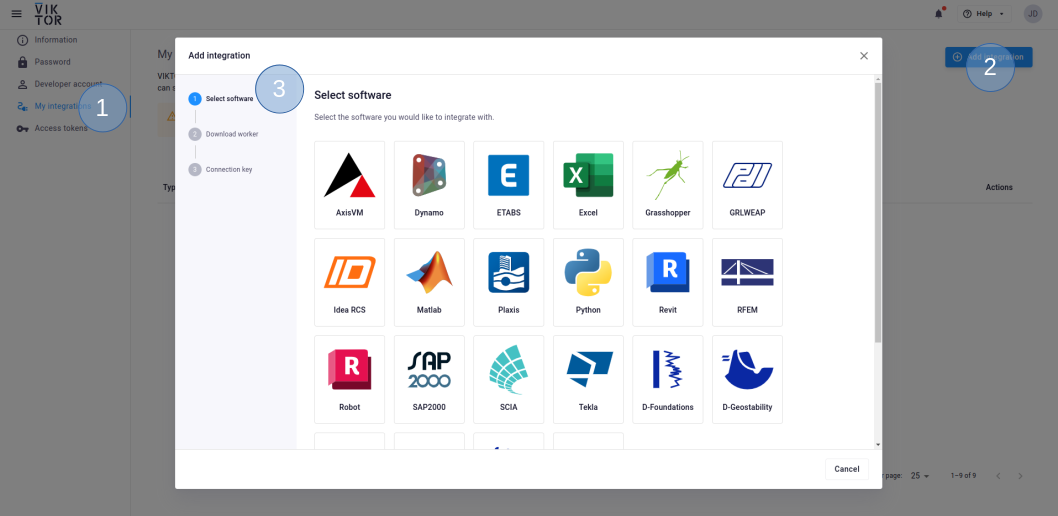
Navigate to the "My Integrations" tab in your personal settings
-
Click "Add integration"
-
Follow the steps provided in the modal

3.1. Select Tekla
3.2. Download the worker .msi (Microsoft Installer) and run it on the machine of choice
3.3. Copy the generated connection key and paste it when the installer asks for it. In the browser, you can now click Finish. Continue the installation in the installer wizard.
Connection KeyThe generated connection key should be copied immediately as VIKTOR will not preserve this data for security reasons.
-
In the installer wizard, select the Python executable of your choice, this can be your system Python, or the python.exe in a dedicated virtual environment
tipYour default Python environment can usually be found in
C:\Users\Username\AppData\Local\Programs\Python\Python31X\python.exeIf you cannot find it, try running the following command in your terminal
where python -
Make sure to launch the worker once the installation is finished. If you closed the integration, you can restart it through the desktop shortcut.
You need to be an environment administrator in order to install a worker for a published app.
-
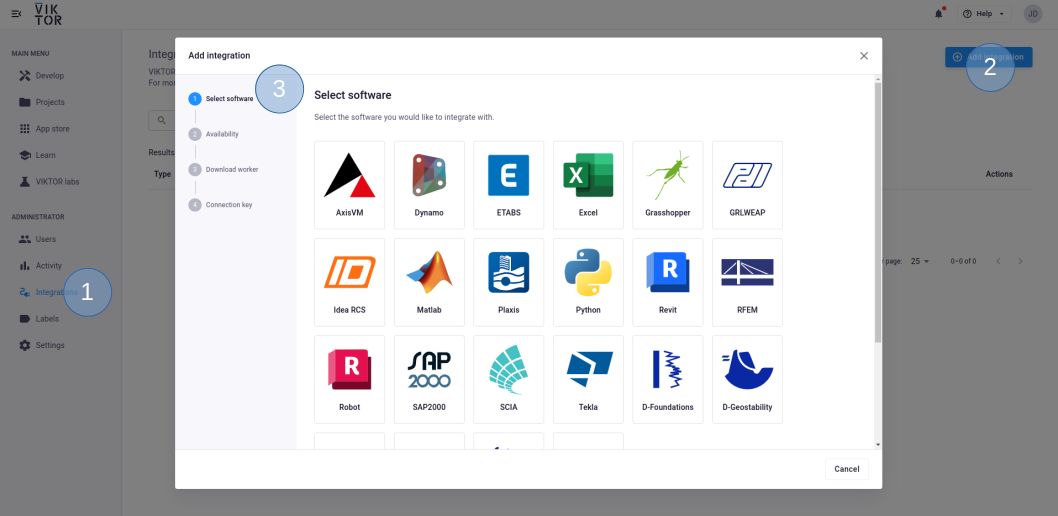
Navigate to the "Integrations" tab in the Administrator panel
-
Click "Add integration"
-
Follow the steps provided in the modal

3.1. Select Tekla
3.2. Select the workspace(s) the integration should be available to
3.3. Download the worker .msi (Microsoft Installer) and run it on the machine of choice
3.4. Copy the generated connection key and paste it when the installer asks for it. In the browser, you can now click Finish and continue in the installer.
Connection KeyThe generated connection key should be copied immediately as VIKTOR will not preserve this data for security reasons.
-
In the installer wizard, select the Python executable of your choice, this can be your system Python, or the python.exe in a dedicated virtual environment
tipYour default Python environment can usually be found in
C:\Users\<Username>\AppData\Local\Programs\Python\Python31X\python.exe.If you cannot find it, try running
where pythonin your terminal. -
Make sure to launch the integration once the installation is finished. If you closed the integration, you can restart it through the desktop shortcut.
Step 3: Configure PyTekla
Open a python environment on the machine that hosts the worker, make sure this is the Python version that you have configured in your worker.
run the following commands:
import pytekla
pytekla.config.set_tekla_path("C:/Program Files/Tekla Structures/2023.0/bin")
Make sure that the Tekla path is set to the bin folder of your Tekla Structures.
You may now run the VIKTOR worker, and connect it to your workspace.
Step 4: Start using Tekla in a VIKTOR app
There are two options to using Tekla in VIKTOR. One way is to use the PyTekla Wrapper to perform all the operations on the Tekla model. The other option is to use Tekla through Grasshopper.
Method 1: use PyTekla
You can use PyTekla's wrpapper to open, save and close models Tekla models. You can copy the boiler plate code into your
run_tekla.py file to get started.
Then you can add your own code to start developing with pyTekla. This boiler plate allows you to edit an active model in
Tekla. Note that this boiler plate is for opening and closing models you will require some extra code.
# THIS FILE HAS TO BE ON THE VIKTOR WORKER DIRECTORY FOR THIS EXAMPLE

# Pip install required packages [on worker]
import os
import json
import math

import ctypes  # An included library with Python install.

from pytekla import wrap
from Tekla.Structures.Model import Model
from Tekla.Structures.Model.Operations import Operation
from System import String


def save_model_as_ifc(path: str) -> bool:
    """This is a function to save the active Tekla model as IFC"""
    model = wrap("Model.Model")
    myie = List[String]()
    myie.Add("..//default//General//Shared//IFC//AdditionalPSets//CIP Construction data.xml")
    flags = Operation.IFCExportFlags()
    flags.IsLocationFromOrganizer = True
    flags.IsPoursEnabled = True

    success = Operation.CreateIFC4ExportFromAll(
        path,
        Operation.IFCExportViewTypeEnum.REFERENCE_VIEW,
        myie,
        Operation.ExportBasePoint.GLOBAL,
        "__Name__",
        "ByObjectClass",
        flags,
        "")
    return success


# Define path to local working directory
workdir = os.getcwd() + '\\'

# Read input parameters from JSON file
with open(workdir + 'input.json') as f:
    params = json.load(f)

# Clear the model to prevent overwriting
model = wrap('Model.Model')
for tekla_obj in model.get_objects_with_types(["Beam"]):
    if tekla_obj:
        tekla_obj.Delete()


# Add your code here


model.commit_changes("Viktor changes")  # Delete this line if you dont want Tekla visualization

# Save ifc
path = workdir + 'output.ifc'
success = save_model_as_ifc(path)
Method 2: use Grasshopper
A powerful connection can also be made with the Grasshopper-Tekla link. Tekla structures are easily created with Grasshopper and the GH-components available. When creating a VIKTOR - Tekla app, Grasshopper can also be used. The main issue is that we want a .ifc from the Tekla model; and Grasshopper nodes don't allow for saving / export Tekla files. This can be solved like this:
- Follow this guide to set up your VIKTOR app that communicates with GH.
- Have your worker look for an
output.ifcin your worker-directory - Use these Grasshopper nodes to create a Tekla model
- Add the following C# component to your Grasshopper file (feel free to replace some defaults, documentation here):
if (run){
    Model model = new Model();
    success = Operation.CreateIFC4ExportFromAll(
        ifc_path,
        Operation.IFCExportViewTypeEnum.REFERENCE_VIEW,
        new List<string> { @"..\\default\\General\\Shared\\IFC\\AdditionalPSets\\CIP Construction data.xml" },
        Operation.ExportBasePoint.GLOBAL,
        "__Name__",
        "ByObjectClass",
        new Operation.IFCExportFlags { IsLocationFromOrganizer = true, IsPoursEnabled = true},
        string.Empty);
}
success = true;
- you can then add the success output to a context print (this way the worker will know the script is finished).
Below you can find an example of how this may look:

Would you like to see an example?
VIKTOR offers a wide variety of sample repositories on GitHub, one of which is the PyTekla integration app.
Testing
TeklaAnalysis.execute needs to be mocked within
the context of (automated) testing.
The viktor.testing module provides the mock_TeklaAnalysis
decorator that facilitate mocking of workers:
import unittest

import viktor as vkt

from viktor.testing import mock_TeklaAnalysis

from app.my_entity_type.controller import MyEntityTypeController


class TestMyEntityTypeController(unittest.TestCase):
    @mock_TeklaAnalysis(get_output_file={
        'result.xml': vkt.File.from_path('test_file.xml'),  # <name>: <File>
        'result.json': vkt.File.from_path('test_file.json'),
        ...
    })
    def test_analysis(self):
        MyEntityTypeController().analysis()
For the decorator's input parameters the following holds:
- If a Sequence type is provided, the next entry is returned for each corresponding method call. When a call is performed on a depleted iterable, an Exception is raised.
- If a single object is provided, the object is returned each time the corresponding method is called (endlessly).
- If None is provided (default), a default File/BytesIO object (with empty content) is returned each time the corresponding method is called (endlessly).