Rhino / Grasshopper
This guide provides the basic information about our Rhino/Grasshopper integration.
If you setup this integration for the first time, we recommend to follow the Rhino/Grasshopper tutorial.
There are 2 ways to integrate VIKTOR with Rhino/Grasshopper:
- Connect to Rhino/Grasshopper on your local computer via the Hops component and a dedicated worker
- Connect to a Rhino Compute Server
We recommend to use the worker (1) when you don't have a Rhino Compute server yet and you want to get started quickly, and to setup a Rhino Compute server (2) when you want to go to production with your app.
Having the basic RhinoCompute setup running may be fine for developing/testing purposes but might not be the ideal solution for production apps, in terms of license billing. Please check RhinoCompute: Licensing & Billing for further details.
System requirements:
- 💻 Windows PC
- 🦏 Rhino 7 with Hops plugin installed
- 🐍 Python =< 3.13 (Check this with your version of Rhino)
Method 1: Connect to Rhino/Grasshopper on your local computer
VIKTOR's Rhino / Grasshopper integration can be set up using the dedicated Grasshopper worker.
If you don't want to have to start Grasshopper; check out how to run RhinoCompute (locally) without running Rhino or Grasshopper
Add integration to app config
To make the worker integration available through the interface, add the following to your viktor.config.toml:
worker_integrations = [
    "grasshopper",
]
Instructions on how to manually install the worker can be found here.
VIKTOR app
In the VIKTOR app, the input files for the worker are defined and the GrasshopperAnalysis is executed to run the Grasshopper worker on the server.
Start by adding your grasshopper script to the app folder (if you would like a script, you can find one in our
tutorial) and add the code below to your app.py file:
import viktor as vkt
import json
import rhino3dm
from pathlib import Path


class Parametrization(vkt.Parametrization):
    # Input fields that correspond with the HOPS components
    ...


class Controller(vkt.Controller):
    parametrization = Parametrization

    @vkt.GeometryView("Geometry", duration_guess=10, x_axis_to_right=True, update_label='Run Grasshopper')
    def run_grasshopper(self, params, **kwargs):
        grasshopper_script_path = Path(__file__).parent / "your_grasshopper_script.gh"
        script = vkt.File.from_path(grasshopper_script_path)
        input_parameters = dict(params)

        # Run the Grasshopper analysis and obtain the output data
        analysis = vkt.grasshopper.GrasshopperAnalysis(script=script, input_parameters=input_parameters)
        analysis.execute(timeout=30)
        output = analysis.get_output()

        # Convert output data to mesh
        file3dm = rhino3dm.File3dm()
        obj = rhino3dm.CommonObject.Decode(json.loads(output["values"][0]["InnerTree"]['{0}'][0]["data"]))
        file3dm.Objects.AddMesh(obj)

        # Write to geometry_file
        geometry_file = vkt.File()
        file3dm.Write(geometry_file.source, version=7)
        return vkt.GeometryResult(geometry=geometry_file, geometry_type="3dm")
Then you will need to add your input fields that correspond to the Hops components in your grasshopper file (see next section) and make sure to replace your_grasshopper_script.gh with the name of your script.
For a full example on how the components relate to the inputs, feel free to check out the grasshopper tutorial.
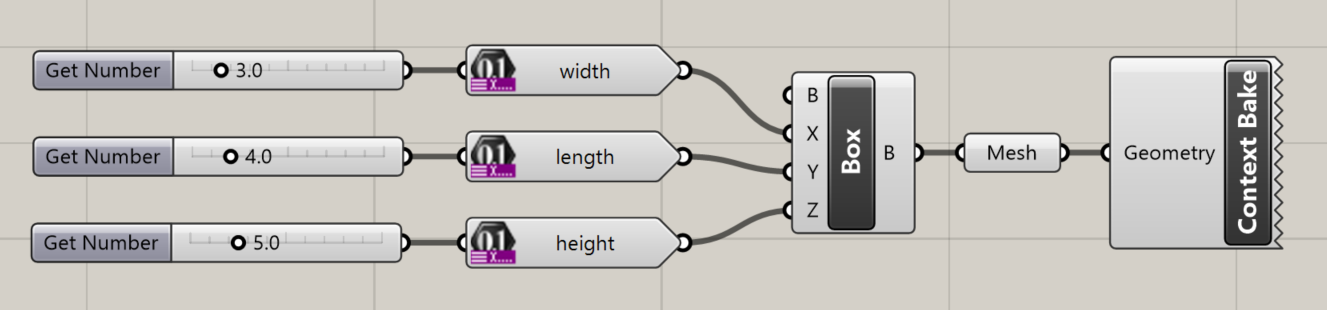
Grasshopper script
The Grasshopper script should be defined so that the Hops 'Get components' are connected to the inputs and outputs. The 'Get components' can be found under Params Tab > Util Group. Components preceded by 'Get' can be used as an input parameter. The 'Context bake' and 'Context print' components should connected to the desired output components to return geometry or text respectively. See the Rhino documentation for an extensive explanation.
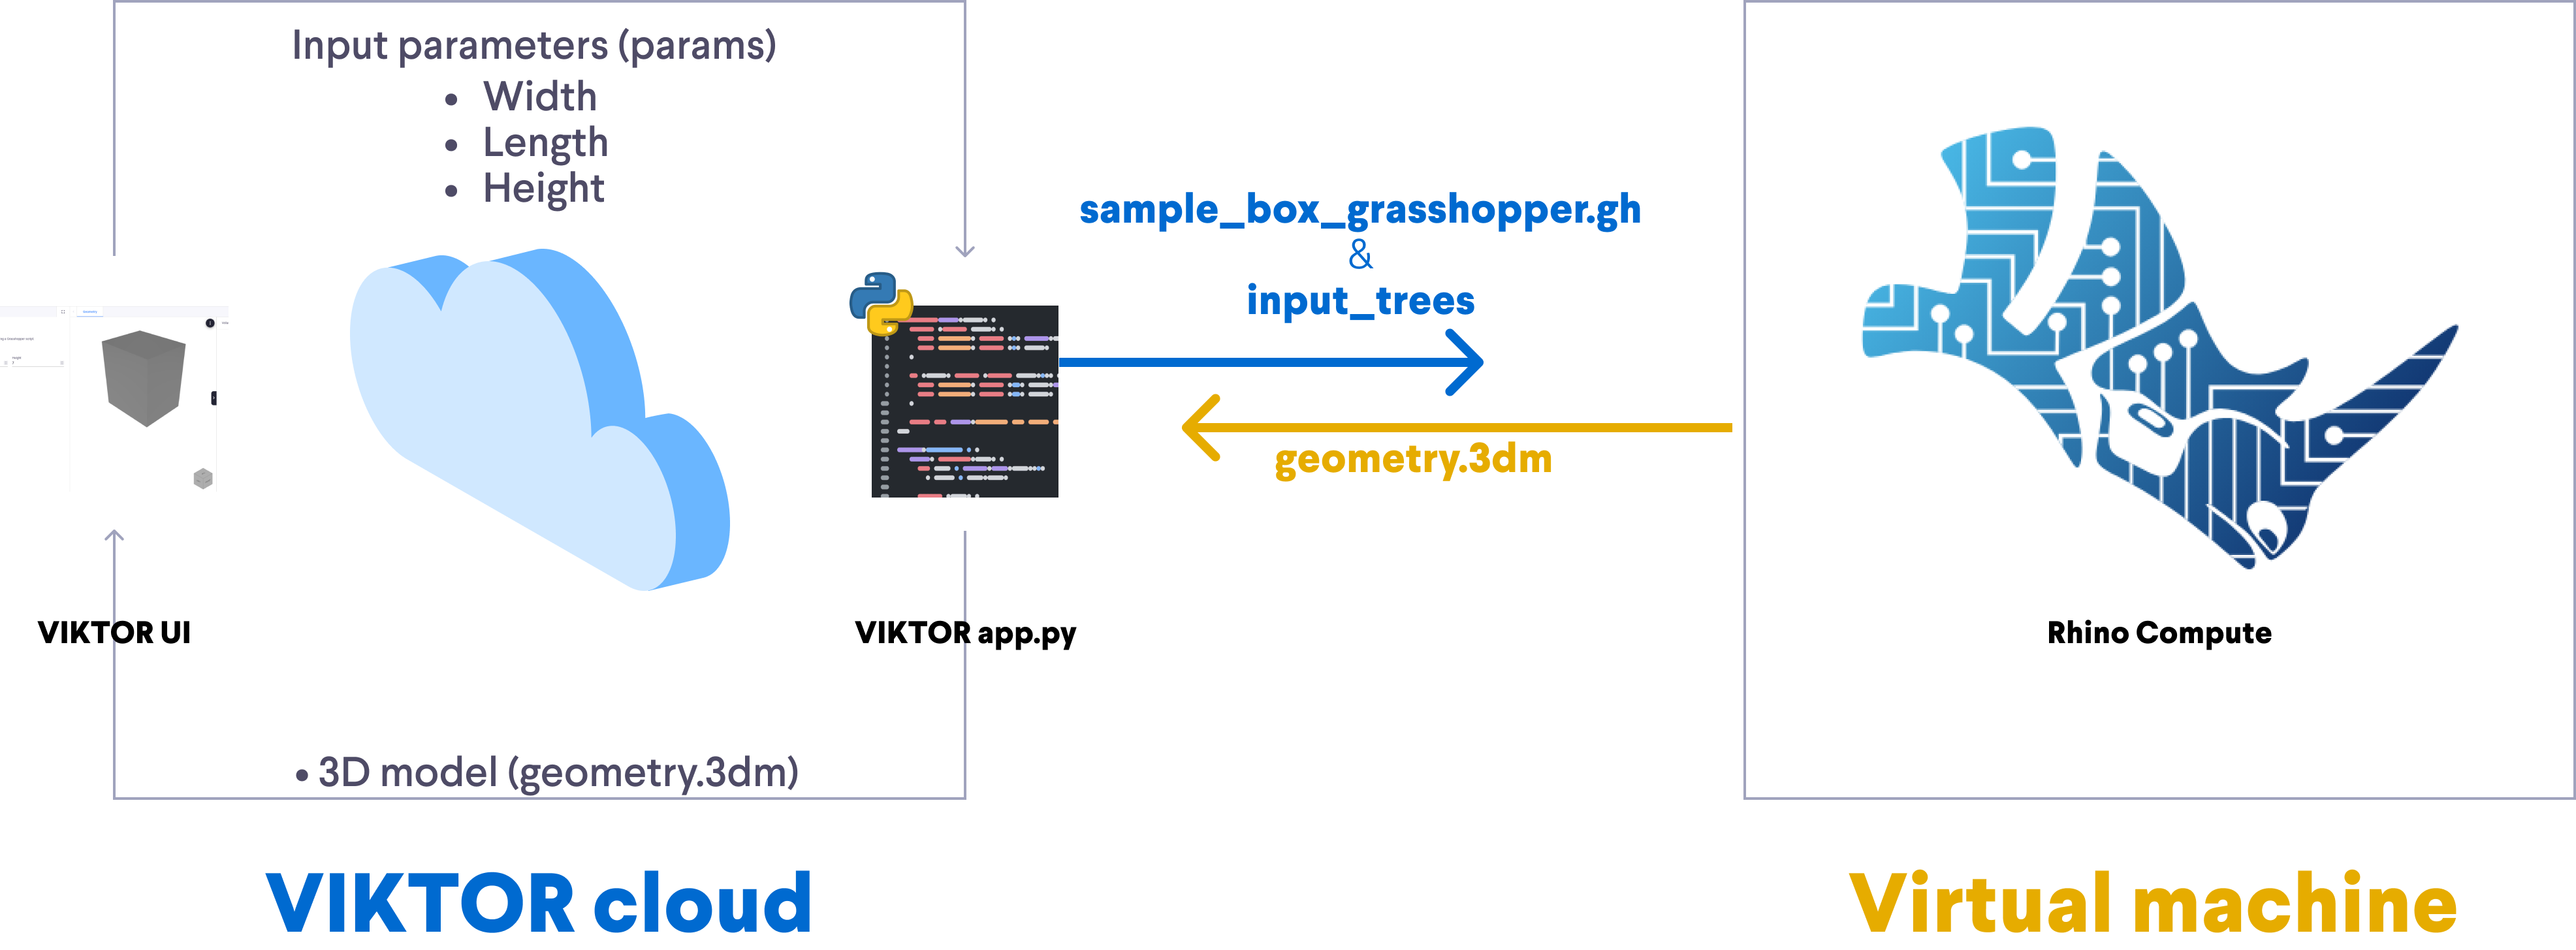
Method 2: Connect your app to a Rhino Compute Server
Instead of using the worker and the local version of Rhino Compute with Hops, you can also connect the VIKTOR app directly to a Rhino Compute Server:
This has the following advantages:
- Faster (the worker creates some overhead running time)
- More robust and scalable, you can make sure the compute server is always running
The main disadvantage is that it takes time and effort to setup a Rhino Compute Server, which takes time and needs to be done by someone who is familiar with setting up Virtual Machines (i.e. an IT department). We recommend to use the worker when you don't have a Rhino Compute server yet and you want to get started quickly, and to setup a Rhino Compute server when you want to go to production with your app.
The following steps are needed to connect your app to a Rhino Computer Server:
1. Setup the Rhino Compute Server
McNeel has documented how to setup a Rhino Compute Server very clear and extensively, see the Compute Guides. Once you have the Rhino Compute Server running, you should have a URL and an API key. Now you can connect your VIKTOR app to this Rhino Compute server.
2. Adjust your app code
Since the compute server is available via the internet, we can now directly communicate with this server in the app code. Change app.py to the following code:
import viktor as vkt
import compute_rhino3d.Grasshopper as gh
import compute_rhino3d.Util
import json
import os
import rhino3dm
import tempfile
from pathlib import Path


class Parametrization(vkt.Parametrization):
    # Input fields that correspond with the HOPS components
    ...


class Controller(vkt.Controller):
    parametrization = Parametrization

    @vkt.GeometryView("Geometry", x_axis_to_right=True, update_label='Run Grasshopper')
    def run_grasshopper(self, params, **kwargs):
        # Credentials for Rhino Compute api
        compute_rhino3d.Util.url = os.getenv("RHINO_COMPUTE_URL")
        compute_rhino3d.Util.apiKey = os.getenv("RHINO_COMPUTE_API_KEY")

        # Create an input tree with the input parameters
        input_trees = []
        for key, value in params.items():
            tree = gh.DataTree(key)
            tree.Append([{0}], [str(value)])
            input_trees.append(tree)

        # Evaluate the Grasshopper definition
        output = gh.EvaluateDefinition(
            str(Path(__file__).parent / 'your_grasshopper-script.gh'),
            input_trees
        )

        # Create a new rhino3dm file and add resulting geometry to file
        file = rhino3dm.File3dm()
        output_geometry = output['values'][0]['InnerTree']['{0}'][0]['data']
        obj = rhino3dm.CommonObject.Decode(json.loads(output_geometry))
        file.Objects.AddMesh(obj)

        # Write a temporary file
        temp_file = tempfile.NamedTemporaryFile(suffix=".3dm", delete=False, mode="wb")
        temp_file.close()
        file.Write(temp_file.name, 7)

        return vkt.GeometryResult(geometry=vkt.File.from_path(Path(temp_file.name)), geometry_type="3dm")
Since we need to send the Grasshopper file to the Rhino Compute server (line 37), place your_grasshopper_script.gh in the same folder as app.py.
As you can see, we are now using the packages compute-rhino3d and rhino3dm in the app code, so we should add these to the requirements.txt:
viktor==X.X.X
compute-rhino3d==0.12.2
rhino3dm==8.17.0
Make sure to set the right Python version to match the rhino3dm distribution in viktor.config.toml:
app_type = 'editor'
python_version = "3.14"
Because of these changes to the requirements and Python version, reinstall the app in the terminal:
> viktor-cli install
Now we can start the app!
As you can see in line 34 and 35, we have not placed the URL and API Key in the code because of security reasons (you do not want to leak these credentials).
When you start the app, add the credentials as follows:
> viktor-cli start --env RHINO_COMPUTE_URL="YOUR_URL" --env RHINO_COMPUTE_API_KEY="YOUR_API_KEY"
Now open the app and you should see a running app with the Rhino Compute server running behind it! 🚀
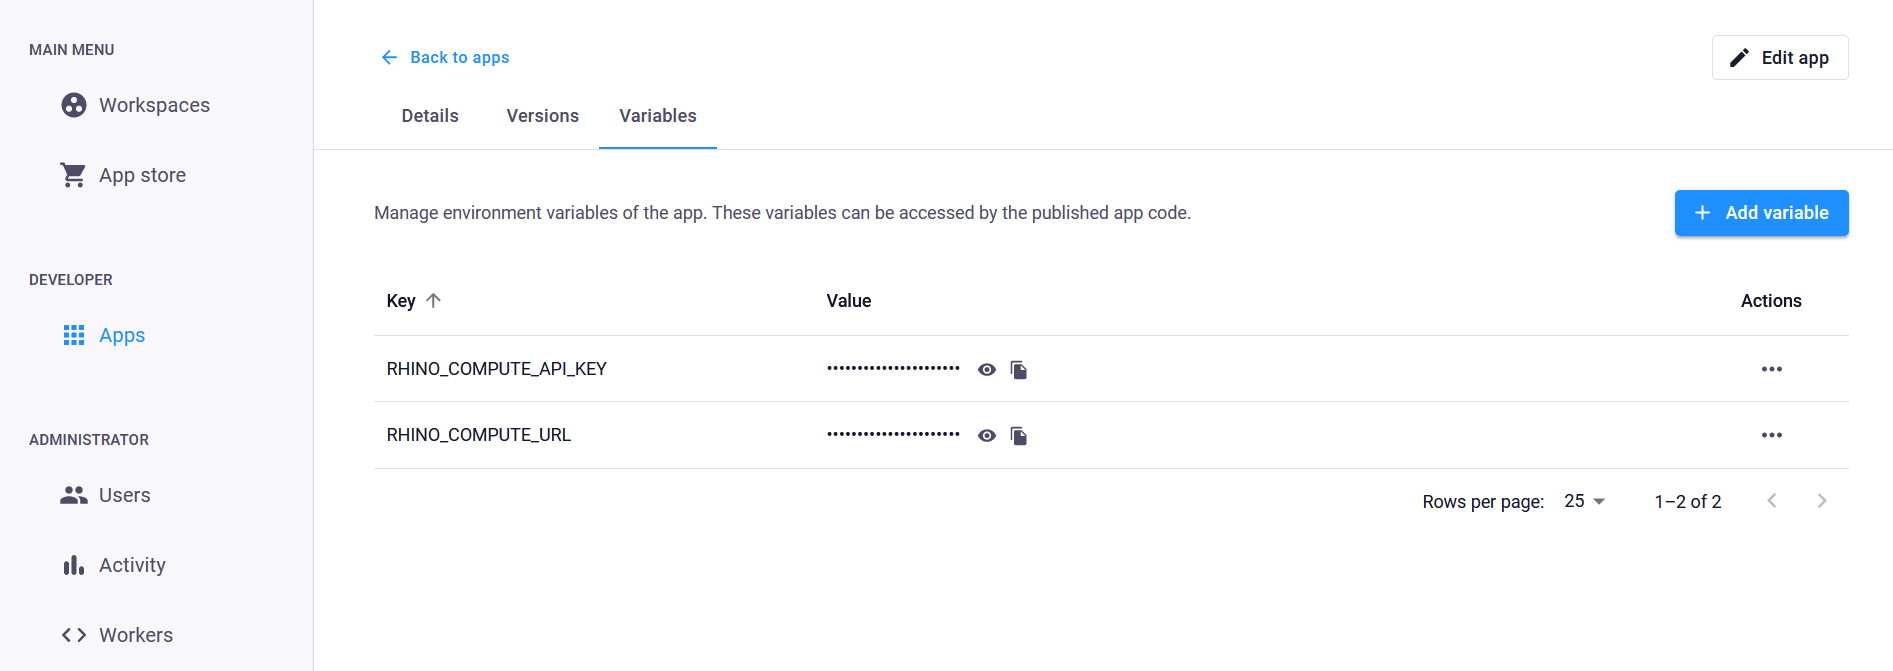
3. Publish your app with the API credentials
If you want to make your app available for other people to use, you can easily do this by publishing the app.
In that case you'll need to add the environment variables for the URL and API key to the app as described in this guide.
Note that these environment variables are only visible to the maintainers of the app, users will never have access to these variables unless specifically been assigned so.