Dynamo Sandbox
This guide is only relevant for Dynamo Sandbox, not to be confused with the Dynamo plugin for Revit!
This guide provides the basis information about our Dynamo Sandbox integration.
If you setup this integration for the first time, we recommend to follow the Dynamo tutorial.
A dynamo module has been developed by VIKTOR which can be used for
easy updating of Dynamo input files and processing output files (results + geometry). With the Dynamo
worker you will also be able to completely automate an integration with Dynamo Sandbox.
Install a Dynamo worker
Follow these steps to install the worker:
- Development
- Published App
-
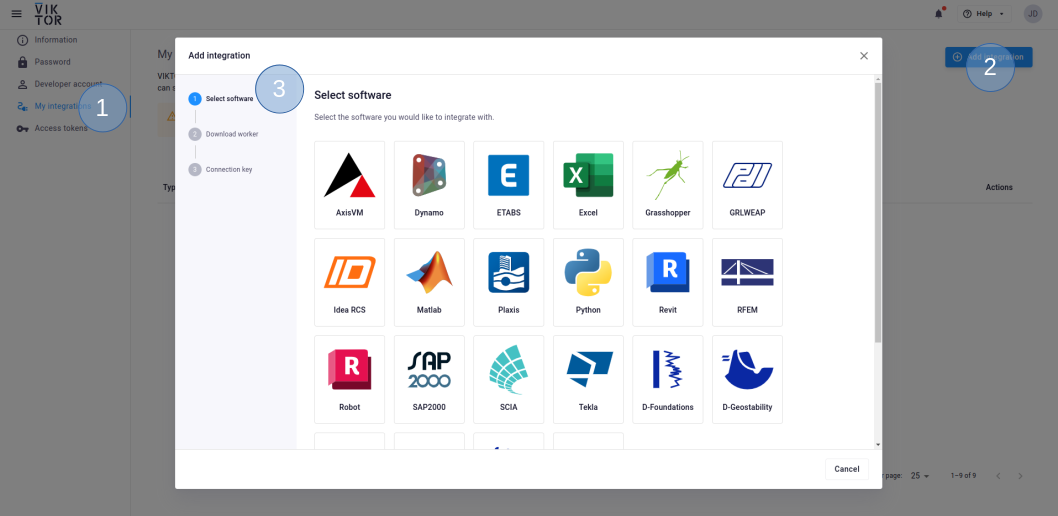
Navigate to the "My Integrations" tab in your personal settings
-
Click "Add integration"
-
Follow the steps provided in the modal

3.1. Select Dynamo
3.2. Download the worker .msi (Microsoft Installer) and run it on the machine of choice
3.3. Copy the generated connection key and paste it when the installer asks for it. In the browser, you can now click Finish. Continue the installation in the installer wizard.
Connection KeyThe generated connection key should be copied immediately as VIKTOR will not preserve this data for security reasons.
-
In the installer wizard, select the DynamoWPFCLI executable
-
Make sure to launch the worker once the installation is finished. If you closed the integration, you can restart it through the desktop shortcut.
You need to be an environment administrator in order to install a worker for a published app.
-
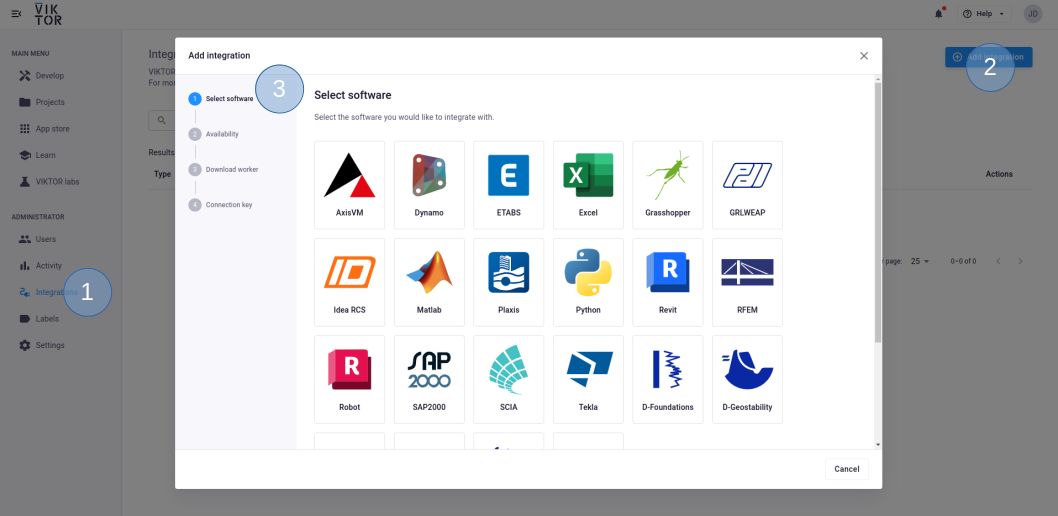
Navigate to the "Integrations" tab in the Administrator panel
-
Click "Add integration"
-
Follow the steps provided in the modal

3.1. Select Dynamo
3.2. Select the workspace(s) the integration should be available to
3.3. Download the worker .msi (Microsoft Installer) and run it on the machine of choice
3.4. Copy the generated connection key and paste it when the installer asks for it. In the browser, you can now click Finish and continue in the installer.
Connection KeyThe generated connection key should be copied immediately as VIKTOR will not preserve this data for security reasons.
-
In the installer wizard, select the DynamoWPFCLI executable
-
Make sure to launch the integration once the installation is finished. If you closed the integration, you can restart it through the desktop shortcut.
Updating a model
An existing Dynamo model can be passed to VIKTOR's
DynamoFile as shown below. With the update method,
the value of input nodes can be updated. When all inputs have been updated as desired, the generate method can be
used to generate an updated File object.
import viktor as vkt

file = vkt.File.from_path("template.dyn")
dyn_file = vkt.dynamo.DynamoFile(file)

# update input nodes
radius = params.radius
dyn_file.update('Radius', radius)  # input node called "Radius"
...

# generate updated file
input_file = dyn_file.generate()
Running an analysis
Integrating with Dynamo Sandbox can be done using the
DynamoAnalysis class (worker required):
files = [
    ('input.dyn', input_file),
]

# run the analysis
analysis = vkt.dynamo.DynamoAnalysis(files=files, output_filenames=["output.xml", "geometry.json"])
analysis.execute(timeout=60)
The executable_key in the example above refers to the "dynamo" command. This command should also be specified in the
configuration file on the server, located in the same directory as the worker. By pointing to the file location of
DynamoWPFCLI.exe (Dynamo Sandbox command-line interface), the Dynamo Sandbox integration can be established. With
additional arguments we can specify where the input model is located and where the results should be exported to.
See the Dynamo Sandbox documentation for more info on running Dynamo from the command-line.
config.yaml
executables:
  dynamo:
    path: 'C:\path\to\DynamoSandbox\DynamoWPFCLI.exe'
    arguments:
      - '-o'
      - 'input.dyn'
      - '-v'
      - 'output.xml'
maxParallelProcesses: 1
Geometry can also be exported, for which an installation of either "FormIt" or "Revit" is required:
    arguments:
    ...
    - '-gp'
    - 'C:\Program Files\Autodesk\FormIt'  # or Revit
    - '-g'
    - 'geometry.json'
Processing results
After running the analysis, the output file (.xml) can be obtained using:
output_file = analysis.get_output_file("output.xml", as_file=True)
With the as_file flag, VIKTOR is instructed to return a File object which can directly be passed to the
get_dynamo_result function. The results can then
be obtained by node id, which corresponds to the same node id as the input file.
import viktor as vkt

dyn_file = vkt.dynamo.DynamoFile(file)
...
output_id = dyn_file.get_node_id("Area")  # output node called "Area"
with output_file.open_binary() as f:
    result = vkt.dynamo.get_dynamo_result(f, id_=output_id)
Results will be returned as str type, which means you will need to take care of conversions in the app.
Processing geometry
In a similar matter the geometry file can be obtained after the analysis has been performed. With the helper function
convert_geometry_to_glb, you can convert it
to a GLB type file, which can directly be visualized in a GeometryResult.
import viktor as vkt

@vkt.GeometryView(...)
def geometry_view(self, params, **kwargs):
    ...
    geometry_file = analysis.get_output_file('geometry.json', as_file=True)
    glb_file = vkt.dynamo.convert_geometry_to_glb(geometry_file)
    return vkt.GeometryResult(glb_file)
Testing
DynamoAnalysis.execute needs to be mocked within
the context of (automated) testing.
The viktor.testing module provides the mock_DynamoAnalysis
decorator that facilitate mocking of workers:
import unittest

import viktor as vkt

from viktor.testing import mock_DynamoAnalysis

from app.my_entity_type.controller import MyEntityTypeController


class TestMyEntityTypeController(unittest.TestCase):
    @mock_DynamoAnalysis(get_output_file={
        'result.xml': vkt.File.from_path('test_file.xml'),  # <name>: <File>
        'result.json': vkt.File.from_path('test_file.json'),
        ...
    })
    def test_analysis(self):
        MyEntityTypeController().analysis()
For the decorator's input parameters the following holds:
- If a Sequence type is provided, the next entry is returned for each corresponding method call. When a call is performed on a depleted iterable, an Exception is raised.
- If a single object is provided, the object is returned each time the corresponding method is called (endlessly).
- If None is provided (default), a default File/BytesIO object (with empty content) is returned each time the corresponding method is called (endlessly).