Tutorial - 3D models
Level: Beginners
Time: 30 min
Prerequisites:
- You have an account and completed the installation process. No account? Get one here
- You have some experience with reading Python code

Introduction
As a designer or engineer, creating 3D models is an essential part of your work. 3D models can help you visualize and communicate complex concepts in a way that is easy to understand. In this tutorial, we will explore how to create 3D models in VIKTOR using Python.
By the end of this tutorial, you will have the skills and knowledge needed to create your own 3D models in VIKTOR using Python. We will start with simple shapes and gradually work our way up to more complex models. Whether you are a beginner or an experienced designer, this tutorial will provide you with a solid foundation in 3D modeling with VIKTOR.
This tutorial consists of six different sections:
- Create an empty app
- Set up the basis
- Drawing the bridge deck
- Adding supports
- The finishing touches
- The complete app code
To give you an idea of what you will be creating, here's a GIF of the application you will me making throughout this tutorial:
 What the app looks like once you complete this tutorial
1. Create app folder
Is your app code giving you an error? Take a look at the complete app code.
Also know that you can always ask help at our Community Forum, where our developer are ready to help with any question related to the installation, coding and more.
When developing app, you store the code on your hard drive. So let's create some folders to store the code.
-
If you haven't yet, create a folder called
viktor-appsto store all your apps. Let's do this inside your user folder, like shown here:C:\Users\<username>\viktor-appsLINUX
Are you a Linux user? Then make sure the CLI has full rights in the apps directory, by changing its permissions with:
sudo chmod -R 777 ~/viktor-apps -
Inside
viktor-apps, make another folder called3D-model-tutorialfor this project:C:\Users\<username>\viktor-apps\3D-model-tutorial
2. Create, install and start an empty app
Let's now create, install and start a blank app template. We will use the blank template to create our data analysis app.
But before we start, make sure to shut down any app that is running (like the demo app) by closing the command-line shell
(for example Powershell) or cancel the process using Ctrl + C.
Follow these steps to create, install and start a blank app template:
-
Open your preferred Integrated Development Environment (IDE), like PyCharm or VS Code.
-
Click File -> Open, and open the folder
3D-model-tutorialwe created before as a new project. -
Inside your IDE, open the terminal. The keyboard shortcut to open a terminal in PyCharm is
Alt + F12and in VS CodeCtrl+Shift+` -
In the terminal, use the command shown below to create empty app template files inside the folder
3D-model-tutorialviktor-cli create-app --app-type editor -
Now we'll install your app and all its dependencies (including
plotlyandpandas) by running this command in the terminal. Just be a patient, this could take up to 5 minutes... Maybe it's time for a ☕?viktor-cli clean-startIf all went well, your empty app is installed and running one your development workspace. Do not close the terminal as this will break the connection with your app.
You can see your app which you can see by visiting the URL shown in the terminal (for example https://cloud.viktor.ai)
Your terminal should show something like this:
 INFO     : Connecting to platform...
 INFO     : Connection is established: https://cloud.viktor.ai  <---- here you can see your app
 INFO     : The connection can be closed using Ctrl+C
 INFO     : App is ready
- You only need create an app template and install it once for each new app you want to make.
- The app will update automatically once you start adding code in
app.py, as long as you don't close the terminal or your IDE. - Did you close your IDE? Use
viktor-cli startto start the app again. No need to install, clear, etc.
Did it not work because you got an error messages?
Some troubleshooting
-
Always make sure to check the spelling of everything you placed in the command-line, a small mistake and the command you are trying to run may not be recognised!
-
If you are encountering:
ERROR:
  Exiting because of an error: no requirements.txt file
PS C:\Users\<username>\viktor-apps>
Then you are not in the correct folder! check the command-line and navigate to the 3D-model-tutorial folder.
-
If you are encountering:
Error: App definition is not compatible with the data currently stored in the database. Use the command 'viktor-cli clear' to clear the database.
PS C:\Users\<username>\viktor-apps\3D-model-tutorial>
That means you have not cleared the database yet! Use the
viktor-cli clearto clear and then you can useviktor-cli startto start the app. No need to install it again!
Not seeing any of these errors? Head over to our community! There is a good chance another developer encountered it and solved it too!
3. Set up the basis
In this tutorial we will make a 3D model. In this example case you will be modelling a bridge including a simplified version of the river running underneath it, the sloped embankment on the side of the river and the supports underneath the bridge. 🌉
Let's start easy and create a simple bridge deck and a river running underneath it, and some input fields to change the dimensions.
Input fields
We will add 4 inputfields to define the dimensions of our bridge, our app: length, width, height and deck_thickness.
We will use a Numberfield, for each.
-
Open
app.py, and add the relevant fields to your parametrization. It is always good to give people some context usingTextelements. Don't forget to import the necessary fields. In the end yourapp.pyfile should look like this:from viktor import ViktorController
from viktor.parametrization import ViktorParametrization, NumberField, Text
class Parametrization(ViktorParametrization):
intro = Text("# 3D model app 🌉\n This app parametrically generates and visualises a 3D model of a bridge")
txt_deck = Text('### Deck layout ') # texts can be used for explanation in the user-interface
length = NumberField("Deck length", min=6, default=100, suffix='m')
width = NumberField("Deck width", min=2, default=20, suffix='m')
deck_thickness = NumberField("Deck thickness", min=0.5, default=1, suffix='m')
height = NumberField("Bridge height", min=2, default=10, suffix='m')
class Controller(ViktorController):
label = 'My Entity Type'
parametrization = Parametrization -
Refresh your app, and you should see the input fields there.
Basic set up & the river
We don’t need a bridge if there is no river. So, let’s start with making the river step by step and set up the basis for the next parts, so we can explain some concepts.
-
We want to show a 3D model, so we will create a
GeometryViewinside yourcontrollerlike this:class Controller(ViktorController):
label = 'My Entity Type'
parametrization = Parametrization
@GeometryView("3D", duration_guess=1, x_axis_to_right=True)
def visualize_bridge(self, params, **kwargs):
return GeometryResult(geometry_group) -
Inside
visualize_bridge, we'll create a emptyGroupto store all elements we want to show:# Create an empty group to hold all the geometry
geometry_group = Group([]) -
Now we'll define the measurements of the river and bridge's surroundings. We don’t want to make new input field for that, so we will just use the bridge measurements for this. Inside
visualize_bridge:# Measurements environment
env_width = params.length
env_thick = params.deck_thickness # Thickness of water and embankment
water_width = params.length - 2 * params.height # Assuming embankment at 45 deg -
Then, create a
Materialso we can make the water blue, and let's make it a bit transparent. Insidevisualize_bridge:# Create materials
mat_water = Material('Water', color=Color.blue(), opacity=0.7) -
Next, create the water by drawing a box is using
SquareBeamand add it to theGroupwe made before. Insidevisualize_bridgeadd:# Draw water
water = SquareBeam(water_width, env_width, env_thick, material=mat_water) -
The last step is return the geometry, so it is visualized:
geometry_group.add([water]) -
Don't forget to import all the necessary parts at the beginning of your code:
from viktor import Color
from viktor.views import GeometryView, GeometryResult
from viktor.geometry import Group, Material, SquareBeam -
Update your app, and you will see the river
All code until now
Click here to see all code until now
from viktor import ViktorController, Color
from viktor.parametrization import ViktorParametrization, Text, NumberField
from viktor.views import GeometryView, GeometryResult
from viktor.geometry import Group, Material, SquareBeam
class Parametrization(ViktorParametrization):
intro = Text("# 3D model app 🌉\n This app parametrically generates and visualises a 3D model of a bridge")
txt_deck = Text('### Deck layout ') # texts can be used for explanation in the user-interface
length = NumberField("Deck length", min=6, default=100, suffix='m')
width = NumberField("Deck width", min=2, default=20, suffix='m')
deck_thickness = NumberField("Deck thickness", min=0.5, default=1, suffix='m')
height = NumberField("Bridge height", min=2, default=10, suffix='m')
class Controller(ViktorController):
label = 'My Entity Type'
parametrization = Parametrization
@GeometryView("3D", duration_guess=1, x_axis_to_right=True)
def visualize_bridge(self, params, **kwargs):
# Create an empty group to hold all the geometry
geometry_group = Group([])
# Measurements environment
env_width = params.length
env_thick = params.deck_thickness                   # Thickness of water and embankment
water_width = params.length - 2 * params.height     # Assuming embankment at 45 deg
# Create materials
mat_water = Material('Water', color=Color.blue(), opacity=0.7)
# Draw water
water = SquareBeam(water_width, env_width, env_thick, material=mat_water)
geometry_group.add([water])
return GeometryResult(geometry_group)
4. Drawing the bridge deck
Now that we have the basis for drawing our 3D models, and a beautiful river 😉, we can quickly create the bridge:
Adding the deck
We'll create the bridge inside the GeometryView, like we did before.
-
Create the deck, using the
SquareBeamfunction as well, and give the deck a width, length and thickness.deck = SquareBeam(params.length, params.width, params.deck_thickness) -
SquareBeamcreates a box with its centre at the origin (0, 0, 0). In order to move the deck to the correct position let's usetranslatedeck.translate((0, 0, params.height)) -
Now we will create the deck top, you can interpret this top as the asphalt layer of the bridge. But first, let's define a new material. This time we'll define the
Colorusing RGB values:mat_deck_top = Material('Deck top', color=Color(60, 60, 60)) -
Again, use
SquareBeamandtranslateit in the z-direction:deck_top = SquareBeam(params.length, params.width, params.deck_thickness / 4, material=mat_deck_top)
deck_top.translate((0, 0, params.height + 5/8*params.deck_thickness)) -
Add the created elements to the geometry
Groupso they get visualized:geometry_group.add([deck, deck_top]) -
Refresh your application, you should see the water and the bridge in 3D view.
5. Adding supports
That's a really beautiful bridge, but something feels wrong, it looks like the bridge is flying, so we are now going to generate some supports for it, parametrically of course.
The plan
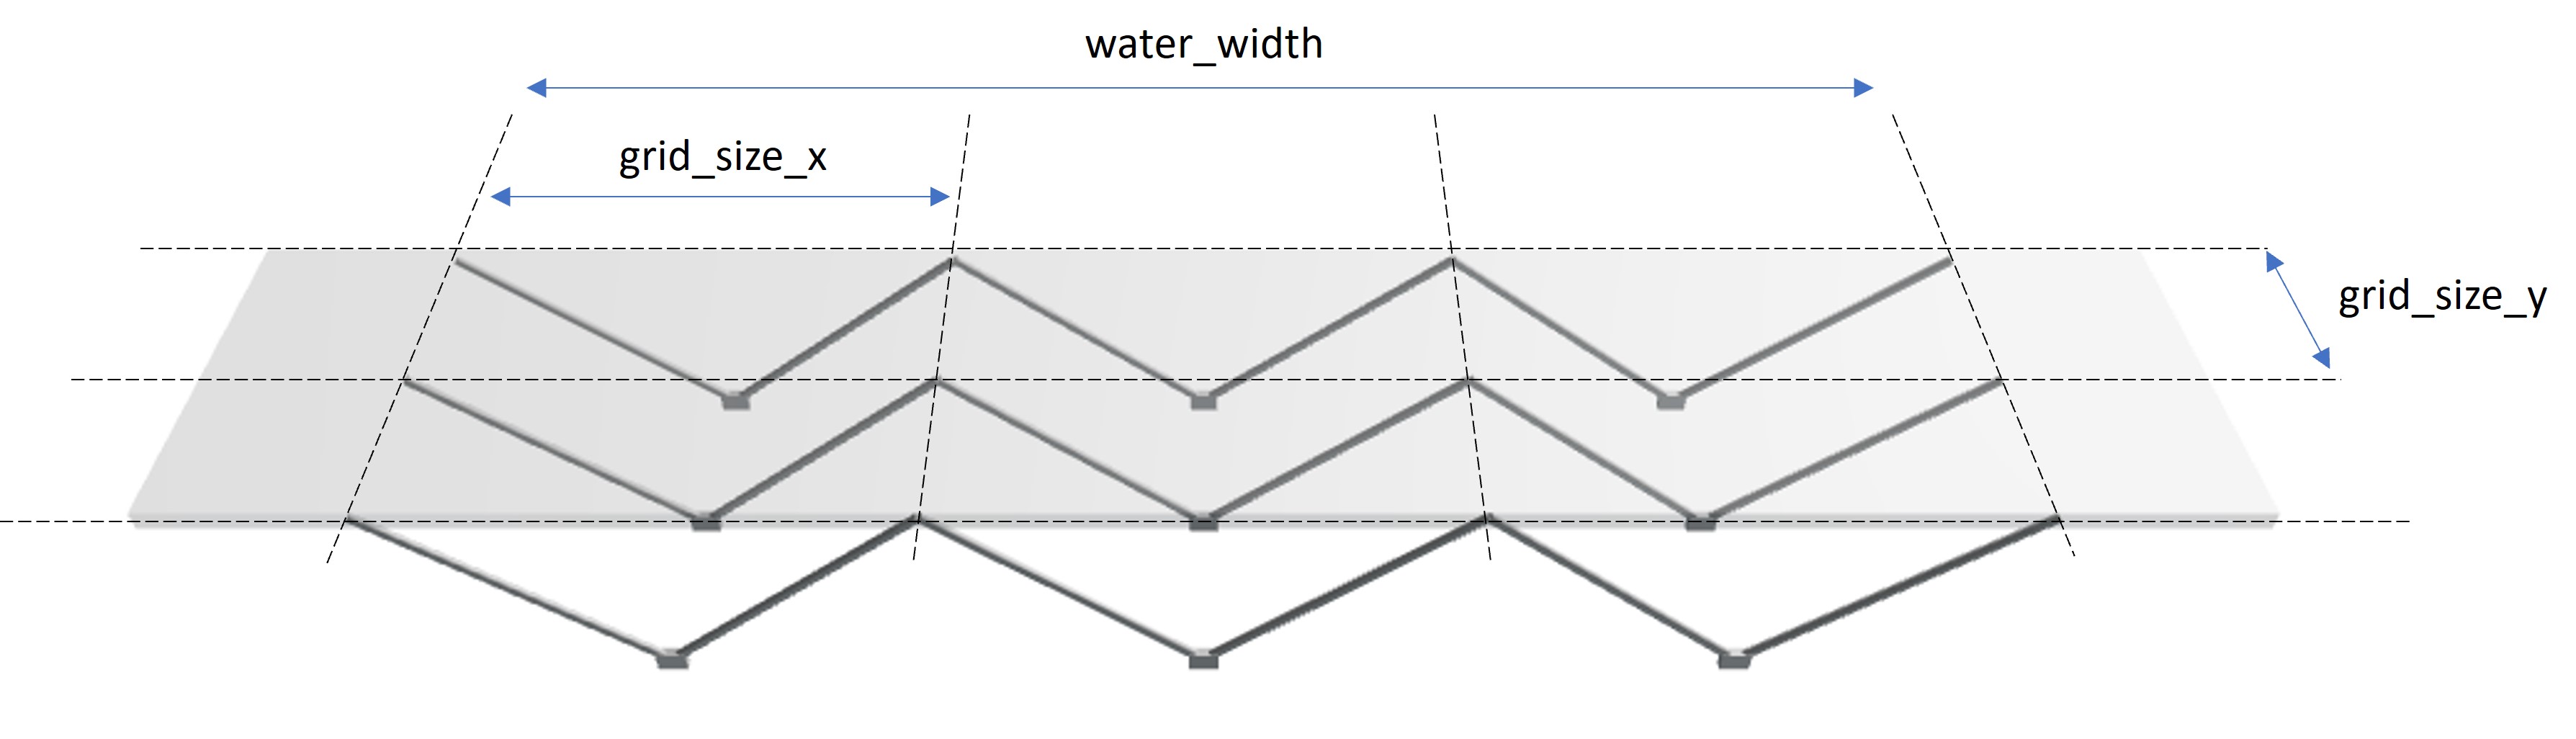
Before going into the code, let's discuss the plan. We will make a V-shaped support and place it on several locations according to a 'grid', as shown here:
Input fields
With that said, let's jump into the code.
-
We will add 2 input fields to our app:
support_amount,support_piles_amount. These inputs will define how many supports we want. Inside theparametrizationclass add the following three lines of code:txt_support = Text('### Support layout', flex=100)
support_amount = NumberField("Number of supports", default=2, min=1)
support_piles_amount = NumberField("Number of piles per support", min=2, default=3) -
Refresh your app and you should see the new input fields.
Create one support
Next let's make the bridge supports. The supports each consist of two columns in a V-formation placed on a support box.
As before, we will draw the different element inside the GeometryView
-
Inside your
GeometryViewbefore thereturn, we will define the pile diameter and the grid size. Note that we did not create an input field to define the diameter (but feel free), so we will make it equal to ½ of the deck thickness:pile_diameter = params.deck_thickness / 2
grid_size_x = water_width / params.support_amount
grid_size_y = (params.width - pile_diameter) / (params.support_piles_amount - 1) -
Draw one column and use
mirror_objectto get the V-shape. We draw the column by extruding a circle along a line usingCircularExtrusion:# Draw columns
top_point = Point(-grid_size_x/2, 0, params.height)
bottom_point = Point(0, 0, 0)
column_line = Line(top_point, bottom_point)
column_1 = CircularExtrusion(pile_diameter, column_line)
column_2 = mirror_object(column_1, Point(0, 0, 0), (1, 0, 0)) -
Let's now add the box at the base to complete our support:
# Draw base
column_base = SquareBeam(3 * pile_diameter, pile_diameter, 2*pile_diameter) -
For the next step, it is convenient to put the 3 elements we just made in a new
Group:support = Group([column_1, column_2, column_base]) -
Don't forget to import:
from viktor.geometry import Point, Line, CircularExtrusion, mirror_object -
Let's see our progress by temporarily adding the
supportto ourgeometry_groupand updating your app:geometry_group.add([support]) -
Before continuing, eliminate the line of code we added in the last step.
Repeating the supports
We will now use the support we draw in the last section and repeat it according to our grid. As before, we will continue
to work inside our GeometryView.
When we hear repeating, our Python minds immediately think in a for loop. But in VIKTOR, we do not use a for loop for
making repetitive geometries. This will make you app unnecessary slow. For this Pattern, LinearPattern, and
BidirectionalPattern are better suited. This can reduce the loading time from minutes to seconds in larger models.
-
First, place the
supportin the corner of the grid usingtranslate:support.translate((-water_width/2 + grid_size_x/2, -params.width/2 + pile_diameter/2, 0)) -
Now, we will copy the support using
BidirectionalPattern. While this may seem like a difficult function at first, the implementation is surprisingly easy:
all_supports = BidirectionalPattern(
base_object=support,
direction_1=[1, 0, 0],
direction_2=[0, 1, 0],
number_of_elements_1=params.support_amount,
number_of_elements_2=params.support_piles_amount,
spacing_1=grid_size_x,
spacing_2=grid_size_y
)
-
Let's add
all_supportstogeometry_groupso we visualize them# Adding geometry group to geometry result
geometry_group.add(all_supports) -
As always, don't forget to import:
from viktor.geometry import BidirectionalPattern -
Refesh your app, and look how amazing your bridge is looking!
All code until now
Click here to see all code until now
from viktor import ViktorController, Color
from viktor.parametrization import ViktorParametrization, Text, NumberField
from viktor.views import GeometryView, GeometryResult
from viktor.geometry import Group, Material, SquareBeam, Point, Line, CircularExtrusion, mirror_object, BidirectionalPattern
class Parametrization(ViktorParametrization):
intro = Text("# 3D model app 🌉\n This app parametrically generates and visualises a 3D model of a bridge")
txt_deck = Text('### Deck layout ') # texts can be used for explanation in the user-interface
length = NumberField("Deck length", min=6, default=100, suffix='m')
width = NumberField("Deck width", min=2, default=20, suffix='m')
deck_thickness = NumberField("Deck thickness", min=0.5, default=1, suffix='m')
height = NumberField("Bridge height", min=2, default=10, suffix='m')
txt_support = Text('### Support layout', flex=100)
support_amount = NumberField("Number of supports", default=2, min=1)
support_piles_amount = NumberField("Number of piles per support", min=2, default=3)
class Controller(ViktorController):
label = 'My Entity Type'
parametrization = Parametrization
@GeometryView("3D", duration_guess=1, x_axis_to_right=True)
def visualize_bridge(self, params, **kwargs):
# Create an empty group to hold all the geometry
geometry_group = Group([])
# ===============================
# Draw Enviroment
# ===============================
# Measurements environment
env_width = params.length
env_thick = params.deck_thickness # Thickness of water and embankment
water_width = params.length - 2 * params.height # Assuming embankment at 45 deg
# Create materials
mat_water = Material('Water', color=Color.blue(), opacity=0.7)
mat_deck_top = Material('Deck top', color=Color(60, 60, 60))
# Draw water
water = SquareBeam(water_width, env_width, env_thick, material=mat_water)
geometry_group.add([water])
# ===============================
# Create Bridge
# ===============================
# Draw deck
deck = SquareBeam(params.length, params.width, params.deck_thickness)
deck.translate((0, 0, params.height))
deck_top = SquareBeam(params.length, params.width, params.deck_thickness / 4, material=mat_deck_top)
deck_top.translate((0, 0, params.height + 5/8*params.deck_thickness))
geometry_group.add([deck, deck_top])
# Define grid
pile_diameter = params.deck_thickness / 2
grid_size_x = water_width / params.support_amount
grid_size_y = (params.width - pile_diameter) / (params.support_piles_amount - 1)
# Draw columns
top_point = Point(-grid_size_x/2, 0, params.height)
bottom_point = Point(0, 0, 0)
column_line = Line(top_point, bottom_point)
column_1 = CircularExtrusion(pile_diameter, column_line)
column_2 = mirror_object(column_1, Point(0, 0, 0), (1, 0, 0))
# Draw base
column_base = SquareBeam(3 * pile_diameter, pile_diameter, 2*pile_diameter)
# Pattern supports
support = Group([column_1, column_2, column_base])
support.translate((-water_width/2 + grid_size_x/2, -params.width/2 + pile_diameter/2, 0))
all_supports = BidirectionalPattern(
base_object=support,
direction_1=[1, 0, 0],
direction_2=[0, 1, 0],
number_of_elements_1=params.support_amount,
number_of_elements_2=params.support_piles_amount,
spacing_1=grid_size_x,
spacing_2=grid_size_y
)
# Adding geometry group to geometry result
geometry_group.add(all_supports)
return GeometryResult(geometry_group)
6. The finishing touches
You already made an amazing parametric bridge and learned the basics of creating 3D models in VIKTOR. In this chapter we just want to show you some little extras that can be useful during your app development journey.
Drawing the embankment
We already learned that you can move things using translate. This is because everything you draw is a TransformableObject.
Besides translate you can also use other transformations, like rotate,
mirror and scale.
Let’s give this a try drawing the embankments.
-
In your
GeometryView, let's add a newMaterial:mat_grass = Material('Grass', color=Color.green()) -
Then, we will create,
rotate, andtranslatethe embankment, and make a copy of it :# Draw embankment (assuming embankment at 45 deg)
embankment_1 = SquareBeam(1.4 * params.height, env_width, env_thick, material=mat_grass)
embankment_1.rotate(-math.pi / 4, direction=[0, 1, 0])
embankment_1.translate(((water_width+params.height)/2, 0, params.height/2))
embankment_2 = mirror_object(embankment_1, Point(0, 0, 0), (1, 0, 0)) -
As allways, add the objects to
geometry_group:geometry_group.add([embankment_1, embankment_2]) -
Dont't forget to import:
import math -
Reaload you app and see what happened
A colorful bridge
Until now, we did not give the bridge a color, which by is shown grey by default. We already learned that you can make a Material and give it a Color, but did you know that we can ask the user to give it a color too?
To demonstrate this, let’s:
- Create an ColorField:
bridge_color = ColorField('Bridge Color', default=Color(200, 200, 200))
- Create a material
mat_bridge = Material('Bridge', color=params.bridge_color)
-
Assign this material to any (or all) of
deck,column_1andcolumn_base. By addingmaterial=mat_bridgeto theSquareBeamandCircularExtrusionfunctions that generate these elements. -
Don’t forget to import
from viktor.parametrization import ColorField
- Reload and play with you app
Complete app code
Were you able to do everything in this tutorial without error? If not, you can always look at the full code:
Complete code
from viktor import ViktorController, Color
from viktor.parametrization import ViktorParametrization, Text, NumberField, ColorField
from viktor.views import GeometryView, GeometryResult
from viktor.geometry import Group, Material, SquareBeam, Point, Line, CircularExtrusion, mirror_object, BidirectionalPattern
import math
class Parametrization(ViktorParametrization):
intro = Text("# 3D model app 🌉\n This app parametrically generates and visualises a 3D model of a bridge")
txt_deck = Text('### Deck layout ') # texts can be used for explanation in the user-interface
length = NumberField("Deck length", min=6, default=100, suffix='m')
width = NumberField("Deck width", min=2, default=20, suffix='m')
deck_thickness = NumberField("Deck thickness", min=0.5, default=1, suffix='m')
height = NumberField("Bridge height", min=2, default=10, suffix='m')
 txt_support = Text('### Support layout', flex=100)
 support_amount = NumberField("Number of supports", default=2, min=1)
 support_piles_amount = NumberField("Number of piles per support", min=2, default=3)
bridge_color = ColorField('Bridge Color', default=Color(200, 200, 200))
class Controller(ViktorController):
label = 'My Entity Type'
parametrization = Parametrization
@GeometryView("3D", duration_guess=1, x_axis_to_right=True)
def visualize_bridge(self, params, **kwargs):
# Create an empty group to hold all the geometry
geometry_group = Group([])
# Measurements environment
env_width = params.length
env_thick = params.deck_thickness # Thickness of water and embankment
water_width = params.length - 2 * params.height # Assuming embankment at 45 deg
# Create materials
mat_water = Material('Water', color=Color.blue(), opacity=0.7)
mat_deck_top = Material('Deck top', color=Color(60, 60, 60))
mat_grass = Material('Grass', color=Color.green())
mat_bridge = Material('Bridge', color=params.bridge_color)
# ===============================
# Draw environment
# ===============================
# Draw water
water = SquareBeam(water_width, env_width, env_thick, material=mat_water)
geometry_group.add([water])
# Draw embankment (at 45 deg)
embankment_1 = SquareBeam(1.4 * params.height, env_width, env_thick, material=mat_grass)
embankment_1.rotate(-math.pi / 4, direction=[0, 1, 0])
embankment_1.translate(((water_width+params.height)/2, 0, params.height/2))
embankment_2 = mirror_object(embankment_1, Point(0, 0, 0), (1, 0, 0))
# Add created geometries to geometry group
geometry_group.add([embankment_1, embankment_2])
# ===============================
# Create Bridge
# ===============================
# Draw deck
deck = SquareBeam(params.length, params.width, params.deck_thickness, material=mat_bridge)
deck.translate((0, 0, params.height))
deck_top = SquareBeam(params.length, params.width, params.deck_thickness / 4, material=mat_deck_top)
deck_top.translate((0, 0, params.height + 5/8*params.deck_thickness))
geometry_group.add([deck, deck_top])
# Define grid
pile_diameter = params.deck_thickness / 2
grid_size_x = water_width / params.support_amount
grid_size_y = (params.width - pile_diameter) / (params.support_piles_amount - 1)
# Draw columns
top_point = Point(-grid_size_x/2, 0, params.height)
bottom_point = Point(0, 0, 0)
column_line = Line(top_point, bottom_point)
column_1 = CircularExtrusion(pile_diameter, column_line, material=mat_bridge)
column_2 = mirror_object(column_1, Point(0, 0, 0), (1, 0, 0))
# Draw base
column_base = SquareBeam(3 * pile_diameter, pile_diameter, 2*pile_diameter, material=mat_bridge)
support = Group([column_1, column_2, column_base])
support.translate((-water_width/2 + grid_size_x/2, -params.width/2 + pile_diameter/2, 0))
all_supports = BidirectionalPattern(
   base_object=support,
   direction_1=[1, 0, 0],
   direction_2=[0, 1, 0],
   number_of_elements_1=params.support_amount,
   number_of_elements_2=params.support_piles_amount,
   spacing_1=grid_size_x,
   spacing_2=grid_size_y
)
# Adding geometry group to geometry result
geometry_group.add(all_supports)
return GeometryResult(geometry_group)
Want to learn how VIKTOR works?
If you are interested in how VIKTOR works behind the scenes, for example how it processes your input, expand the tabs below!
How does it work?
How does the Parametrization work?
In the Parameterization class you can add input fields that allow the user to provide input to your app, and there are more than 20 different input fields you can use, including numbers, text, colors, images and files.
Inside the Parametrization class, you can also format the layout of your app by adding sections, tabs, steps and pages.
To show your Parametrization in the app, we need to add the line parametrization = Parametrization inside the
Controller class, because it is the controller that determines what is shown and not.
How does the Parametrization get saved?
So you may be wondering, how do you get the information from the parametrization to my controller?
Well, we do this automatically for you. The values of all parameters are stored in a single variable called params
, which is accessible inside the Controller class.
These variables are stored in a Munch; this is similar to a dictionary, but work with point denotation.
Example:
- Let's say we have a variable called
heightas a NumberField in ourParameterization. - To use it in a method in the
Controller, define it as:def my_method(self, params, **kwargs) - You can now make calculations inside that method using our height parameter as
params.height!
How does the Controller work?
The Controller class is the place where you add everything you want to calculate and show.
As explained in this tutorial, we show results in a View and we always add views in our controller.
You can even add several views in a single app by adding them to the controller class... and yes, we have
many Views,for showing graphs, maps, 3D models, reports, images and more.
In the Controller, you also do or call your calculation. Remember that the user input given in the parametrization,
is accessible inside the Controller class in the variable The params.
To infinity and beyond!
Well done! You are now able to create an app that can parametrically design a 3D model which includes rectangular as well as circular extrusions with mirror, rotate and pattern possibilities!
Obviously there is way more to discover about VIKTOR and its 3D modelling capabilities. Check those out in our documentation
Finally, the journey doesn't end here. Check out some of our other tutorials or go to the next section where you can see the different paths you can follow in your journey to learn more about VIKTOR.