Tutorial - Create an interactive 3D building
Level: Beginners
Time: 30 min
Prerequisites:
- You have an account and completed the installation process. No account? Get one here
- You have some experience with reading Python code

Introduction
Welcome to this tutorial on how to create a web app that takes you from making simple 3D elements, to combining them into a parametric building, using VIKTOR and Python!
As an engineer or architect, you may work with changing requirements for a project. In this tutorial we will take an office building as an example.
We will explore how to visualize 3D elements and create patterns from our inputs to create an interactive building with VIKTOR and python. Like this we wont need to change any code when we need to change the requirements of the building.
- Create an app folder
- Create and Install the app
- Adding 3D geometry
- Let's make it interactive
- Complete Code
By the end of this tutorial you will be able to make 3D elements and use them in patterns in a VIKTOR app and have a basic understanding of how you can use built-in VIKTOR elements to upgrade your visuals! Try the app we'll be building below:
1. Create app folder
Is your app code giving you an error? Take a look at the complete app code.
Also know that you can always ask help at our Community Forum, where our developer are ready to help with any question related to the installation, coding and more.
When developing app, you store the code on your hard drive. So let's create some folders to store the code for this project.
-
If you haven't yet, create a folder called
viktor-appsto store all your apps. Let's do this inside your user folder, like shown here:C:\Users\<username>\viktor-appsLINUX
Are you a Linux user? Then make sure the CLI has full rights in the apps directory, by changing its permissions with:
sudo chmod -R 777 ~/viktor-apps -
Inside
viktor-apps, make another folder called3d-building-tutorialfor this project:C:\Users\<username>\viktor-apps\3d-building-tutorial
2. Create, install and start an empty app
Let's now create, install and start a blank app template. We will use the blank template to start making our app.
But before we start, make sure to shut down any app that is running (like the demo app) by closing the command-line shell
(for example Powershell) or cancel the process using Ctrl + C.
Follow these steps to create, install and start a blank app template:
-
Open your preferred code editor (e.g. PyCharm, VS Code, etc.).
-
Click File -> Open, and open the folder
3d-building-tutorialwe created before as a new project. -
Inside your code editor, open the terminal. The keyboard shortcut to open a terminal in PyCharm is
Alt + F12and in VS CodeCtrl+Shift+` -
In the terminal, use the command shown below to create empty app template files inside the folder
3d-building-tutorialviktor-cli create-app --app-type editor -
Now we'll install your app and all its dependencies by running this command in the terminal. Just be patient, this could take up to 5 minutes... Maybe it's time for a ☕?
viktor-cli clean-startIf all went well, your empty app is installed and running one your development workspace. Do not close the terminal as this will break the connection with your app.
You can see your app which you can see by visiting the URL shown in the terminal (for example https://cloud.viktor.ai)
Your terminal should show something like this:
 INFO     : Connecting to platform...
 INFO     : Connection is established: https://cloud.viktor.ai  <---- here you can see your app
 INFO     : The connection can be closed using Ctrl+C
 INFO     : App is ready
- You only need create an app template and install it once for each new app you want to make.
- The app will update automatically once you start adding code in
app.py, as long as you don't close the terminal or your code editor. - Did you close your code editor? Use
viktor-cli startto start the app again. No need to install, clear, etc.
Did it not work because you got an error messages?
Some troubleshooting
-
Always make sure to check the spelling of everything you placed in the command-line, a small mistake and the command you are trying to run may not be recognised!
-
If you are encountering:
ERROR:
  Exiting because of an error: no requirements.txt file
PS C:\Users\<username>\viktor-apps>
Then you are not in the correct folder! check the command-line and navigate to the 3d-building-tutorial folder.
-
If you are encountering:
Error: App definition is not compatible with the data currently stored in the database. Use the command 'viktor-cli clear' to clear the database.
PS C:\Users\<username>\viktor-apps\3d-building-tutorial>
That means you have not cleared the database yet! Use the
viktor-cli clearto clear and then you can useviktor-cli startto start the app. No need to install it again!
Not seeing any of these errors? Head over to our community! There is a good chance another developer encountered it and solved it too!
3. Adding a 3D geometry
Lets jump into our app.py file and start working on our VIKTOR application. The first thing we will do is make sure we can see all our progress in the 3D view. To do this we will start by importing VIKTOR's SquareBeam, GeometryResult and GeometryView.
from viktor.geometry import SquareBeam
from viktor.views import GeometryView, GeometryResult
For now we will leave the Parametrization as is. In the Controller, lets change the label to something like "Parametric Building" and add the GeometryView. The geometry that we will display is the SquareBeam, for now, lets make it a 1-by-1-by-1 block.
class Controller(ViktorController):
    label = "Parametric Building"
    parametrization = Parametrization

    @GeometryView("3D building", duration_guess=1, x_axis_to_right=True)
    def get_geometry(self, params, **kwargs):
        block = SquareBeam(
            length_x=1,
            length_y=1,
            length_z=1
        )
        return GeometryResult(block)
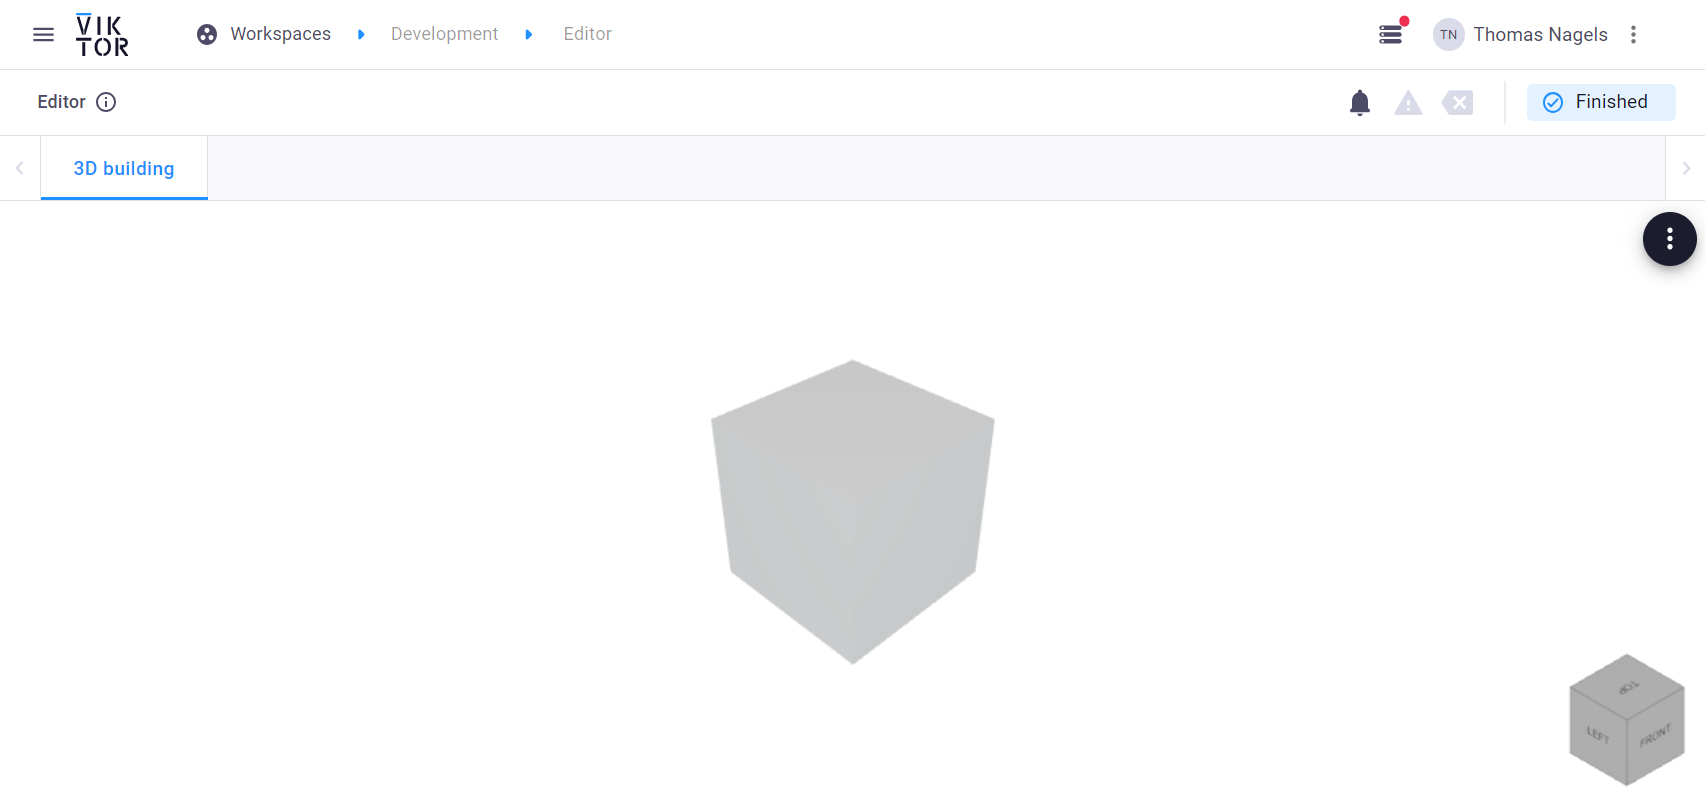
Save your app.py, if you closed the terminal enter viktor-cli start and go to your cloud environment (e.g. https://cloud.viktor.ai) to see your cube. If all went well you should now see a simple cube in the middle of your screen similar to the image below. You can zoom and pan around it with your mouse. If you click the three dots on the top right you can see some options that come standard with VIKTOR's GeometryView.
4. Let's make it interactive
To go from a simple cube to a parametric building we will have to:
- make the cube adjustable in size to become a slab (ceiling of a floor)
- make windows (to represent the floor)
- make a window-slab-window-slab-etc pattern to make a building
- duplicate the pattern to make multiple floors
Parametrize the cube into a slab
In order to turn the cube into a slab, we will make the dimension in the vertical axis fixed. That way we have a fixed ceiling/floor thickness. Then we will make the dimensions in the x and y direction variable.
Lets start by adding a NumberField to the parametrization. Make sure to import the NumberField from the viktor.parametriation
first. You may add a minimum and a default value to make sure you are presented with a model on start up. In this case, a
building's dimensions cannot be negative so we choose zero as the minimum and let's say our hypothetical client's lot is
currently about 30x30 meters so we will choose that as our default.
from viktor.parametrization import NumberField
...

class Parametrization(ViktorParametrization):
    width = NumberField('Width', min=0, default=30)
    length = NumberField('Width', min=0, default=30)
...
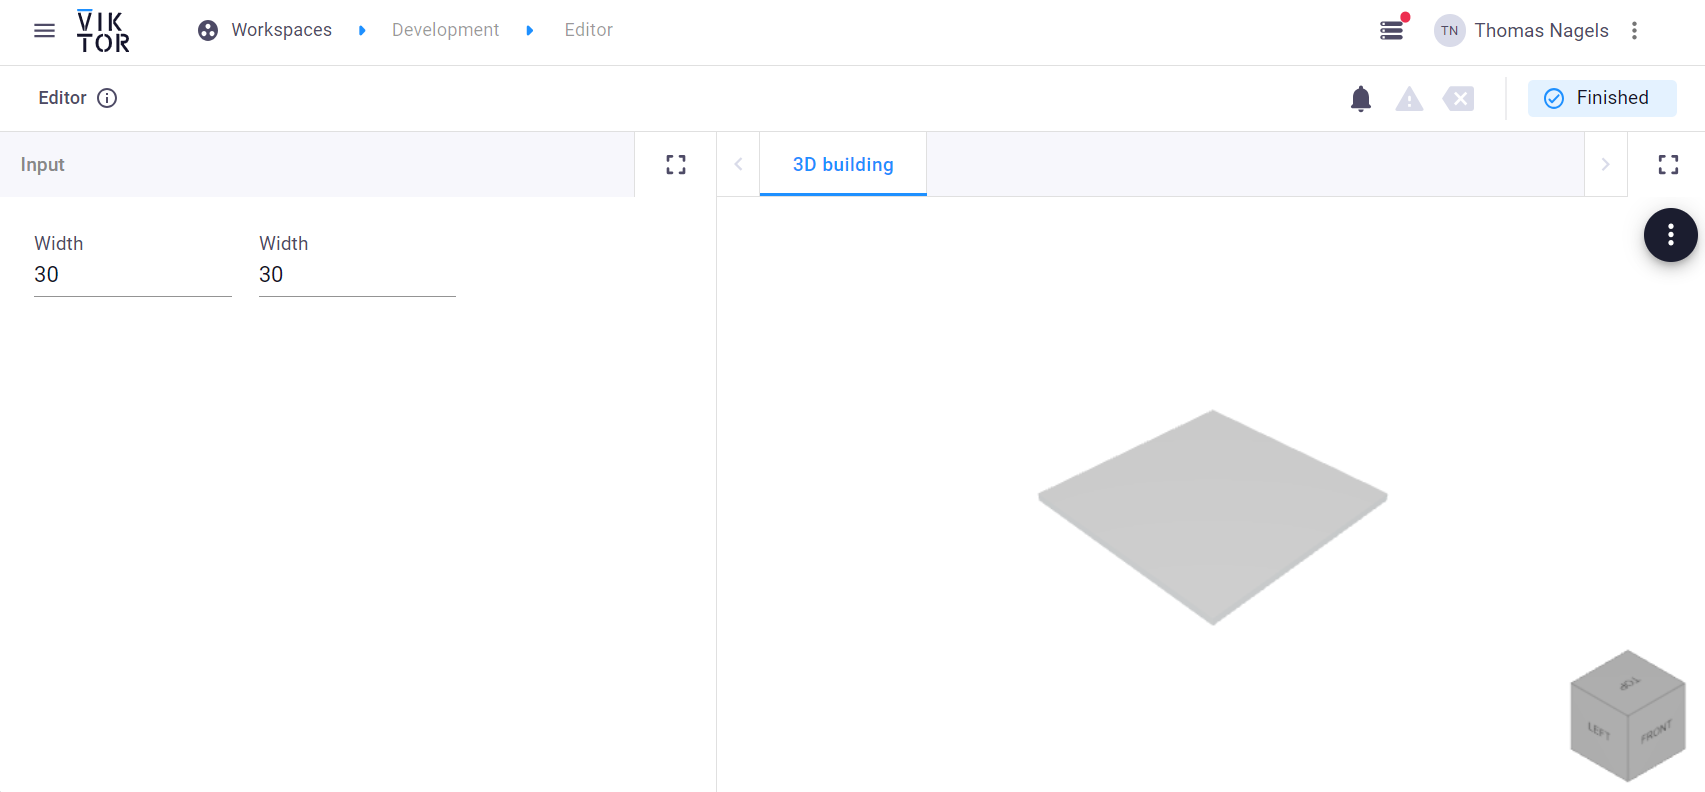
If you navigate to your browser again, you will see these two fields appear on the left side of the window but the cube is still the same. To get our cube to turn into a slab, lets change the code.
Notice how we change the hard-coded values of length_x and length_y to params.length and params.width.
class Controller(ViktorController):
    label = "Parametric Building"
    parametrization = Parametrization

    @GeometryView("3D building", duration_guess=1, x_axis_to_right=True)
    def get_geometry(self, params, **kwargs):
        block = SquareBeam(
            length_x=params.width,   #<-- change this
            length_y=params.length,  #<-- change this
            length_z=1
        )
        return GeometryResult(block)
If you go back to the browser, you should now see that changing the code results in a change in the size of the block. When you refresh the page, you should see that the default dimensions for the width and length are 30, just like we coded in the parametrization. If all went well it should look something like the image below:
Make the windows of the floor
To make the windows of the floor we will assign materials. Since we already have our slab, lets call the material for that "concrete" and for our windows "glass".
We can easily add these materials and their properties to the get_geometry method by importing the Color and
Material from viktor and viktor.geometry respectively.
...

from viktor import Color
from viktor.geometry import Material

...

class Controller(ViktorController):
    label = "Parametric Building"
    parametrization = Parametrization

    @GeometryView("3D building", duration_guess=1, x_axis_to_right=True)
    def get_geometry(self, params, **kwargs):
        #Materials:
        glass = Material("Glass", color=Color(150, 150, 255)) #<-- add this
        facade = Material("Concrete")                         #<-- add this

        block = SquareBeam(
            length_x=params.width,
            length_y=params.length,
            length_z=1
        )
        return GeometryResult(block)
Now we have two materials and a block, but we need to have two blocks, one to represent the conrete facade and the other for the windows. So, we can simply rename the block that we have, duplicate it for the windows and assign the materials.
By grouping together the facade and the window we can have a single object that represents an entire floor. Let's also
display this in our GeometryView to see our floor, make sure to import Group from viktor.geometry for this.
...

from viktor.geometry import Group

...

class Controller(ViktorController):
    label = "Parametric Building"
    parametrization = Parametrization

    @GeometryView("3D building", duration_guess=1, x_axis_to_right=True)
    def get_geometry(self, params, **kwargs):
        #Materials:
        glass = Material("Glass", color=Color(150, 150, 255))
        facade = Material("Concrete")

        floor_glass = SquareBeam(
            length_x=params.width,
            length_y=params.length,
            length_z=1,
            material=glass            #<-- add this
        )
        floor_facade = SquareBeam(
            length_x=params.width,
            length_y=params.length,
            length_z=1,
            material=facade           #<-- add this
            )

        floor = Group([floor_glass, floor_facade])  #<-- add this

        return GeometryResult(floor) #<-- Make sure to change this
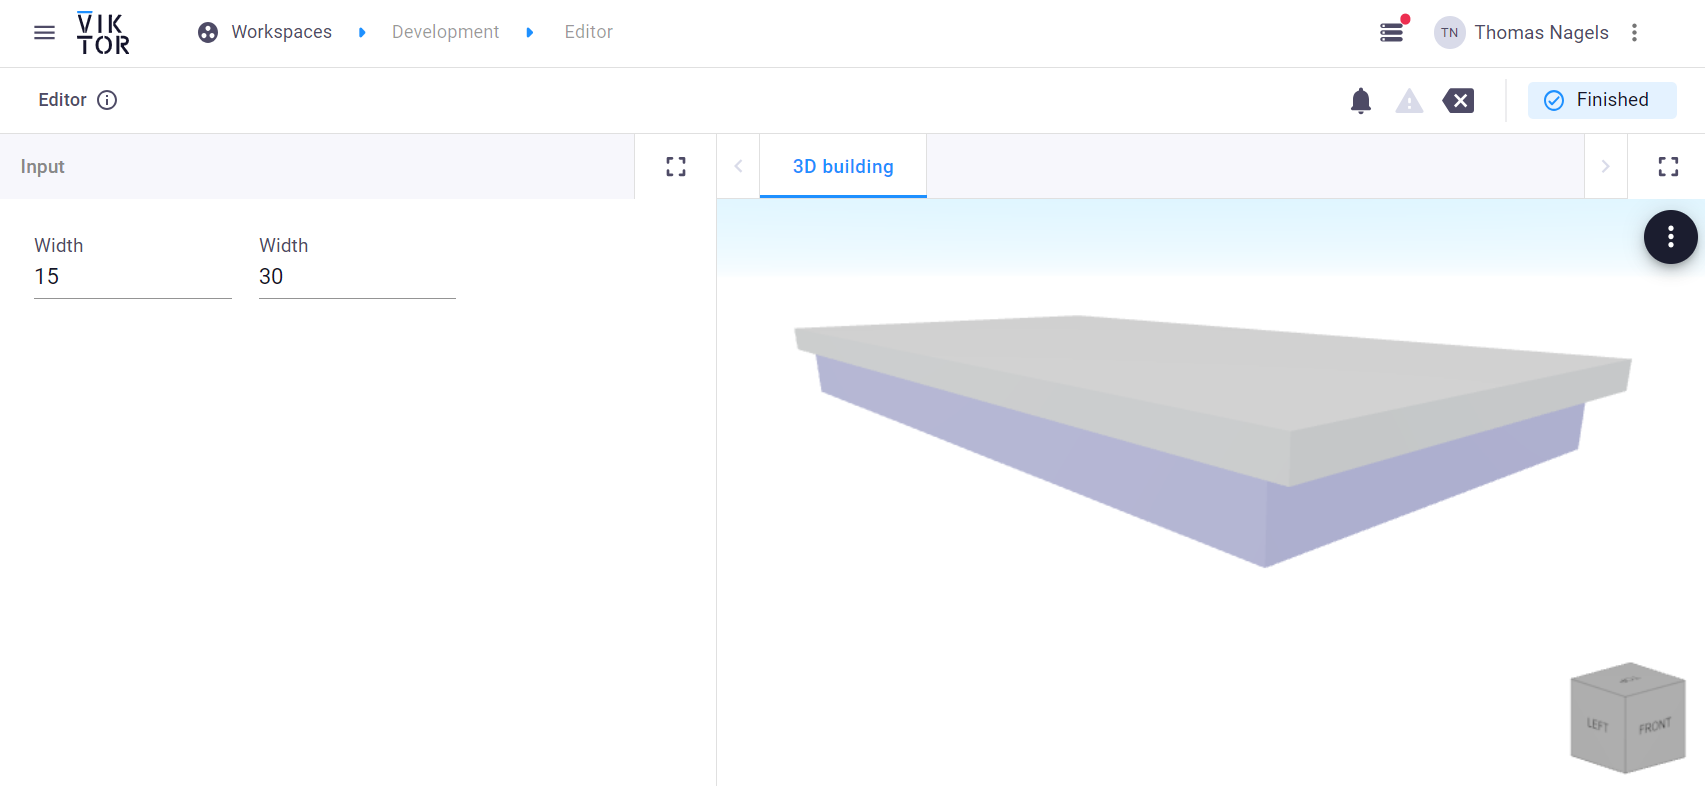
You may have noticed that you still see the slab like before, it does not look like an entire floor including windows. That is because our windows are now inside of the slab. Lets change the values so that we have a bit of overhang and a bit of offset, just like some real buildings have.
...

class Controller(ViktorController):
    label = "Parametric Building"
    parametrization = Parametrization

    @GeometryView("3D building", duration_guess=1, x_axis_to_right=True)
    def get_geometry(self, params, **kwargs):
        #Materials:
        glass = Material("Glass", color=Color(150, 150, 255))
        facade = Material("Concrete")

        floor_glass = SquareBeam(
            length_x=params.width,
            length_y=params.length,
            length_z=2,                    #<-- change this
            material=glass
            )
        floor_facade = SquareBeam(
            length_x=params.width+1,       #<-- change this
            length_y=params.length+2,      #<-- change this
            length_z=1,
            material=facade
            )

        floor_facade.translate((0, 0, 1.5)) #<-- add this

        floor = Group([floor_glass, floor_facade])

        return GeometryResult(floor)
The floor you have made should look something like the image below:
Duplicating a 3D element
Now you should be able to see a single floor in your GeometryView. The next step is to duplicate the floor to a certain
amount. For this lets use VIKTOR's LinearPattern which you will first need to import from viktor.geometry. We can then
add it to the method. Let's make the building 16 floors high and because our floor's thickness is equal to three we will
make that the spacing.
...

from viktor.geometry import LinearPattern

...

class Controller(ViktorController):
label = "Parametric Building"
parametrization = Parametrization

    @GeometryView("3D building", duration_guess=1, x_axis_to_right=True)
    def get_geometry(self, params, **kwargs):

        ...

        floor = Group([floor_glass, floor_facade]) #<-- USe this line as a reference!

        building = LinearPattern(floor, direction=[0, 0, 1], number_of_elements=16, spacing=3)

        return GeometryResult(building)
If all went well, you should now see a 16 storey building in your browser similar to the image below. You should also be able to change the values of the width and length of this building.

Let's make it a bit more interesting by adding the number of floors to the parametrization and allowing the user to choose
a color for their building. For this we will import ColorField from the viktor.parametrization and add another NumberField.
Since we want the building to have a default of 16, a minimum of 10 and a maximum of 40 floors , lets improve the user
experience and make this a slider.
...

from viktor.parametrization import ColorField

...

class Parametrization(ViktorParametrization):
    ...

    number_floors = NumberField("How many floors", variant='slider', min=10, max=40, default=16) #<-- add this field
    building_color = ColorField("Facade Color", default=Color(221, 221, 221)) #<-- add this field

    ...

class Controller(ViktorController):
label = "Parametric Building"
parametrization = Parametrization

    @GeometryView("3D building", duration_guess=1, x_axis_to_right=True)
    def get_geometry(self, params, **kwargs):

        ...

        facade = Material("Concrete", color=params.building_color) #<-- add color here

        ...

        building = LinearPattern(floor, direction=[0, 0, 1], number_of_elements=params.number_floors, spacing=3) #<-- change to parametric input here

        return GeometryResult(building)
Improve the user's experience
The best applications make it easy for the user to reach their goal. By adding text we can inform the user about the application.
We may also choose to add a schematic drawing or image to inform them visually. This can all be done in the Parametrization
so let's add a Text to our app.
....

from viktor.parametrization import Text

....

class Parametrization(ViktorParametrization):
    intro_text = Text(

"# 3D Parametric Building App 🏢\n"

"In this app, the user can change the dimensions of the building, choose the amount of floors and a color for the facade. The app will generate a 3D building for the user as output."
)
The final app should now look like this:
Well done!
If your app now works you have successfully completed this tutorial! You just made some architects shiver with those programming skills there!
5. Complete app code
Were you able to do everything in this tutorial without error? If not, you can always take a look at the full code:
Complete code
from viktor.parametrization import ViktorParametrization, NumberField, ColorField, Text
from viktor import ViktorController
from viktor.geometry import SquareBeam, Material, Color, Group, LinearPattern
from viktor.views import GeometryView, GeometryResult


class Parametrization(ViktorParametrization):
    intro_text = Text(
        "# 3D Parametric Building App 🏢\n"
        "In this app, the user can change the dimensions of the building, choose the amount of floors and a color for "
        "the facade. The app will generate a 3D building for the user as output."
    )
    width = NumberField('Width', min=0, default=30)
    length = NumberField('Length', min=0, default=30)
    number_floors = NumberField("how many floors", variant='slider', min=10, max=40, default=25)
    building_color = ColorField("Building Color", default=Color(221, 221, 221))

class Controller(ViktorController):
    label = "Parametric Building"
    parametrization = Parametrization

    @GeometryView("3D building", duration_guess=1, x_axis_to_right=True)
    def get_geometry(self, params, **kwargs):
        #Materials:
        glass = Material("Glass", color=Color(150, 150, 255))
        facade = Material("Concrete", color=params.building_color)

        floor_glass = SquareBeam(
            length_x=params.width,
            length_y=params.length,
            length_z=2,
            material=glass
        )
        floor_facade = SquareBeam(
            length_x=params.width+1,
            length_y=params.length+2,
            length_z=1,
            material=facade
            )
        floor_facade.translate((0, 0, 1.5))

        floor = Group([floor_glass, floor_facade])

        building = LinearPattern(floor, direction=[0, 0, 1], number_of_elements=params.number_floors, spacing=3)

        return GeometryResult(building)
Want to learn how VIKTOR works?
If you are interested in how VIKTOR works behind the scenes, for example how it processes your input, expand the tabs below!
How does it work?
How does the Parametrization work?
In the Parameterization class you can add input fields that allow the user to provide input to your app, and there are more than 20 different input fields you can use, including numbers, text, colors, images and files.
Inside the Parametrization class, you can also format the layout of your app by adding sections, tabs, steps and pages.
To show your Parametrization in the app, we need to add the line parametrization = Parametrization inside the
Controller class, because it is the controller that determines what is shown and not.
How does the Parametrization get saved?
So you may be wondering, how do you get the information from the parametrization to my controller?
Well, we do this automatically for you. The values of all parameters are stored in a single variable called params
, which is accessible inside the Controller class.
These variables are stored in a Munch; this is similar to a dictionary, but works with point denotation.
Example:
- Let's say we have a variable called
heightas a NumberField in ourParameterization. - To use it in a method in the
Controller, define it as:def my_method(self, params, **kwargs) - You can now make calculations inside that method using our height parameter as
params.height!
How does the Controller work?
The Controller class is the place where you add everything you want to calculate and show.
As explained in this tutorial, we show results in a View and we always add views in our controller.
You can even add several views in a single app by adding them to the controller class... and yes, we have
many Views,for showing graphs, maps, 3D models, reports, images and more.
In the Controller, you also do or call your calculation. Remember that the user input given in the parametrization,
is accessible inside the Controller class in the variable The params.
What's next
Very impressive! You have now learned the basics of the VIKTOR GeometryView. In this tutorial, we have only scratched
the surface of what you can do using geometries in VIKTOR. So don’t stop your journey there!
If you like an extra challenge, here are some ideas:
- Can you make the windows opaque?
- Can you make the height of the windows/floors parametric as well? Maybe a client is looking for fancy floor-to-ceiling windows with minimal overhang?
Or just follow some of our other tutorials
You can find more information about how to use the GeometryView in the Geometry guide.
It also includes some of the geometry elements that VIKTOR offers out of the box.