App Builder
What is the App Builder?
The App Builder is your AI-powered coding assistant, designed to help you create VIKTOR apps quickly, all from your browser. It features a browser-based chat interface and a development environment. This eliminates the need for any local software installation, allowing you to go from an idea to a working app in seconds with our AI assistant as your pair-programmer! The AI assistant updates your app based on your prompts, but you can also make manual changes directly in the code editor. A real-time preview of your app is available, allowing you to see changes instantly. Once you're satisfied with your app, you can deploy it to your environment with a single click!
Using the App Builder
Getting Started
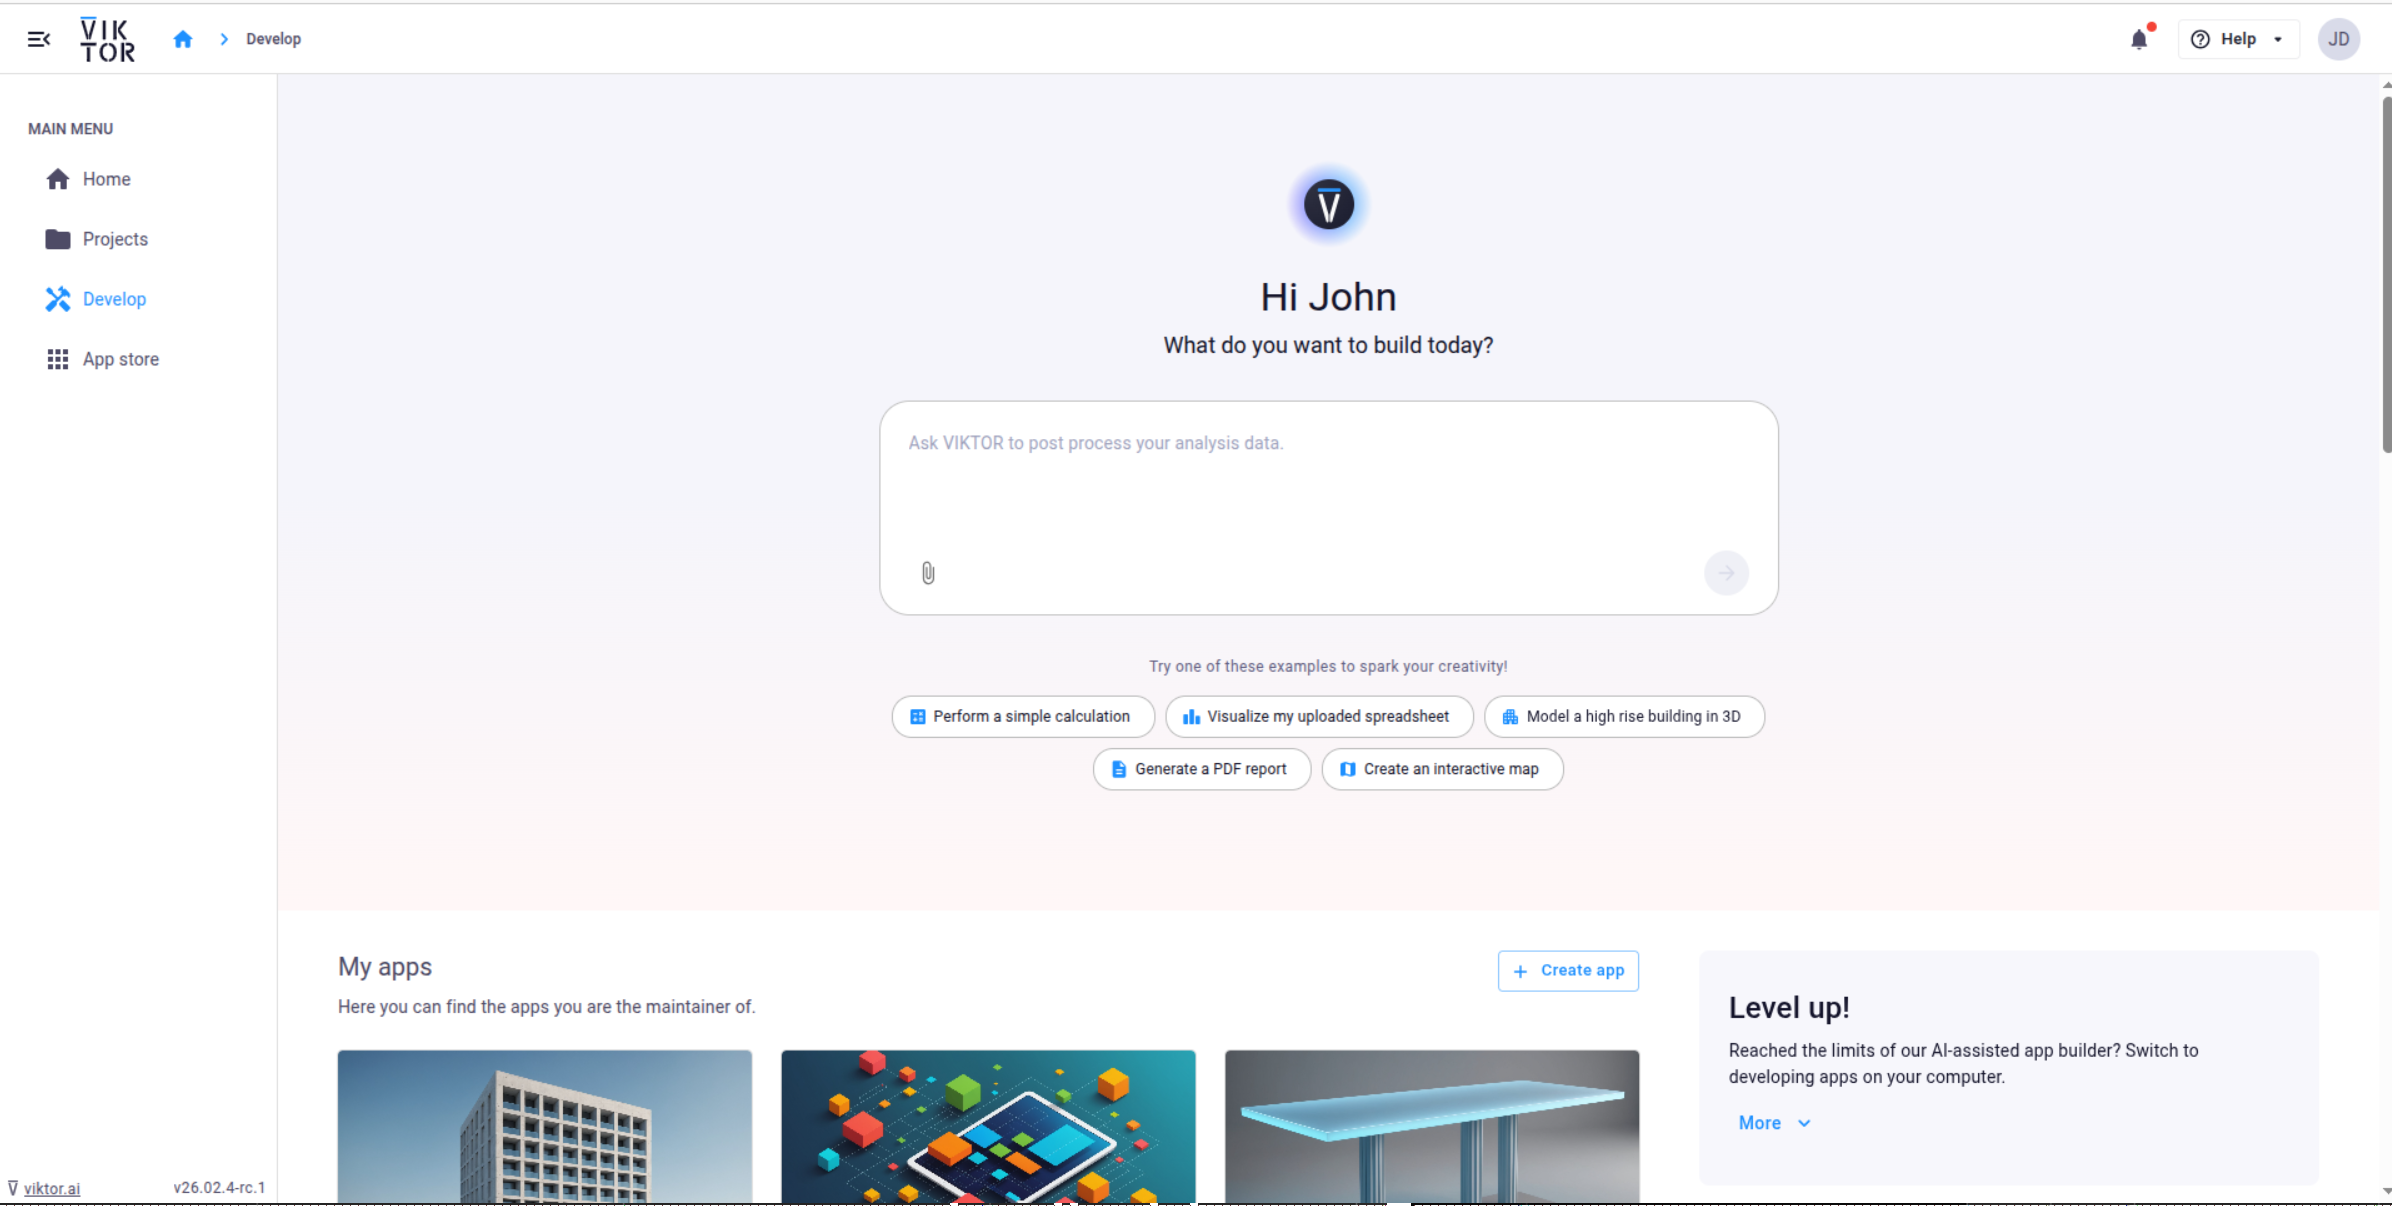
You can create new apps using the App Builder directly from the Develop page in the VIKTOR environment.
- Start by entering a prompt. Describe the kind of app you want to build, specifying the desired inputs, visualization, and logic.
-
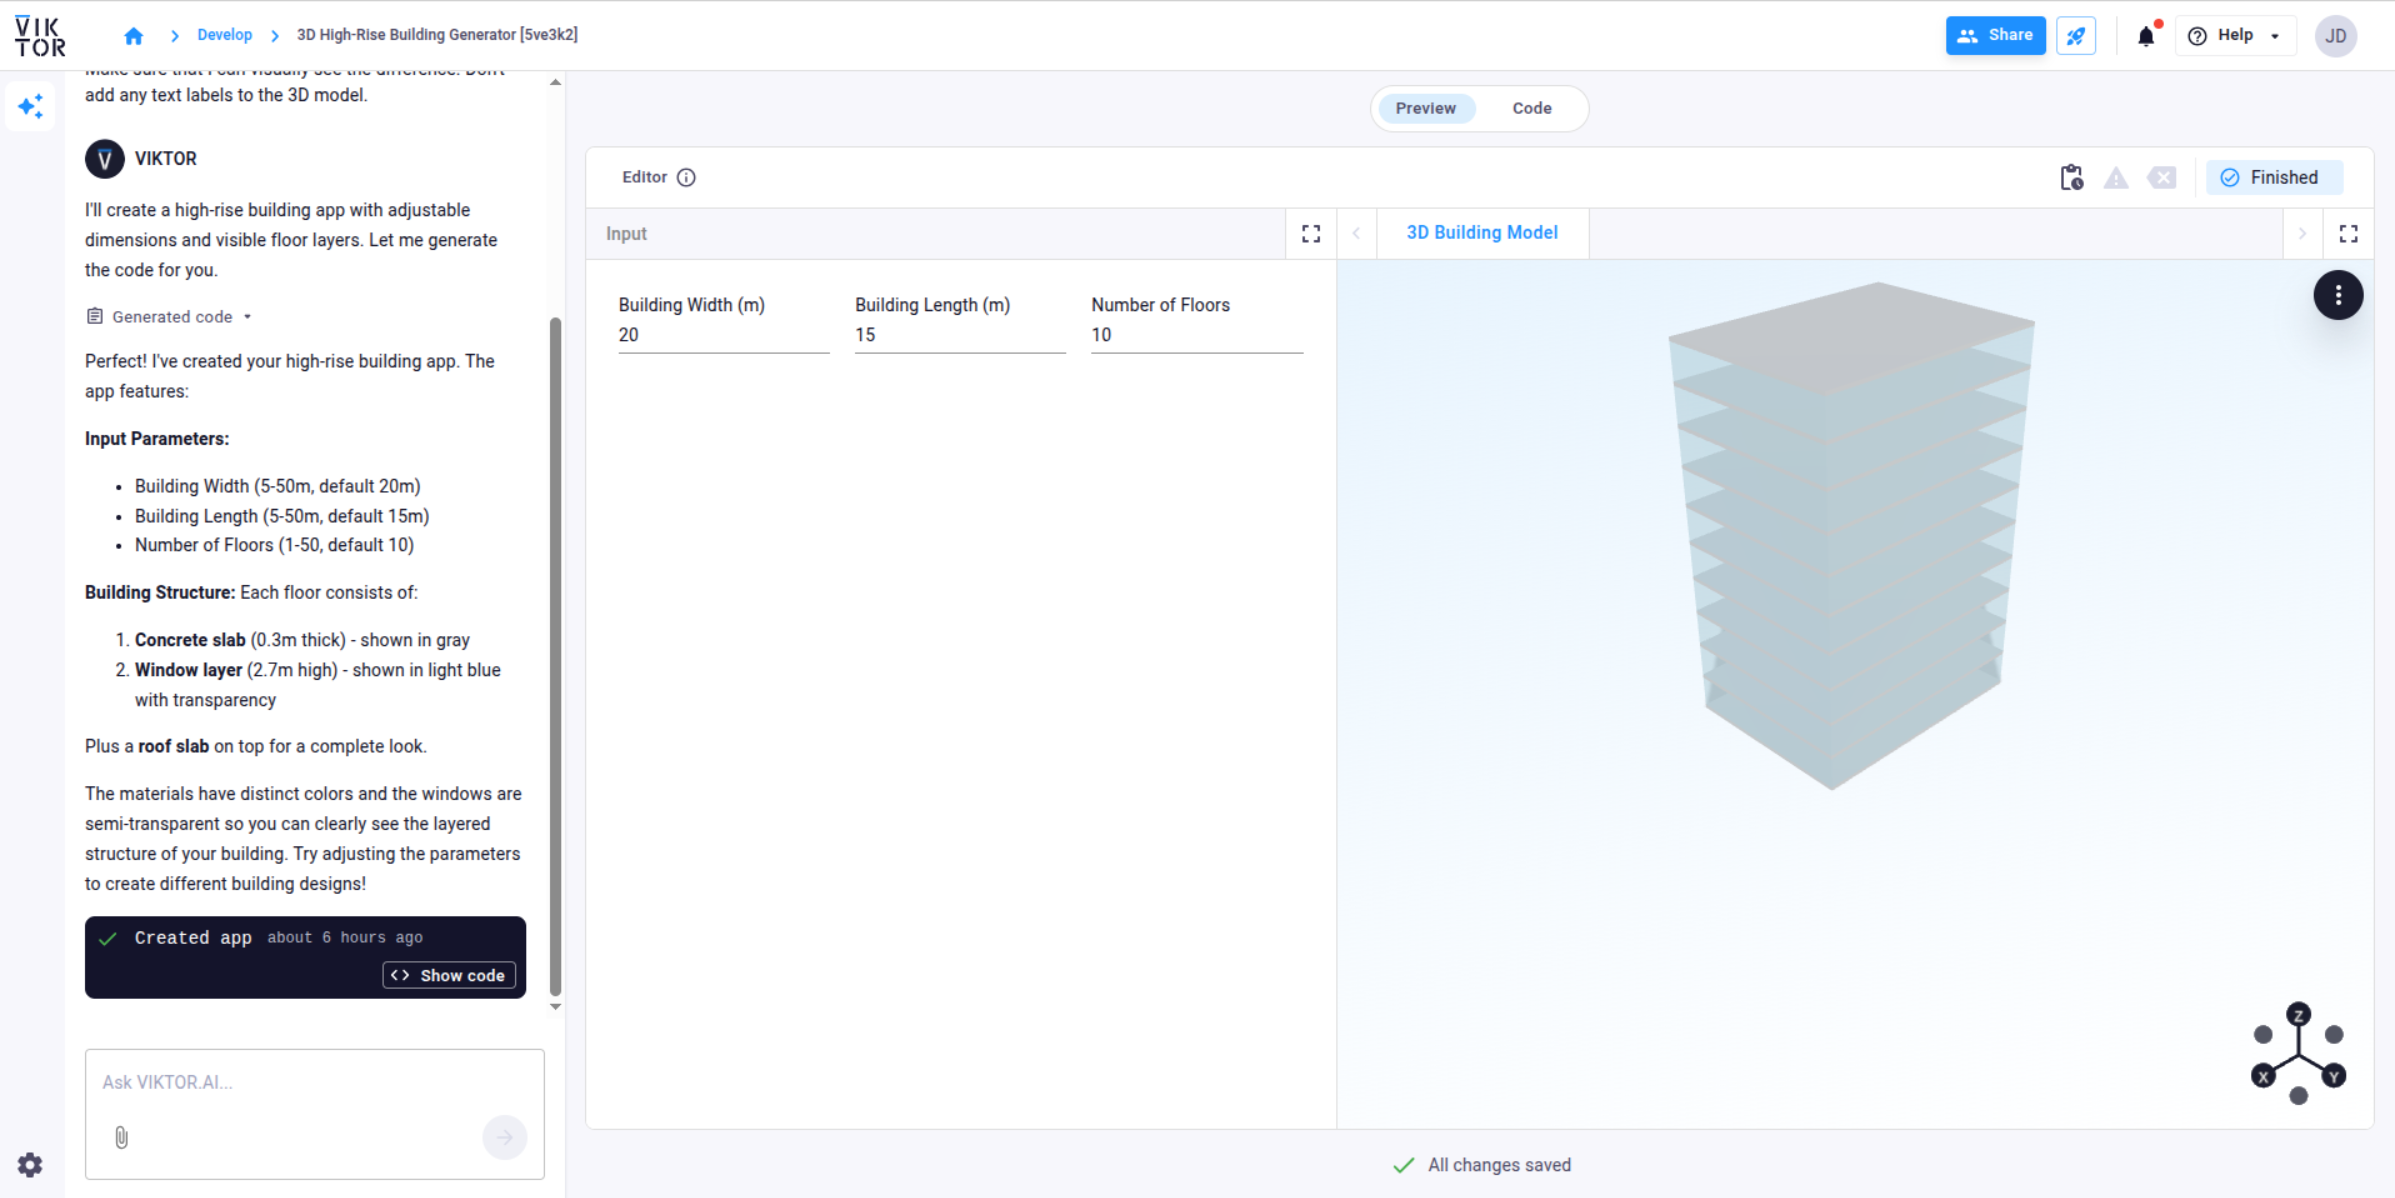
Upon sending your prompt, you will enter the App Builder, and our AI assistant will begin generating your app.
-
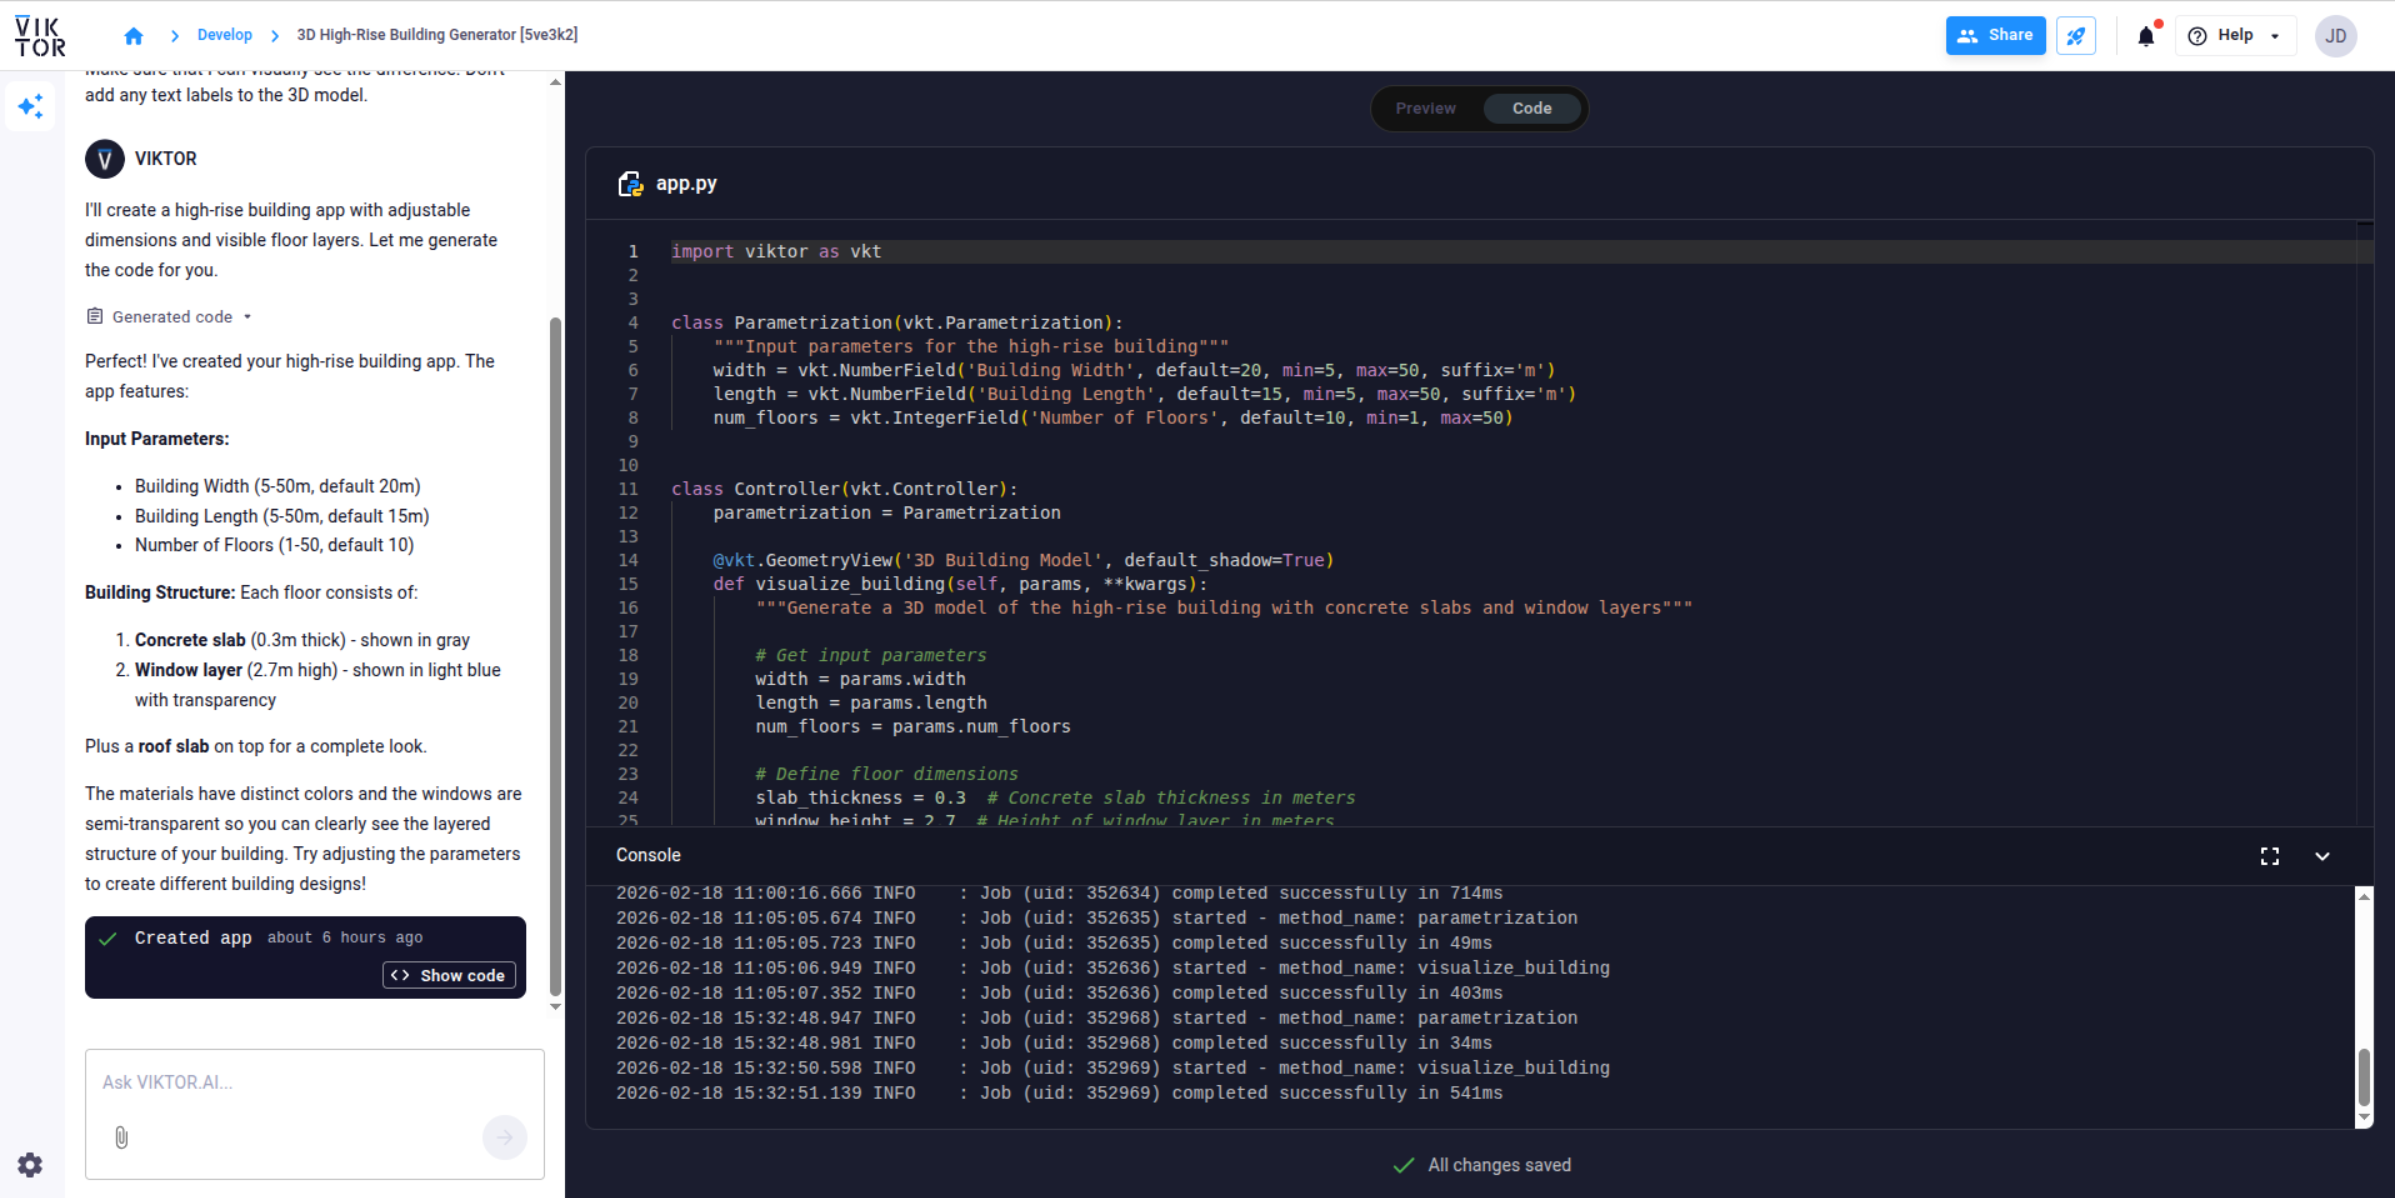
Once the AI assistant finishes generating the app code, it will provide an explanation of the actions performed on the left side of the screen. On the right, you will see a preview of your app. You can interact with the app in Preview mode to test its functionality. To view the underlying Python code, simply switch to Code mode.
Console
The App Builder includes a console at the bottom of the screen that displays real-time logs from the Python process. The console is visible in both Preview and Code modes and shows:
- Output from
print()statements in your code - Python logs and errors
- Runtime information from your app
The console is particularly useful for debugging and understanding what's happening during app execution. Simply add print() statements to your code to inspect variable values and track execution flow.
Iterating on Your App
You can iteratively improve your app in two ways:
- Using the AI assistant: Ask follow-up questions to VIKTOR's AI assistant. The assistant will update the app and show you the results.
- Manual editing: Switch from Preview to Code mode, adjust any code in the editor, and after saving your changes, the preview will reload to show the updated app.
Managing Changes
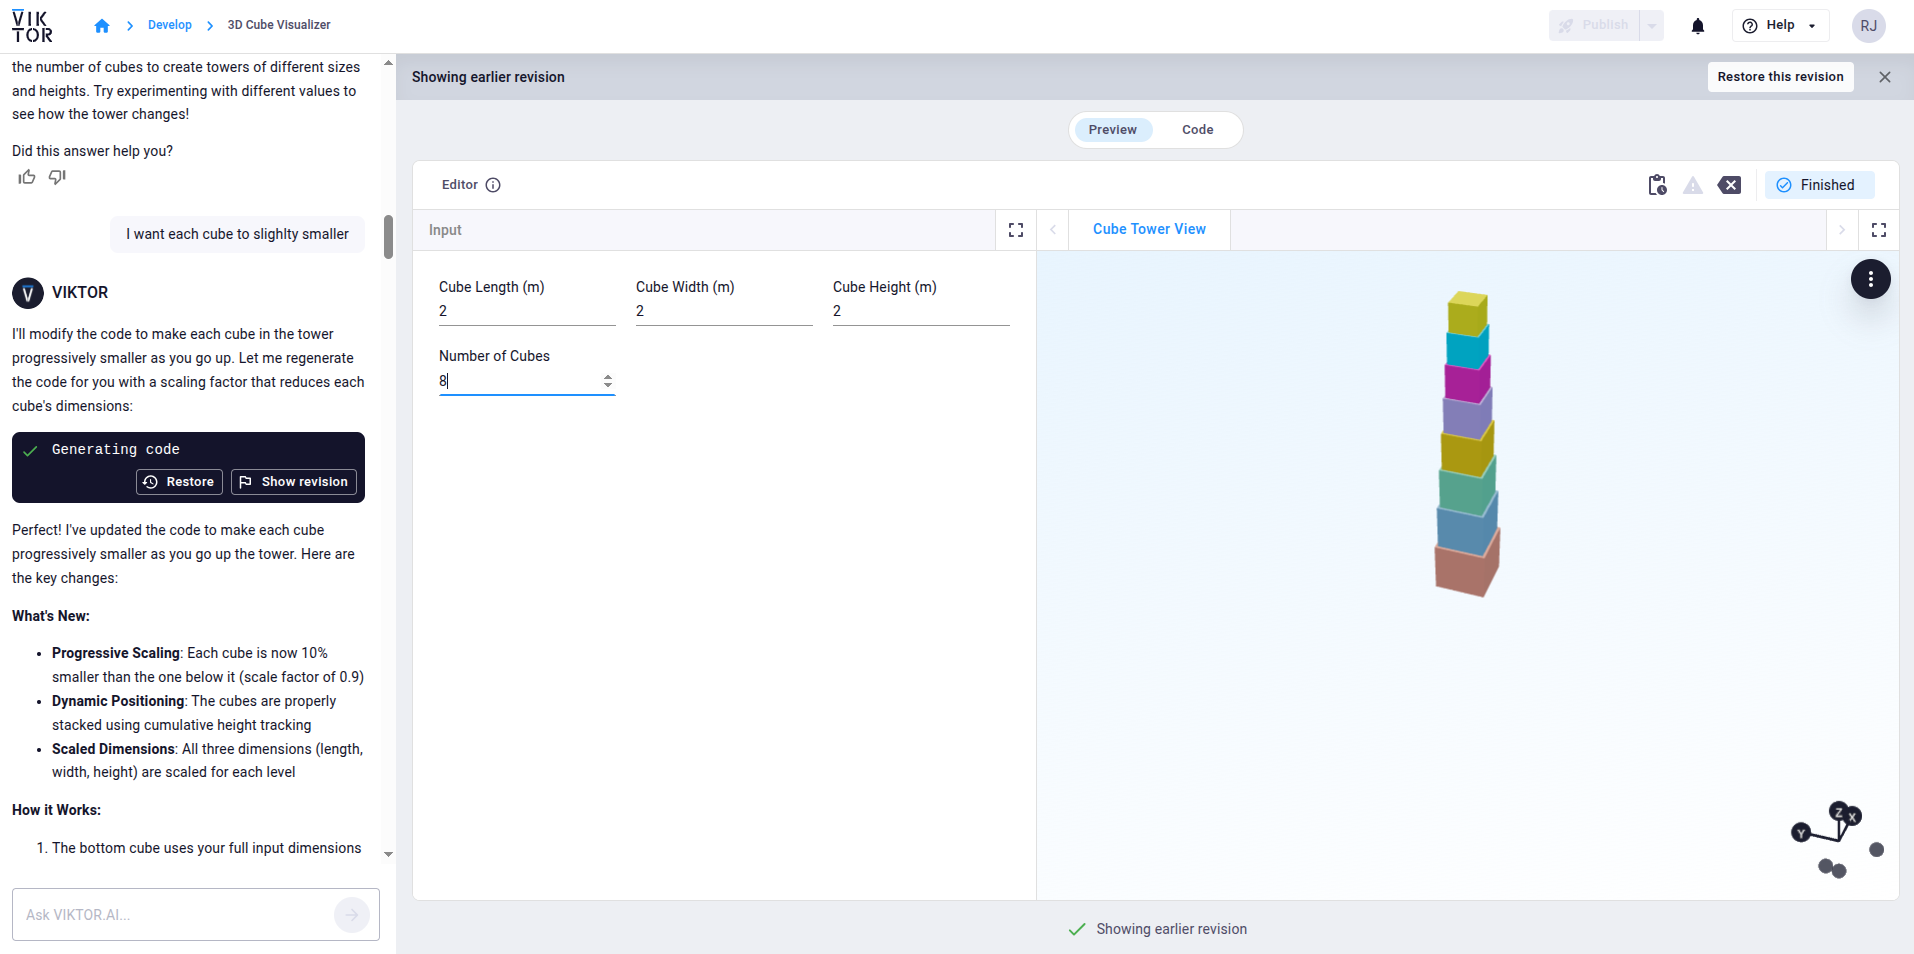
To inspect what changes have been made to your app, click the 'Show changes' button. This will open a comparison of the current and previous revisions. If you are not happy with how the assistant has changed your app, you can revert these changes by clicking the 'Undo' button.

Each change made to your app, whether by you or the AI assistant, is automatically saved as a revision. This allows you to restore earlier versions of your app. To find a revision, scroll up in your chat history. You can restore that revision directly by clicking the 'Restore' button. You may first want to see what the revision looked like by clicking the 'Show revision' button, which will load the revision for your inspection before restoring.
Sharing and Collaboration
The 'Share' button in the top-right corner allows you to invite colleagues to either collaborate on building your app or test its functionality.
Adding maintainers
Add colleagues as maintainers when you want to build the app together. Maintainers have full access to:
- Edit the app code
- Chat with the AI assistant
- View the complete conversation history
- Access all app revisions
When multiple maintainers are collaborating, the App Builder uses an edit lock mechanism to prevent conflicts. When one maintainer is actively working in the App Builder, other maintainers cannot access it until the first user exits and the lock is released.
Inviting testers
Invite colleagues as testers when you want them to try out your app and provide feedback without editing the code. Testers can interact with the app preview and test its functionality, but cannot modify the code or access the AI assistant.
Publishing
Once you are satisfied with your app and wish to make it available within your environment, click the 'Publish' button (rocket icon) in the top-right corner. After the publishing process is completed, you can add the app to a project to start using it.
Every change you make to your app within the App Builder is saved as a revision, so you can exit the App Builder without losing your progress. You can find your apps on both the Develop page and in the App Store under My apps. Click the Develop button to re-enter the App Builder and continue enhancing your app!

File support
The App Builder allows you to upload a file to provide additional context for the AI assistant. This is especially useful when your app idea is based on existing data, documentation, or visuals. The assistant will automatically use the uploaded file to better understand your request and generate more relevant code.
In the current version, only one file can be uploaded per conversation, but it will remain available throughout the entire conversation even if you leave and return to the App Builder later.
Supported file types:
- Documents: .pdf, .csv, .doc, .docx, .xls, .xlsx, .html, .txt, .md (Max size: 4.5 MB)
- Images: .png, .jpg, .jpeg, .gif, .webp (Max size: 3.75 MB, max resolution: 8000 × 8000 px)
Below you can find a few supported use cases for the file upload functionality:
- Uploading a CSV or Excel file to build an app that processes and visualizes the data. (note: you will need to upload the file in the resulting app to check the functionality though)
- Uploading a PDF report or specification document to extract relevant parameters or logic.
- Uploading an image or schematic to guide the app's UI or calculations.
Once uploaded, the file is automatically available to the assistant and does not need to be referenced again manually, although doing so could improve accuracy.
When creating an app that processes uploaded files, the example file you provide to the app builder is used by the AI to generate the app code. However, to test the app functionality in the preview, you will still need to upload a file manually, as the example file is not automatically carried over to the preview environment.
Best practices
- Be specific about what the assistant should do with the file. For example: “Extract all material parameters from the uploaded PDF and use them to populate the form.”
- Mention the file or filename in your prompt. For example: “Use the uploaded Excel file to create an app that plots the temperature over time.”
- The App builder will examine the file to extract relevant information. If the app builder struggles you can help by providing additional context. For example: “The CSV has three columns: time, pressure, and velocity.”
App details
From within the App Builder you can access the app details using the gear icon in the bottom left corner. Here you can configure several aspects that can be relevant during development or after publishing.
Environment variables and secrets
Environment variables are fully supported in the App Builder. You can configure environment variables for your App Builder apps using the same process as for published apps:
- Click on the gear icon in the bottom left corner inside the App Builder.
- Select the 'Variables' tab to create, update or remove environment variables.
- Environment variables set here are automatically available within the App Builder environment during development.
Environment variables can be accessed in your app code using the standard Python os module:
import os

my_variable = os.getenv("MY_ENV_VAR")
For more detailed information on configuring and using environment variables, see the Environment variables documentation.
Saving functionality
On the Configuration tab you can configure your app's data persistence behavior by selecting an app type. This determines whether users can save their work or start fresh each time.
Editor-only (default)
With this option, your app functions as a calculator without any data persistence. Every time a user opens the app, they start with a clean slate - no previous inputs or results are saved. This is ideal for:
- Simple calculators or conversion tools
- One-time analyses
- Apps where users don't need to save or share their work
Enable Saving
This option allows users to save their inputs and results. They can create multiple saved instances (entities), return to edit them later, and share them with other users. This is suitable for:
- Design tools where users want to save multiple design options
- Analysis apps where users need to track and compare different scenarios
- Collaborative workflows where users need to share their work
The entity layer (saving functionality) is only available in the published app, not in the app preview inside the app builder. To test saving functionality, you must publish your app first.
For more information on the differences between app types, see App types in the Getting Started section.
Integrations
OAuth 2.0 integrations allow your app to connect to external services such as cloud storage providers, databases, or third-party APIs. This enables your app to fetch data from or push data to these services securely.
Your administrator must configure and enable integrations before they become available to you. If you don't see the integration you need, contact your administrator.
Setting up an integration
To add an integration to your App Builder app:
-
Select the integration: Click the gear icon in the bottom left corner and navigate to the Integrations tab. Select the OAuth 2.0 integration you want to use and save your selection.
-
Inform the AI assistant: Return to the App Builder chat and tell the AI assistant which integration you want to use in your app. For example:
"I want to use the Autodesk Platform Services integration to access project data from ACC."
-
Authorize access: The AI assistant will generate the necessary code. When you interact with the app preview and trigger the integration, a pop-up will appear to guide you through the OAuth 2.0 login flow for the selected service.
Example use cases
- Connect to Autodesk Platform Services (APS) to access project data from Autodesk Construction Cloud (ACC) or BIM 360
- Access external databases to fetch or update data
- Integrate with cloud storage providers to read and write files
- Pull data from third-party APIs for analysis or visualization
The underlying Large Language Model
The App Builder uses Anthropic's Claude 4.6 Sonnet through AWS Bedrock to generate VIKTOR code based on your prompts. Please refer to our AI addendum for more information on how AI features are integrated into the VIKTOR platform.
Writing effective prompts
The AI in the VIKTOR App Builder helps you transform ideas into working applications quickly. To get the most out of it, it’s crucial to learn how to write effective prompts.
Think of prompting as providing clear, concise instructions to a highly capable assistant. The better your instructions, the better the result.
Core prompting principles
-
Structured input and output
Clearly state what inputs you’re providing and what outputs you expect, whether they are text, code, plots, tables, or 3D models. -
Clarity and specificity
Provide enough context for the AI to understand the scope and capabilities. Describe exactly what calculations, formulas, or visualizations you need. -
Task decomposition
Break complex tasks into smaller, manageable steps. For instance, first prompt for the UI, then the logic, and finally the visualization.
These principles are also covered in our blog:
Mastering LLMs: Essential Prompting Techniques for AEC Professionals
Tips for better prompts
Start with the goal:
I want an app that calculates pressure loss in a pipe based on user input.
Mention input/output:
Inputs: diameter, flow rate, pipe length. Output: pressure loss in bar, shown as a table and line plot.
Use engineering terms:
Use the Darcy‑Weisbach equation to calculate pressure loss.
Break it down into steps:
First, generate the form UI. Then, write the calculation logic. Finally, render results.
Guide the view/output:
Show pressure loss as a line plot versus pipe length, and include a summary table.
Additionally, you can add some examples of inputs/outputs and expected behavior. This will allow the AI assistant to understand your intentions.
Troubleshooting and debugging
LLMs make mistakes, therefore, you might encounter issues or unexpected behavior. Here's how to approach troubleshooting and debugging your app within the App Builder.
Understanding error messages
When an error occurs, the App Builder will display an error message. When you switch to Code mode, the console will display the error with a Python traceback.
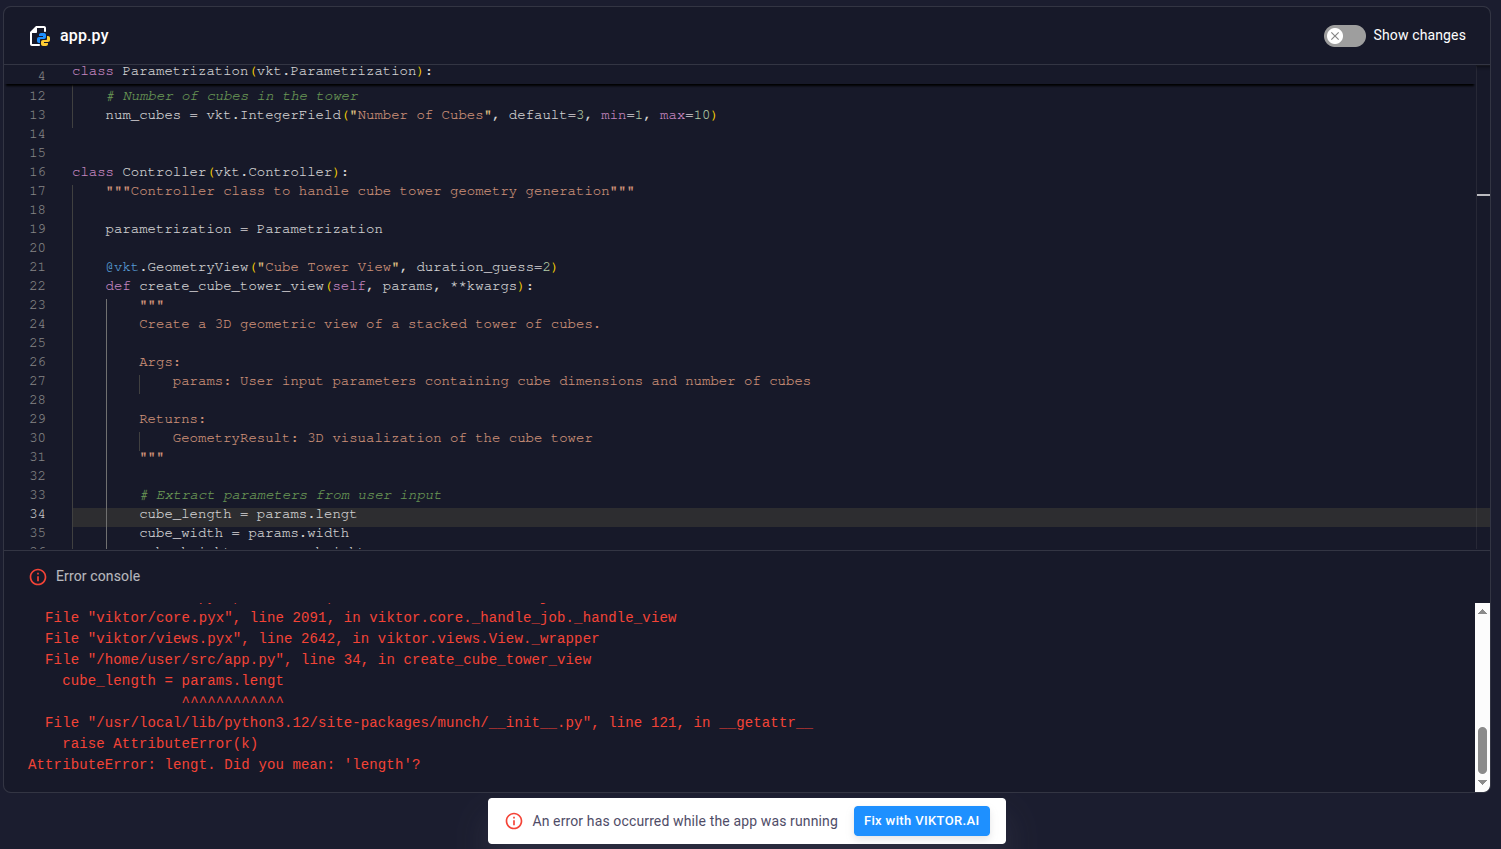
This traceback is crucial for identifying the problem:
- Location: Look for file names (e.g. app.py) and line numbers. This tells you exactly where the error occurred in your code.
- Error Type: The error type (e.g. Attribute, TypeError, ValueError) indicates the kind of problem.
- Attribute: Usually means you're trying to use a variable or function that hasn't been defined.
- TypeError: Occurs when an operation is performed on an object of an inappropriate type (e.g. trying to add a string and a number).
- ValueError: Indicates that an operation received an argument that has the right type but an inappropriate value.
- Description: Read the accompanying description carefully. It often provides specific details about why the error occurred.
More information on Python Tracebacks can be found in this Real Python article.
You can ask the AI assistant to fix the error for you by clicking the 'Fix with VIKTOR.AI' button. The AI assistant can also help explain why the error occurred.
Debugging your Python code
- Use Print Statements: Add
print()statements to your code to inspect variable values and track execution flow. The output will be visible in the console at the bottom of the screen, helping you understand what's happening during execution. - Check Input Values: Verify that the inputs provided in the UI are what your code expects. Sometimes, a simple typo in the input can lead to unexpected results.
- Inspect Intermediate Calculations: For complex calculations, break it down in smaller steps and visualize each sub-result. This helps pinpoint exactly where the calculation goes wrong.
- Monitor the Console: Keep an eye on the console for logs and output from your Python process. This can reveal issues that aren't immediately visible in the UI.
When the App Builder gets stuck or generates unexpected code
Sometimes the App Builder might struggle with a complex prompt, produce irrelevant code, or seem 'stuck' in a loop. Here's how to help it:
- Simplify Your Prompt: If your initial prompt was very broad or complex, try breaking it down into smaller, more specific steps (as outlined in 'Task Decomposition')
- Instead of: 'Create an app that calculates structural integrity and plots the results in 3D, allowing for material changes and load variations.'
- Try: 'First, create a form with inputs for material properties (e.g., Young's Modulus, Poisson's Ratio) and dimensions. Next, add a view for a simple stress calculation based on these inputs.'
- Provide More Context: If the AI is missing information, provide it explicitly. This is especially true when trying to use uploaded files in your app.
- If the AI struggles with a CSV: 'The CSV file has three columns: Time (s), Force (kN), Displacement (mm).'
- Rephrase or Reset: If the AI's response is consistently off-topic, try rephrasing your prompt with different keywords or a different approach. If it seems truly stuck, you can try reverting to an earlier revision of your app and trying a different prompting strategy.
- Make Manual Edits: For small, specific issues, it might be faster and more efficient to switch to Code mode and fix the Python code yourself rather than trying to prompt the AI to fix it.
By following these troubleshooting and debugging steps, you can more effectively develop and refine your VIKTOR apps using the App Builder.
Limitations
Not all features supported in local development are available in the App Builder. When you encounter one of these limitations, we currently advise you to copy the app code and continue developing locally. The installation and activation flow for local development can be found under the 'Level up' section on the Develop page.
App types
The current version of the App Builder supports creating Editor and Simple type apps. For more information on the different app types, please refer to App types in the Getting Started section of the documentation.
Python version
The App Builder runtime uses Python 3.13. It is currently not possible to change to a different Python (minor) version.
Supported packages
The App Builder currently supports a fixed set of libraries that you can use in your apps. In the current version of the App Builder, it is not possible to install additional packages. Below you can find the full list of supported packages:
aiohttp==3.13.3
altair==6.0.0
anthropic==0.76.0
beautifulsoup4==4.14.3
blue-prints==0.6.0
bokeh==3.8.2
chardet==5.2.0
databricks-sdk==0.81.0
ezdxf==1.4.3
fiona==1.10.1
folium==0.20.0
geopandas==1.1.2
geopy==2.4.1
google-genai==1.60.0
ifcopenshell==0.8.4.post1
jinja2==3.1.6
kaleido==1.2.0
lxml==6.0.2
matplotlib==3.10.8
networkx==3.6.1
numpy==2.4.1
openai==2.16.0
opencv-python==4.13.0.90
openpyxl==3.1.5
openseespy==3.7.1.2
pandas==2.3.3
pdfplumber==0.11.9
pillow==12.1.0
pint==0.25.2
plotly==6.5.2
polars==1.37.1
pymupdf==1.26.7
pypdf==6.6.2
python-docx==1.2.0
python-pptx==1.0.2
reportlab==4.4.9
requests==2.32.5
scikit-learn==1.8.0
scipy==1.17.0
seaborn==0.13.2
shapely==2.1.2
statsmodels==0.14.6
sympy==1.14.0
trimesh==4.11.1
urllib3==2.6.3
viktor==14.27.2
xarray==2026.1.0
yfinance==1.1.0
Multiple file support
The current version of the App Builder does not support using multiple files to structure your app code. You must write all app code in a single app.py file. The same applies to using additional files next to your Python code for storing constants or other data.
Software integrations / workers
The VIKTOR platform supports integrating with local desktop software using a worker. The current version of the App Builder is not optimized to generate the required app code for these integrations. Additionally, you need to install a worker and connect it to your app manually. Therefore, we currently advise developing apps with integrations locally rather than using the App Builder.
Regional hosting
VIKTOR supports regional hosting, meaning apps are synced across multiple geographic regions. Apps created with the App Builder are also synced across regions. However, the content (chat history and app revisions) of the associated App Builder environment is not synced across regions.