Cloud-based development
If your local machine does not meet all requirements for development with the VIKTOR platform you can choose to use a remote development environment. A remote development environment is an environment that is hosted in the cloud and can often be used together with a code editor in the browser. Examples of remote development environments are GitHub Codespaces, GitPod, and Replit.
Create an account
Create a VIKTOR account if you haven't done so yet.
- Company account: please contact your local administrator to create an account for you
- Free account: create a free VIKTOR account by registering on the VIKTOR website
Setup instructions
- GitHub Codespaces
- GitPod
Follow the steps below to set up a GitPod workspace and get started with developing on the VIKTOR platform:
-
Create a repository on GitHub, GitLab or Bitbucket for your VIKTOR app (if you don't have one already).
-
Add a GitPod configuration file called
.gitpod.ymlto your project's root directory with the content shown below. Do not forget to commit the changes. This configuration file instructs GitPod to download the VIKTOR CLI upon initialization of the workspace. More information on the GitPod configuration file can be found here.tasks:
- name: VIKTOR
init: |
curl -Lo viktor-cli 'https://sys.viktor.ai/api/v1/get-cli/?platform=linux&format=binary'
chmod +x viktor-cli
mv viktor-cli /workspace/viktor-cli
command: |
echo "export PATH=\$PATH:/workspace" >> ~/.bashrc
source ~/.bashrc -
Log in to GitPod with your GitLab, GitHub or Bitbucket account.
-
Click on Settings > Variables to configure several environment variables required to authenticate with the VIKTOR platform. Click the
New Variablebutton to add a new environment variable. The following variables should be added:VIKTOR_ENV:- Free users:
cloud.viktor.ai - Paid users:
{company}.viktor.ai(substitute{company}with the name of your company)
- Free users:
VIKTOR_DEV: the email address that your VIKTOR account is registered on.VIKTOR_TOKEN: your development token.
How do I obtain a token?
You can generate a token by logging in to your development environment. If you are logging in for the first time, use the link from the activation mail to generate a password to log in to the development environment. Alternatively, you can click "Forgot Password" to receive a mail to (re)set your password. After logging in close the first-time user modal (this modal is shown when you have not activated your account yet) and go to the settings page by clicking the three dots next to your name in the top-right corner and after that clicking 'Settings'. Select the 'Developer Account' tab and click the 'Generate new token' button.
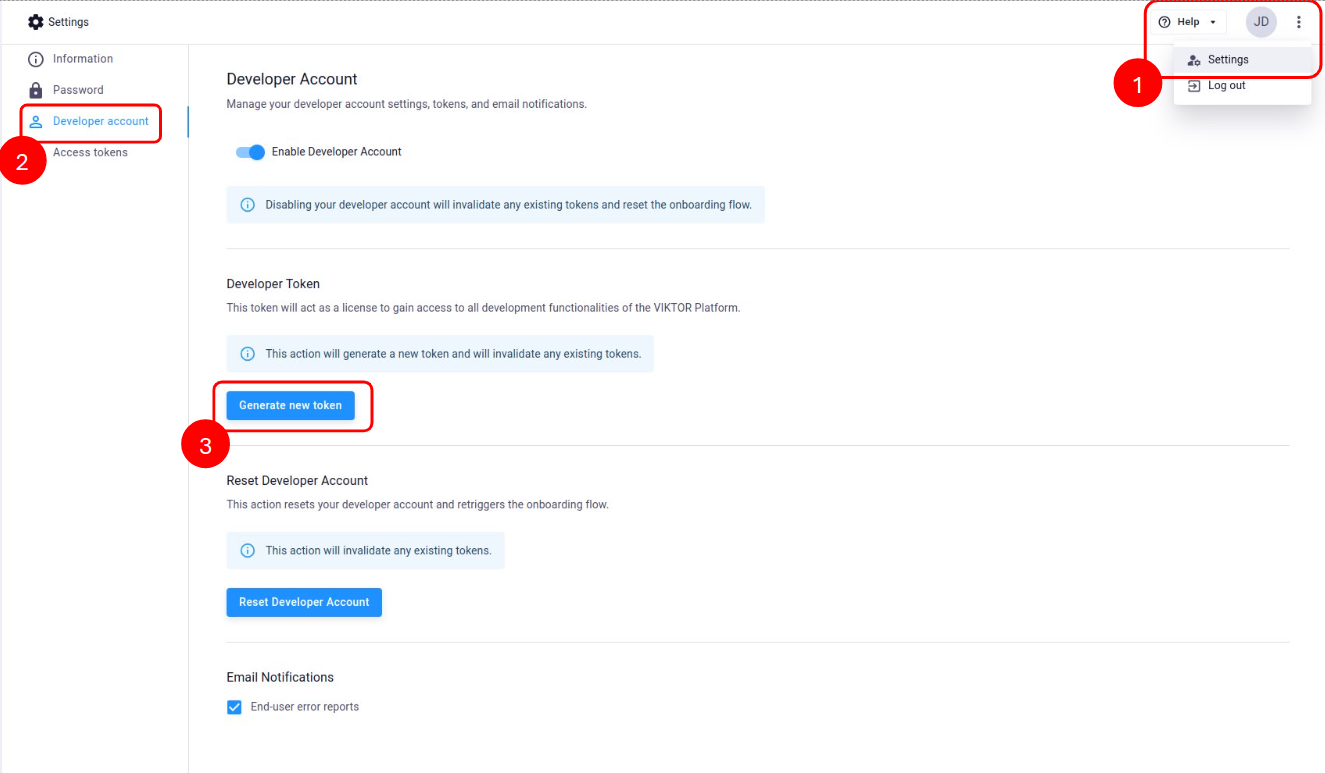 How to generate a new token
ScopeYou can scope these variables to only be available for the repository you created in step 1 by inserting the owner of the repository (i.e. your GitLab, GitHub or Bitbucket username) and the name of the repository separated by a
/. -
Click the button 'New Workspace' to initialize your GitPod workspace. You will be asked to select a repository. Select the repository created in step 1 from the list. You will now land in a browser-based version of Visual Studio Code, a popular Python IDE.
-
Run the following command to verify the configuration:
viktor-cli check-systemThis should print:
V Your system is ready to use VIKTOR with isolation mode 'venv'.
You can find all your workspaces in the dashboard: https://gitpod.io/workspaces.
Follow the steps below to set up a GitHub codespace and get started with developing on the VIKTOR platform:
- Create a new repository:
-
Navigate to the following url to create a repository from our template:
-
Under "Repository name" choose your desired app name
-
Click "Create repository"
-
- Create a codespace:
-
In the repository created in step 1 click "Code" -> "Codespaces" -> click the three dots -> "New with options..."
-
Under "Recommended secrets" paste the value for
VIKTOR_CREDENTIALSobtained during the onboarding flow -
Click "Create codespace"
VIKTOR_CREDENTIALSYour VIKTOR Credentials can be used to access or alter your sensitive data. You should therefore make sure to securely store these and never store it directly in source-code or other plain text formats.
You can always revoke and regenerate the credentials by restarting the onboarding flow, and replacing the old value stored under "Codespaces secrets" in your GitHub settings.
-
You can find all your codespaces, grouped by repository, in the dashboard: https://github.com/codespaces. For more info about codespaces please refer to the official codespaces docs.
Congratulations, you are now ready to start coding your first VIKTOR app! 🚀