Install VIKTOR with Docker
The installation procedure to run VIKTOR using Docker is not recommended for first-time users.
By using Docker, running the code in development will more closely resemble production, so the chance of encountering differences between development and production is smaller. We recommend Docker only for experienced developers, as setting up Docker for Windows is not always convenient and, depending on your company size, may require a paid subscription.
Prerequisites
If you want to use VIKTOR within an enterprise IT-environment, please contact your IT-department to verify that your machine meets all requirements. Alternatively, you can consider using a cloud-based development environment.
Before you start the installation procedure, you can go through the following checklist to make sure your setup is ready for installation:
-
Machine should run on Windows 10 Home/Pro/Enterprise or Linux.
-
Python (64-bit); the programming language used by VIKTOR.
-
You will need personal VIKTOR credentials (try for free!).
-
Virtualization needs to be turned on on your machine.
Go toTask manager → Performanceand see if "Virtualization" is enabled.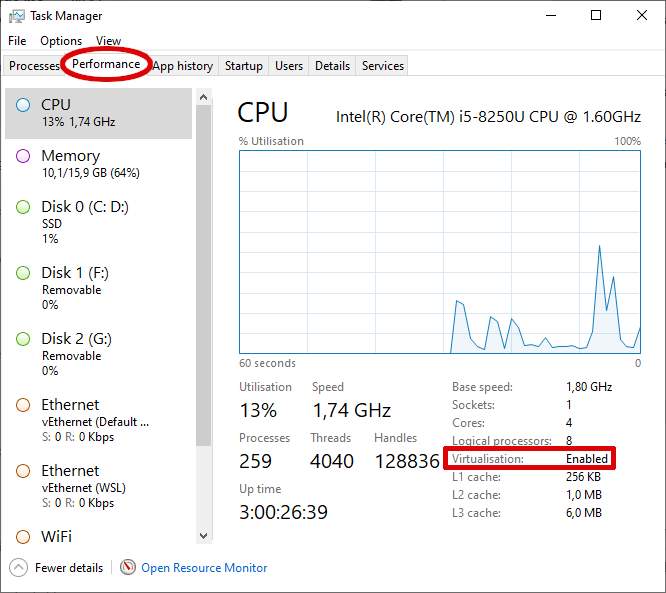
If enabling of "Virtualization" is not allowed, it must be enabled in the BIOS of the machine first. In the BIOS, enable “Virtualization Technology (VTx)” (location and name may vary per machine) to do so. Please contact your IT department if you don't have the necessary permissions to make adjustments in your BIOS.
What will I install?
In order to use the VIKTOR platform, you need to install the following tools:
- Docker: software used by the CLI to run your app code in an isolated 'container' in the background.
- CLI: VIKTOR's command-line interface (CLI) is required to interact with your app.
Installing Docker
If you are using Linux, Docker can be installed using the package manager.
There are two ways to install / use Docker on Windows:
- Hyper-V virtualization (default): system requirements
- Windows Subsystem for Linux 2 (WSL2): system requirements
The benefits and drawbacks of running on WSL2 are listed below:
+ installation and starting an app is fast
+ installation of an app does not fail when deep dependency trees are present
+ WSL2 is available for Windows Home, whereas Hyper-V is not
- WSL2 is not supported on all Windows versions
- conceptually more complex due to the separate Linux filesystem and command-line interface
- setting up requires more time
We recommend to choose the default Hyper-V method and only choose WSL2 if you use Windows Home or you are experiencing issues during app development.
- Hyper-V
- WSL2
-
Install Docker on your machine. When prompted, ensure "Enable Hyper-V Windows Features" is selected or "Install required Windows components for WSL 2" is deselected (options differ per installation version).
-
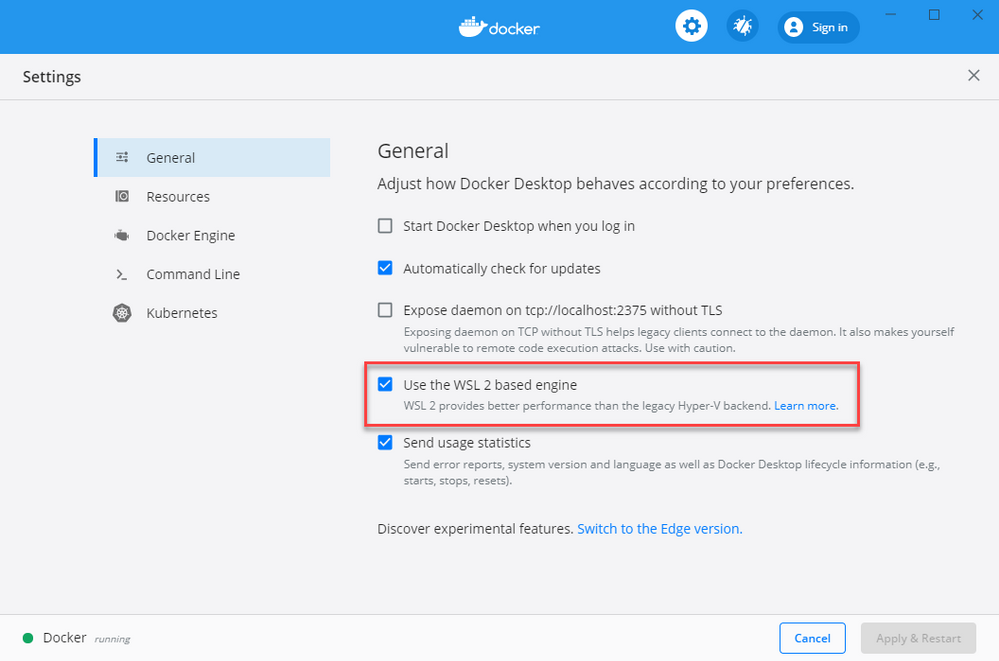
Open the Docker settings and disable the checkbox to use the WSL2 based engine in the "General" section, if this isn't the case yet:

-
Make sure that you share your user folder (
C:\Users\<username>). Allowing sharing of drives or folders (shared drives) is necessary when using Linux containers. If this was not done during the installation, you can set it inDocker → Settings → Resources → File Sharing. -
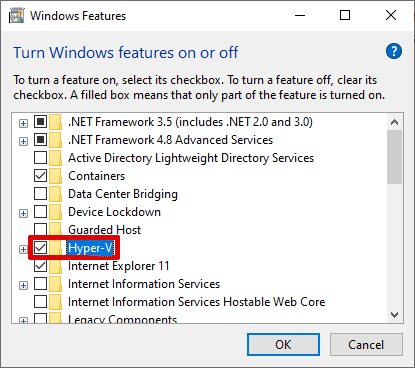
In the start menu, type “Turn Windows features on or off” (“Turn windows features on or off”) and make sure that Hyper-V is checked:
-
You can check all required Hyper-V features by running the
systeminfocommand incmd.exe. All requirements should have a value "yes". If this is not the case, please visit the website of Microsoft for more information.
An alternative method of running VIKTOR is by using Windows Subsystem for Linux 2 (WSL2). WSL2 is a dedicated part of Windows which can be used to run Linux processes, providing an alternative to Hyper-V virtualization.
In order to run Docker with WSL2, you will need to meet the stated requirements.
-
Install Docker on your machine. When prompted, ensure "Enable Hyper-V Windows Features" is deselected or "Install required Windows components for WSL 2" is selected (options differ per installation version).
-
Install WSL2.
- When asked for a Linux distribution, we recommend choosing the latest Ubuntu LTS version.
- It is NOT necessary to create an account for the distribution.
In case you do not have access to the Microsoft store, a manual download of a Linux distribution can be found here.
-
Start Ubuntu from the start menu. This action will open a command-line shell and ask you to create a user account.
-
Open the Docker settings and configure the following:
- General: enable the checkbox to use the WSL2 based engine
- Resource → WSL integration: enable the checkbox "Enable integration ..." and manually select the correct Ubuntu distro
-
Reboot your machine.
-
Start Ubuntu and type the following path in the file explorer address bar:
\\wsl$\Ubuntu-20.04(replace "Ubuntu-20.04" with your distribution name) to get started.
Installing the CLI
The VIKTOR command-line interface (CLI) is required to interact with your app code (installing dependencies, starting the app, etc.). Choose the CLI for your specific operating system and installation method below:
- Hyper-V
- WSL2
- Linux
The CLI can be made available in the Linux Subsystem by moving the executable from the
'Downloads' folder (or any other location you extracted the executable in) to the Linux home folder (~):
mv /mnt/c/Users/<username>/Downloads/viktor-cli ~
Using the CLI from any folder
If you want to use the CLI from any folder, the directory where the CLI resides must be added to the PATH environment
variable (a variable that specifies the directories to be searched to find a command). Follow the instructions below to
make the CLI available from any folder for your operating system.
- Hyper-V
- WSL2 / Linux
The PATH variable is automatically set when using the Windows installer.
We recommend to create a single folder on your hard disk in which all your individual applications will be created, and
give it an appropriate name (e.g. C:\Users\<username>\viktor-apps).
Right click on the created folder and pin to "Quick Access" to enable easy navigation to this folder.
You can (permanently) add a directory to the PATH environment variable by adding it to the ~/.bashrc file. The
easiest way to do this, is to open the bash shell in the directory of the CLI and extend the existing PATH
variable with the current working directory (PWD). Use the source command to refresh the PATH variable within the
current session without having to restart the shell:
echo "export PATH=\$PATH:'$PWD'" >> ~/.bashrc
source ~/.bashrc
"Bash" is the default command-line shell for most Linux distributions (including WSL2) that uses a start-up script
called .bashrc located in the user's home directory (~). If you work with a different shell, you have to replace
~/.bashrc in the above commands with the shell's corresponding start-up script (e.g. ~/.zshrc for Zsh).
Make sure the CLI is executable by using the chmod command:
chmod +x viktor-cli
If everything has been configured correctly, executing the command below in any folder should open the CLI's help-menu:
viktor-cli --help
We recommend to create a single folder on your hard disk in which all your individual applications will be created, and
give it an appropriate name (e.g. ~/viktor-apps).
Make sure the CLI has full rights in the your apps directories, by changing its permissions with:
sudo chmod -R 777 ~/viktor-apps
CLI configuration
Next you'll need to set up the CLI. Open your command-line shell (Command Prompt in Windows) and enter the following command:
viktor-cli configure
The configure command opens a prompt that guides you through the configuration process. You can copy-paste in the command-line shell using a right-click of your mouse. You will need to enter the following information:
- Development environment. This is the environment that you will use while developing VIKTOR apps. The correct development environment
is also stated in the invitation email you received when your account was created.
- Free users:
cloud.viktor.ai - Paid users:
{company}.viktor.ai(substitute{company}with the name of your company)
- Free users:
- Email address used to create your VIKTOR account.
- Personal token. You can generate a token by logging in to your development environment. If you are logging in for the first time, use the link from the activation mail to generate a password to log in to the development environment. Alternatively, you can click "Forgot Password" to receive a mail to (re)set your password. Go to the settings page by clicking the three dots next to your name in the top-right corner and after that clicking 'Settings'. Select the 'Developer Account' tab and click the 'Generate new token' button. You can copy the token and paste it in the command-line shell with a right-click of your mouse and clicking 'Paste'.
- Select the isolation mode
dockerand press enter. - Enter the path to your Python installation. If Python has been added to the
PATHenvironment variable it will be inserted as a suggestion, select it by pressing enter.
System check
Run the following command to verify the installation:
viktor-cli check-system --docker
The check system command performs several checks. The conclusion of the checks are printed at the end of the message:
Starting VIKTOR system check...

V Operating system internet access
V Docker runs
V Docker using correct container
V Docker access to user directory
V Docker internet access
V Docker access to PyPI
V Docker access to VIKTOR domains

The system check has been completed with the following conclusions:

V Your system is ready to use VIKTOR with isolation mode 'docker'
If all checks succeeded, a "V" will be printed in front of Your system is ready to use VIKTOR with isolation mode 'docker'.
If any of the system checks fails, additional information can be printed to the command-line by using the --verbose
flag as follows:
viktor-cli check-system --docker --verbose