Basic app structure
On this page you will encounter terms that are highlighted. These terms are core concepts and are used throughout our entire documentation. If you ever need a quick refresher, you can click on the section below to get a nice overview!
Remind me!
In alphabetical order:
App files:
- app.py: this file contains the controller, and additional logic of your application.
- requirements.txt: all Python dependencies of your project are listed in this file. It should at least specify which version of the VIKTOR SDK your app should be using.
- viktor.config.toml: additional configuration settings are listed in this file.
Core:
- controller: contains the code that defines the parametrization and one or multiple views.
- editor: the place where users can create and adjust their designs, perform calculations, and inspect results.
- parametrization: the parametrization consists of the input fields, sliders, and buttons a user can interact with. These fields are available on the left-hand side of the editor.
- params: the Python object that can be used to access the user input in your app code.
- view: a view is a visualization shown on the right-hand side of an editor. You can show 3D models, maps, graphs, reports, pictures and much more. You can define multiple views.
The core of a VIKTOR app is the editor. This is the place where users can create and adjust their designs, perform calculations, and inspect results. The image below shows the editor of a VIKTOR app:

An editor can be created by defining a so-called controller, which holds the code for:
- Parametrization: the parametrization consists of the input fields, sliders, and buttons a user can interact with. These fields are available on the left-hand side of the editor.
- View: a view is a visualization shown on the right-hand side of an editor. You can show 3D models, maps, graphs, reports, pictures and much more. While each editor consists of a single parametrization, multiple views can be present.
Before diving into these concepts more, let's have a look at what files you will need to build a VIKTOR app.
App files
The minimum file structure of a VIKTOR app looks as follows:
my-app
├── app.py
├── requirements.txt
└── viktor.config.toml
- app.py: this file contains the controller, and additional logic of your application.
- requirements.txt: all Python dependencies of your project are listed in this file. It should at least specify which version of the VIKTOR SDK your app should be using.
- viktor.config.toml: additional configuration settings are listed in this file.
The controller
To define a controller you will need to inherit from the ViktorController class:
import viktor as vkt


class Controller(vkt.Controller):
    ...
You can specify controller attributes if desired.
Click to see all available controller attributes
parametrization: defines the editor's parametrization.summary: to show a summary.label: name of the entity type as shown in the interface.children: (tree-type app only) define this entity-type's children. Not providing the key is equal to having no children.show_children_as: (tree-type app only) defines how to visualize the children ('Table' | 'Cards').allow_saving: Specify whether user is allowed to save entities of this entity-type. May only be set for root entity types in tree-type app.- When this value is set as
Falsemore than one user can run calculations on same editor, and the entities of this entity type becomes read-only. This value defaults toTrue.
- When this value is set as
- methods for views.
- methods for action buttons.
- method for processing of a file upload.
Defining a parametrization
To create the editor's parametrization, you need to define a class that inherits from
ViktorParametrization and assign it to the controller class using the parametrization attribute.
Input fields and action buttons can be added to the editor by adding them as attributes on the parametrization class:
import viktor as vkt


class Parametrization(vkt.Parametrization):
    input_1 = vkt.TextField('This is a text field')       # add a field for textual input
    input_2 = vkt.NumberField('This is a number field')   # add a field for numeric input


class Controller(vkt.Controller):
    parametrization = Parametrization  # assign the parametrization class to the controller class
The above editor will look as follows in the interface:
 Example parametrization
Defining a view
Views can be added to the editor by defining a method on the controller class and decorate it with one of our available views.
The label argument is obligatory and defines the name of the view as shown in the interface.
The view method should return the view result that corresponds to the chosen view type (e.g. TableResult for a
TableView):
import viktor as vkt


class Controller(vkt.Controller):

    @vkt.TableView("Results")
    def results(self, params, **kwargs):
        data = [
          [1, 2],
          [3, 4],
        ]
        row_headers = ["Row 1", "Row 2"]
        col_headers = ["Col 1", "Col 2"]
        return vkt.TableResult(data, row_headers=row_headers, column_headers=col_headers)
The view label is required, however more arguments can be specified if desired.
Click to see all available view arguments
label(obligatory): name of the view as shown in the interface.duration_guess: tells the platform whether the view should be rendered as a quick or slow visualization:- <= 3: Quick visualization, which updates with every change in the editor.
- > 3: Slow visualization, which can be refreshed manually by means of an update button.
description: provide more information to the user through a tooltip (supports Markdown).update_label: change the default text presented on the update button.visible(>= v14.22.0): set the view's visibility based on other input fields. See 'Hide a view'.
The above editor will look as follows in the interface:
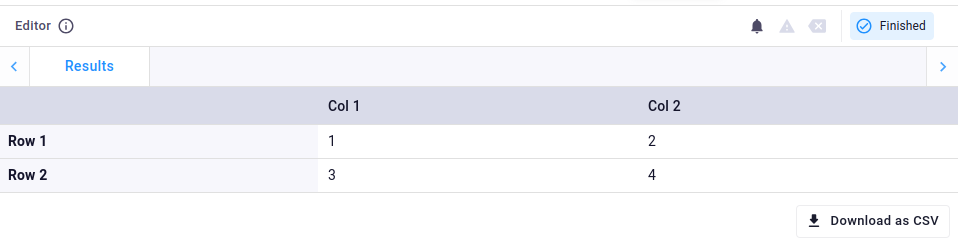 Example view
params - connecting input to output
In the sections above we have seen how to define the parametrization and the views. You may have noticed that the example mentioned params in the signature of the view method:
def results(self, params, **kwargs):
which is not used elsewhere in the code..
This params argument is used by the VIKTOR platform to inject the user input into your
application logic. Let's combine the examples we saw earlier into a single controller. The input value can be obtained by
referencing the attribute names, for example params.input_1:
import viktor as vkt


class Parametrization(vkt.Parametrization):
    input_1 = vkt.TextField('This is a text field')
    input_2 = vkt.NumberField('This is a number field')


class Controller(vkt.Controller):
    parametrization = Parametrization

    @vkt.TableView("Results")
    def results(self, params, **kwargs):
        data = [
          [params.input_1, 2],    # retrieving the user input value of the TextField
          [3, params.input_2],    # retrieving the user input value of the NumberField
        ]
        row_headers = ["Row 1", "Row 2"]
        col_headers = ["Col 1", "Col 2"]
        return vkt.TableResult(data, row_headers=row_headers, column_headers=col_headers)
The above editor will look as follows in the interface:
 Example editor