Tutorial - Integrate Dynamo
Estimated time: 45 minutes
Difficulty level: Intermediate

Introduction
Welcome to this tutorial on integrating Dynamo with VIKTOR! VIKTOR is a platform dedicated to the Engineering and Construction industry, providing a seamless integration with 3rd party software. In this tutorial, we will explore how to render a basic house with Dynamo and visualize it in VIKTOR. To get started, the user will provide parameters such as the number of houses, width, depth, number of floors, and heights for floors and roofs. The VIKTOR worker will then compute the Dynamo model using the command-line interface included within Dynamo Sandbox. The geometry of the model is generated using either Autodesk Revit or FormIt. The geometry JSON is then converted to a mesh, which is rendered and visualized in VIKTOR. In this tutorial, we will cover the step-by-step process of setting up a VIKTOR app with Dynamo integration we will cover:
- Setup VIKTOR app
- Create a method to update Dynamo file
- Create a mocked GeometryView
- Create a data processing method
- Create a Data View with the mocked output files
- Create a geometry processing method
- Add the worker logic to supply
- Setting up worker
By the end of this tutorial, you will have created a simple VIKTOR application that creates a geometry and data view of a simple house, see GIF below:

So, let's get started and learn how to create amazing 3D models in Viktor using Python!
You can find the complete code below
Pre-requisites
- You have some experience with reading Python code
- You have downloaded the Dynamo file, link
During the tutorial, we added some links to additional information; but don't let them distract you too much. Stay focused on completing the tutorial. After this, you will know everything you need to create an app which includes integrating with Dynamo.
1. Setup a VIKTOR app
Create an empty app
Let’s first create and start an empty app. If you don't remember how this worked you can check out the first few steps of the Starter guide. Make sure to give your app a recognisable name, like "my-Dynamo-app".
Here a short summary of the process.
- Create an empty editor type app
viktor-cli create-app my-Dynamo-app --app-type editor
-
Navigate to the app directory
cd my-Dynamo-app -
Install and start the app
viktor-cli clean-start
Please be aware that the create-app function sets the newly created app to use the latest SDK-version
While this tutorial was written using SDK version 14.0.0.
Add input fields
We will add 6 input fields to our app: number_of_houses, number_of_floors, depth, width, height_floor and height_roof.
We will use Numberfield, for this.
- Open
app.py, and add the relevant fields to your parametrization. If you like you could accompany the fields with some instructive text. Don't forget to import the necessary fields. In the end yourapp.pyfile should look like this:
from viktor import ViktorController
from viktor.parametrization import ViktorParametrization
from viktor.parametrization import NumberField
from viktor.parametrization import Text

class Parametrization(ViktorParametrization):
    intro = Text("# 3D  Dynamo app \n This app parametrically generates and visualises a 3D model of a house using a Dynamo script. \n\n Please fill in the following parameters:")

    # Input fields
    number_of_houses = NumberField("Number of houses", max=8.0, min=1.0, variant='slider', step=1.0, default=3.0)
    number_of_floors = NumberField("Number of floors", max=5.0, min=1.0, variant='slider', step=1.0, default=2.0)
    depth = NumberField("Depth", max=10.0, min=5.0, variant='slider', step=1.0, default=8.0, suffix="m")
    width = NumberField("Width", max=6.0, min=4.0, variant='slider', step=1.0, default=5.0, suffix="m")
    height_floor = NumberField("Height floor", max=3.0, min=2.0, variant='slider', step=0.1, default=2.5, suffix='m')
    height_roof = NumberField("Height roof", max=3.0, min=2.0, variant='slider', step=0.1, default=2.5, suffix='m')


class Controller(ViktorController):
    label = 'My Entity Type'
    parametrization = Parametrization
- Refresh your app, and you should see the input fields there.
2. Create a method to update Dynamo file
In this chapter, we will define the code to take the parameters as input, update the Dynamo file, and return the updated
files. This will be done by creating a staticmethod in the Controller class, similar to what is described in the Generic integration
section of the VIKTOR documentation.
The following code will update the nodes of the Dynamo file and generate an input file with the parameters from the parametrization class:
@staticmethod
def update_model(params) -> Tuple[File, DynamoFile]:
    """This method updates the nodes of the Dynamo file with the parameters
    from the parametrization class."""

    # First the path to the Dynamo file is specified and loaded
    file_path = Path(__file__).parent / "dynamo_model_sample_app.dyn"
    _file = File.from_path(file_path)
    dyn_file = DynamoFile(_file)

    # Update Dynamo file with parameters from user input
    dyn_file.update("Number of houses", params.number_of_houses)
    dyn_file.update("Number of floors", params.number_of_floors)
    dyn_file.update("Depth", params.depth)
    dyn_file.update("Width", params.width)
    dyn_file.update("Height floor", params.height_floor)
    dyn_file.update("Height roof", params.height_roof)

    # generate updated file
    input_file = dyn_file.generate()

    return input_file, dyn_file
Let us go through the above mentioned logic:
- Retrieve the input files for the analysis, in this case the
dynamo_model_sample_app.dynfile, and create aDynamoFileobject instantiated from thedynamo_model_sample_app.dynfile. You can download the sample dynamo model here. - With the
updatemethod, the value of input nodes can be updated. - When all inputs have been updated as desired, the
generatemethod can be used to generate an updatedFileobject.
To create this method you will have to import different functions. See code below:
from typing import Tuple

from pathlib import Path
from viktor import File
from viktor.external.dynamo import DynamoFile
3. Create a GeometryView with mocked ouput files
In this chapter we will develop a GeometryView to display the house's geometry. However,
for now, we will use a mocked output file. In chapter 7 we will
create the json file using the Dynamo script.
To visualize the mocked output add a GeometryView method to your Controller class, see code below:
    @GeometryView("Mocked 3d model", duration_guess=1, x_axis_to_right=True)
    def mocked_geometry_view(self, params, **kwargs):
        # Step 1: Update model
        input_file, dynamo_file = self.update_model(params)

        # Step 2: Running analysis
        file_path = Path(__file__).parent / "Mocked_3d_model.json"
        _3d_file = File.from_path(file_path)

        # Step 3: Processing geometry
        glb_file = convert_geometry_to_glb(_3d_file)

        return GeometryResult(geometry=glb_file)
Let us go through the above mentioned logic:
- Update the Dynamo file with the
update_modelmethod(see chapter 2) - For now we are using a mocked file, instead of running the analysis in Dynamo. The mocked file can be downloaded here. In chapter 7 it is explained how to create the json file using the Dynamo script.
- With the helper function
convert_geometry_to_glb, you can convert the json file to a GLB type file, which can directly be visualized in aGeometryView. - Refresh your app, and you should see a 3D model of a house.
To create this mtehod you will have to import different functions. See code below:
from viktor.external.dynamo import convert_geometry_to_glb
from viktor.views import GeometryResult
from viktor.views import GeometryView
4. Create a data processing method
In this chapter, we will define code to extract data from the dynamo file and output file. The dynamo file is used to get
the node ID, and the output.xml file is used to get the values. We will be creating another staticmethod in the Controller
class. See code below:
@staticmethod
def convert_dynamo_file_to_data_items(input_file: DynamoFile, output_file: File) -> DataGroup:
    """Extracts the output of the Dynamo results by using the input and output files."""
    # Collect ids for the computational output from the Dynamo file (numerical output)
    output_id_floor_area = input_file.get_node_id("(OUTPUT) Floor area per house")
    output_id_total_cost = input_file.get_node_id("(OUTPUT) Total cost")
    output_id_mki = input_file.get_node_id("(OUTPUT) MKI")
    output_id_co2 = input_file.get_node_id("(OUTPUT) CO2")

    # Collect the numerical results from the output file using the collected ids
    with output_file.open_binary() as f:
        floor_area = get_dynamo_result(f, id_=output_id_floor_area)
        total_cost = get_dynamo_result(f, id_=output_id_total_cost)
        mki = get_dynamo_result(f, id_=output_id_mki)
        co2 = get_dynamo_result(f, id_=output_id_co2)

    # Add values to a structured data group
    data_group = DataGroup(
        DataItem(label="Floor area", value=round(float(floor_area), 2), suffix="m²"),
        DataItem(label="Total cost", value=round(float(total_cost), 2), suffix="€"),
        DataItem(label="MKI", value=round(float(mki), 2)),
        DataItem(label="CO₂ emission", value=round(float(co2), 2), suffix="ton CO₂"),
    )
    return data_group
Let us go through the above mentioned logic:
- Get the
node_id, which corresponds to the same node id as the input file. - Collect the numerical results.
- We create a structured data group from the collected numerical results using the
DataGroupandDataItemclasses.
To create this method you will have to import different functions. See code below:
from viktor.external.dynamo import get_dynamo_result
from viktor.views import DataGroup
from viktor.views import DataItem
5. Create a DataView with mocked ouput files
In this chapter we will create a DataView to display the data. However, for now, we will use
a mocked output file. In chapter 7 we will create the xml file
using the Dynamo script.
To visualize the mocked output add a DataView method to your Controller class, see code below:
    @DataView("Mocked data results", duration_guess=1)
    def mocked_data_view(self, params, **kwargs):
        # Step 1: Update model
        input_file, dynamo_file = self.update_model(params)

        # Step 2: Running analysis
        file_path = Path(__file__).parent / "Mocked_data_results.xml"
        _data_file = File.from_path(file_path)

        # Step 3: Process numerical output
        data_group = self.convert_dynamo_file_to_data_items(dynamo_file, _data_file)

        return DataResult(data=data_group)
Let us go through the above mentioned logic:
- Update the Dynamo file with the
update_modelmethod (see chapter 1) - For now we are using a mocked file, instead of running the analysis in Dynamo. The mocked file can be downloaded here.
- With the static method
convert_dynamo_file_to_data_items, you can convert the .xml file to aDataGroup, which can be directly visualized inDataView. - Refresh your app, and you should see a data view with the data.
To create this method you will have to import the DataResult and DataView. See code below:
from viktor.views import DataResult
from viktor.views import DataView
6. Create a GeometryAndDataView with the mocked output files
In this chapter we will combine the geometry view and data view in one view using the GeometryAndDataView
class. We will use the mocked files. To this end, replace the mocked_dat_view and the mocked_geometry_view methods with
a single geometry_and_data_view method:
@GeometryAndDataView("Mocked 3d/data", duration_guess=1, x_axis_to_right=True)
    def geometry_and_data_view(self, params, **kwargs):
        """The endpoint that initiates the logic to visualize the geometry and data executed
        and retrieved from a Dynamo script."""
        # Step 1: Update model
        input_file, dynamo_file = self.update_model(params)


        # Step 2: Running analysis
        file_path = Path(__file__).parent / "Mocked_3d_model.json"
        _3d_file = File.from_path(file_path)

        file_path = Path(__file__).parent / "Mocked_data_results.xml"
        _data_file = File.from_path(file_path)

        # Step 3: Processing geometry
        glb_file = convert_geometry_to_glb(_3d_file)

        # Step 4: Process numerical output
        data_group = self.convert_dynamo_file_to_data_items(dynamo_file, _data_file)

        return GeometryAndDataResult(geometry=glb_file, data=data_group)
Don't forget to import both the new view and result:
from viktor.views import GeometryAndDataResult
from viktor.views import GeometryAndDataView
Now all basic (mocked) functionality is present in our app, just to be sure all code so far is presented below:
Click here to see all code until now
from typing import Tuple

from viktor import ViktorController
from viktor.parametrization import ViktorParametrization, NumberField
from viktor.views import GeometryAndDataView
from viktor.views import GeometryAndDataResult
from viktor.views import DataItem
from viktor.views import DataGroup
from viktor.external.dynamo import DynamoFile
from viktor.external.dynamo import get_dynamo_result
from viktor.external.dynamo import convert_geometry_to_glb
from viktor.core import File
from pathlib import Path


class Parametrization(ViktorParametrization):
    # Input fields
    number_of_houses = NumberField("Number of houses", max=8.0, min=1.0, variant='slider', step=1.0, default=3.0)
    number_of_floors = NumberField("Number of floors", max=5.0, min=1.0, variant='slider', step=1.0, default=2.0)
    depth = NumberField("Depth", max=10.0, min=5.0, variant='slider', step=1.0, default=8.0, suffix="m")
    width = NumberField("Width", max=6.0, min=4.0, variant='slider', step=1.0, default=5.0, suffix="m")
    height_floor = NumberField("Height floor", max=3.0, min=2.0, variant='slider', step=0.1, default=2.5, suffix='m')
    height_roof = NumberField("Height roof", max=3.0, min=2.0, variant='slider', step=0.1, default=2.5, suffix='m')


class Controller(ViktorController):
    label = 'My Entity Type'
    parametrization = Parametrization

    @staticmethod
    def update_model(params) -> Tuple[File, DynamoFile]:
        """This method updates the nodes of the Dynamo file with the parameters
        from the parametrization class."""

        # First the path to the Dynamo file is specified and loaded
        file_path = Path(__file__).parent / "dynamo_model_sample_app.dyn"
        _file = File.from_path(file_path)
        dyn_file = DynamoFile(_file)

        # Update Dynamo file with parameters from user input
        dyn_file.update("Number of houses", params.number_of_houses)
        dyn_file.update("Number of floors", params.number_of_floors)
        dyn_file.update("Depth", params.depth)
        dyn_file.update("Width", params.width)
        dyn_file.update("Height floor", params.height_floor)
        dyn_file.update("Height roof", params.height_roof)

        # generate updated file
        input_file = dyn_file.generate()

        return input_file, dyn_file


    @staticmethod
    def convert_dynamo_file_to_data_items(input_file: DynamoFile, output_file: File) -> DataGroup:
        """Extracts the output of the Dynamo results by using the input and output files."""
        # Collect ids for the computational output from the Dynamo file (numerical output)
        output_id_floor_area = input_file.get_node_id("(OUTPUT) Floor area per house")
        output_id_total_cost = input_file.get_node_id("(OUTPUT) Total cost")
        output_id_mki = input_file.get_node_id("(OUTPUT) MKI")
        output_id_co2 = input_file.get_node_id("(OUTPUT) CO2")

        # Collect the numerical results from the output file using the collected ids
        with output_file.open_binary() as f:
            floor_area = get_dynamo_result(f, id_=output_id_floor_area)
            total_cost = get_dynamo_result(f, id_=output_id_total_cost)
            mki = get_dynamo_result(f, id_=output_id_mki)
            co2 = get_dynamo_result(f, id_=output_id_co2)

        # Add values to a structured data group
        data_group = DataGroup(
            DataItem(label="Floor area", value=round(float(floor_area), 2), suffix="m²"),
            DataItem(label="Total cost", value=round(float(total_cost), 2), suffix="€"),
            DataItem(label="MKI", value=round(float(mki), 2)),
            DataItem(label="CO₂ emission", value=round(float(co2), 2), suffix="ton CO₂"),
        )
        return data_group


    @GeometryAndDataView("Mocked 3d/data", duration_guess=1, x_axis_to_right=True)
    def geometry_and_data_view(self, params, **kwargs):
        """The endpoint that initiates the logic to visualize the geometry and data executed
        and retrieved from a Dynamo script."""
        # Step 1: Update model
        input_file, dynamo_file = self.update_model(params)


        # Step 2: Running analysis
        file_path = Path(__file__).parent / "Mocked_3d_model.json"
        _3d_file = File.from_path(file_path)

        file_path = Path(__file__).parent / "Mocked_data_results.xml"
        _data_file = File.from_path(file_path)

        # Step 3: Processing geometry
        glb_file = convert_geometry_to_glb(_3d_file)

        # Step 4: Process numerical output
        data_group = self.convert_dynamo_file_to_data_items(dynamo_file, _data_file)

        return GeometryAndDataResult(geometry=glb_file, data=data_group)
By now, you should be able to see a GeometryView and a DataView displaying a 3D house and some data, respectively, using the mocked files. In the next chapter, we will use the Dynamo script to generate the actual output files, replacing the mocked files with real data.
7. Add the worker logic to supply the real output files
In this chapter, we will implement the logic to supply the actual output files generated by the Dynamo script, replacing
the previously mocked files. We will begin by modifying the geometry_and_data_view method to return the real output files
generated by the script. Please refer to the code snippet below:
    @GeometryAndDataView("Building 3D", duration_guess=5, x_axis_to_right=True)
    def geometry_and_data_view(self, params, **kwargs):
        """The endpoint that initiates the logic to visualize the geometry and data executed
        and retrieved from a Dynamo script."""
        # Step 1: Update model
        input_file, dynamo_file = self.update_model(params)

        # Step 2: Running analysis
        files = [
            ('input.dyn', input_file),
        ]

        generic_analysis = GenericAnalysis(files=files, executable_key="dynamo",
                                           output_filenames=["output.xml", "geometry.json"])
        generic_analysis.execute(timeout=60)

        # Step 3: Processing geometry
        geometry_file = generic_analysis.get_output_file('geometry.json', as_file=True)
        glb_file = convert_geometry_to_glb(geometry_file)

        # Step 4: Process numerical output
        output_file = generic_analysis.get_output_file('output.xml', as_file=True)
        data_group = self.convert_dynamo_file_to_data_items(dynamo_file, output_file)

        return GeometryAndDataResult(geometry=glb_file, data=data_group)
- Update the Dynamo file with the
update_modelmethod(see chapter 2) - We use the
GenericAnalysisclass to run the analysis. Theexecutable_keyin the example above refers to the "dynamo" command. This command should also be specified in the configuration file on the server, located in the same directory as the worker. For more information on how to configure the server, refer to next chapter - Processing the geometry, the .json file can be obtained with the
get_ouput_file. method. With the helper functionconvert_geometry_to_glb, you can convert it to a GLB type file, which can directly be visualized in aGeometryAndDataView. - Processing geometry, the .xml file can be obtained with the
get_ouput_file. method. With the static methodconvert_dynamo_file_to_data_items, you can convert the .xml file to aDatagroup, which can be directly visualized inGeometryAndDataView.
To create this method you will have to import the GenericAnalysis:
from viktor.external.generic import GenericAnalysis
8. Setting up worker
A worker is a program that connects VIKTOR with third-party software to execute tasks and retrieve results through the platform. The worker communicates with the VIKTOR cloud via an encrypted connection, eliminating the need to open public ports on the network. For the Dynamo integration, the generic worker must be installed.
Install worker
Follow these steps to install the worker:
-
Select the generic worker. The installer starts an installation wizard from which the worker can be configured. Administrator rights on the machine are required to perform the installation.
-
Specification of the installation directory. The standard directory that is used for the installation is:
C:\Program Files\VIKTOR\VIKTOR for <application> <software package> <version>
-
Configuration of the worker. Using the installation wizard you will be asked to fill the required information step-by-step. During this installation wizard you are asked for your credentials.
-
For the credentials, follow these steps (see picture)
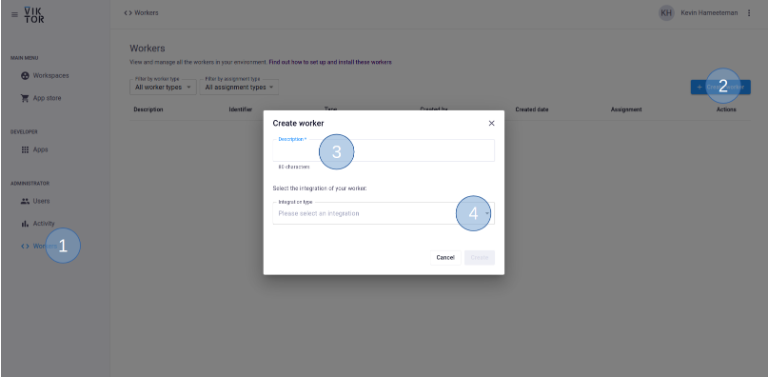
- Go to the "Workers" tab
- Click the "Create worker" button (top right)
- Fill in the description, allocation to specific and use your workspace
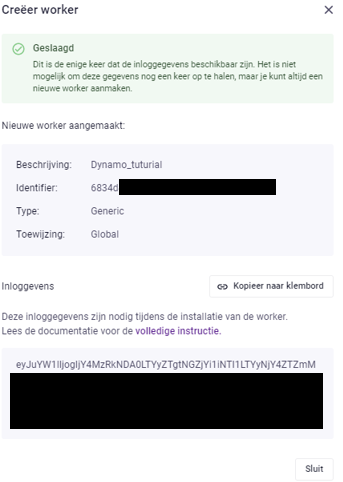
- Click "Create". You will get the following pop-up (see figure below). Copy the credential code and place it in the install wizard immediately. VIKTOR will not preserve this data for security reasons.
Setup worker
To set up the worker, you first need to install FormIt, which can be downloaded from here.
After it is installed, you can set up the worker to execute the logic when the input files have been sent by the VIKTOR app.
The setup of the worker is defined in the config.yaml file, which can be found in the same folder where the worker is
installed (see last chapter). Edit the config.yaml file as follows:
executables:
  dynamo:
    path: 'C:\Program Files\Autodesk\FormIt\DynamoSandbox\DynamoWPFCLI.exe'
    arguments:
    - '-o'
    - 'input.dyn'
    - '-v'
    - 'output.xml'
    - '-gp'
    - 'C:\Program Files\Autodesk\FormIt'
    - '-g'
    - 'geometry.json'
maxParallelProcesses: 1
path: Here we define the path of the program to be executed.arguments: Under this key we can list all arguments that can be added to the executable. This works similar to command-line arguments.-oOpen the dynamo script(input.dyn)-vOuput geometry file (name = output.xml)-gpPath to local installation of Autodesk FormIt or Revit-gOuptut geometry file (name = geometry.json)
For more information about the Dynamo CLI see the Dynamo CLI documentation
Start up worker
Once you have saved your config.yaml file, you can run viktor-worker-generic.exe. Be sure to run the executable with
Administrator rights. If all went well, you will be presented with the worker terminal in which the message: "Successfully
connected to the server" is displayed. Also in in top right corner in your viktor environment you should see a green indicator
in your worker overview, see the figure below.

All code together
from typing import Tuple

from viktor import ViktorController
from viktor.parametrization import ViktorParametrization, NumberField
from viktor.views import GeometryAndDataView
from viktor.views import GeometryAndDataResult
from viktor.views import DataItem
from viktor.views import DataGroup
from viktor.external.generic import GenericAnalysis
from viktor.external.dynamo import DynamoFile
from viktor.external.dynamo import get_dynamo_result
from viktor.external.dynamo import convert_geometry_to_glb
from viktor.core import File
from pathlib import Path


class Parametrization(ViktorParametrization):
    # Input fields
    number_of_houses = NumberField("Number of houses", max=8.0, min=1.0, variant='slider', step=1.0, default=3.0)
    number_of_floors = NumberField("Number of floors", max=5.0, min=1.0, variant='slider', step=1.0, default=2.0)
    depth = NumberField("Depth", max=10.0, min=5.0, variant='slider', step=1.0, default=8.0, suffix="m")
    width = NumberField("Width", max=6.0, min=4.0, variant='slider', step=1.0, default=5.0, suffix="m")
    height_floor = NumberField("Height floor", max=3.0, min=2.0, variant='slider', step=0.1, default=2.5, suffix='m')
    height_roof = NumberField("Height roof", max=3.0, min=2.0, variant='slider', step=0.1, default=2.5, suffix='m')


class Controller(ViktorController):
    label = 'My Entity Type'
    parametrization = Parametrization

    @staticmethod
    def update_model(params) -> Tuple[File, DynamoFile]:
        """This method updates the nodes of the dynamo file with the parameters
        from the parametrization class."""

        # First the path to the dynamo file is specified and loaded
        file_path = Path(__file__).parent / "dynamo_model_sample_app.dyn"
        _file = File.from_path(file_path)
        dyn_file = DynamoFile(_file)

        # Update dynamo file with parameters from user input
        dyn_file.update("Number of houses", params.number_of_houses)
        dyn_file.update("Number of floors", params.number_of_floors)
        dyn_file.update("Depth", params.depth)
        dyn_file.update("Width", params.width)
        dyn_file.update("Height floor", params.height_floor)
        dyn_file.update("Height roof", params.height_roof)

        # generate updated file
        input_file = dyn_file.generate()

        return input_file, dyn_file

    @GeometryAndDataView("Building 3D", duration_guess=5, x_axis_to_right=True)
    def geometry_and_data_view(self, params, **kwargs):
        """The endpoint that initiates the logic to visualize the geometry and data executed
        and retrieved from a Dynamo script."""
        # Step 1: Update model
        input_file, dynamo_file = self.update_model(params)

        # Step 2: Running analysis
        files = [
            ('input.dyn', input_file),
        ]

        generic_analysis = GenericAnalysis(files=files, executable_key="dynamo",
                                           output_filenames=["output.xml", "geometry.json"])
        generic_analysis.execute(timeout=60)

        # Step 3: Processing geometry
        geometry_file = generic_analysis.get_output_file('geometry.json', as_file=True)
        glb_file = convert_geometry_to_glb(geometry_file)

        # Step 4: Process numerical output
        output_file = generic_analysis.get_output_file('output.xml', as_file=True)
        data_group = self.convert_dynamo_file_to_data_items(dynamo_file, output_file)

        return GeometryAndDataResult(geometry=glb_file, data=data_group)

    @staticmethod
    def convert_dynamo_file_to_data_items(input_file: DynamoFile, output_file: File) -> DataGroup:
        """Extracts the output of the Dynamo results by using the input and output files."""
        # Collect ids for the computational output from the dynamo file (numerical output)
        output_id_floor_area = input_file.get_node_id("(OUTPUT) Floor area per house")
        output_id_total_cost = input_file.get_node_id("(OUTPUT) Total cost")
        output_id_mki = input_file.get_node_id("(OUTPUT) MKI")
        output_id_co2 = input_file.get_node_id("(OUTPUT) CO2")

        # Collect the numerical results from the output file using the collected ids
        with output_file.open_binary() as f:
            floor_area = get_dynamo_result(f, id_=output_id_floor_area)
            total_cost = get_dynamo_result(f, id_=output_id_total_cost)
            mki = get_dynamo_result(f, id_=output_id_mki)
            co2 = get_dynamo_result(f, id_=output_id_co2)

        # Add values to a structured data group
        data_group = DataGroup(
            DataItem(label="Floor area", value=round(float(floor_area), 2), suffix="m²"),
            DataItem(label="Total cost", value=round(float(total_cost), 2), suffix="€"),
            DataItem(label="MKI", value=round(float(mki), 2)),
            DataItem(label="CO₂ emission", value=round(float(co2), 2), suffix="ton CO₂"),
        )
        return data_group
To infinity and beyond
Nice! You are now able to create an app that can integrate with an external installation of Dynamo through a Generic Worker!
Of course, the journey doesn't end here. Check out some of our other tutorials or go to the next section where you can see the different paths you can follow in your journey to learn more about VIKTOR.